Note: With the latest 1.23.0 release, the Anbox Cloud documentation is moved to https://documentation.ubuntu.com/anbox-cloud/en/latest/. Hence, the information in this discourse post may be obsolete. The documentation posts on discourse will be unlisted and archived shortly.
Discourse will still be used for user engagement and release announcements.
The Anbox Cloud Appliance uses a self-signed certificate to provide HTTPS services. If you want to serve the appliance over HTTPS using a valid SSL/TLS certificate, follow the steps in this document to generate and install a valid SSL/TLS certificate on the Anbox Cloud Appliance.
This document assumes you have the Anbox Cloud Appliance installed. If you haven’t, follow the instructions to do so.
If you run the appliance on AWS, you can choose to use the AWS Certificate Manager. Otherwise, you must manage the certificate yourself manually.
Manage the certificate yourself
To generate and install a certificate yourself, complete the following steps.
1. Add a DNS record
Setting up DNS redirection depends on your DNS provider. Refer to the documentation of your provider to create a DNS record pointing to the IP/DNS of the AWS instance where the Anbox Cloud Appliance is running.
2. Configure the location
Configure the location for the appliance using the created DNS name:
sudo snap set anbox-cloud-appliance experimental.location=<your DNS name>
This option is experimental. It will be removed in a future release when a better replacement exists.
3. Generate an SSL certificate
There are many ways to create a valid SSL certificate. One way is to use Let’s Encrypt to generate a free SSL certificate.
First, connect and SSH into your appliance instance, and install the certbot snap:
sudo snap install --classic certbot
Before generating your certificate using certbot, stop the Traefik service from listening on port 80 for the certificate creation:
sudo snap stop anbox-cloud-appliance.traefik
Then run the following command to generate your certificate:
sudo certbot certonly --standalone
This command prompts you to enter the domain name for the certificate to be generated. You will see the following message when the certificate is created successfully:
Successfully received certificate.
Certificate is saved at: /etc/letsencrypt/live/<your domain name>/fullchain.pem
Key is saved at:         /etc/letsencrypt/live/<your domain name>/privkey.pem
This certificate expires on yyyy-MM-dd.
These files will be updated when the certificate renews.
Certbot has set up a scheduled task to automatically renew this certificate in the background.
4. Install the SSL certificate
Copy the generated certificate to the /var/snap/anbox-cloud-appliance/common/traefik/tls directory:
sudo cp /etc/letsencrypt/live/<your domain name>/fullchain.pem /var/snap/anbox-cloud-appliance/common/traefik/tls/cert.pem
sudo cp /etc/letsencrypt/live/<your domain name>/privkey.pem   /var/snap/anbox-cloud-appliance/common/traefik/tls/key.pem
Then start the Traefik service:
sudo snap start anbox-cloud-appliance.traefik
With the certificate installed on the appliance, you now can access the appliance using the created domain name.
Renew the SSL certificate
The certbot snap packages installed on your machine already set up a systemd timer that will automatically renew your certificates before they expire. However, in order to get the certificate renewed successfully for the appliance, you must complete the following steps:
-
Stop the Traefik service to release port 80 right before the certificate is going to be renewed. This can be done through the
pre-hook:cat <<EOF | sudo tee /etc/letsencrypt/renewal-hooks/pre/001-stop-traefik.sh #!/bin/bash sudo snap stop anbox-cloud-appliance.traefik EOF sudo chmod +x /etc/letsencrypt/renewal-hooks/pre/001-stop-traefik.sh -
Install the certificate right after it has been renewed and start the Traefik service through the
post-hook:cat <<EOF | sudo tee /etc/letsencrypt/renewal-hooks/post/001-start-traefik.sh #!/bin/bash sudo cp /etc/letsencrypt/live/<your domain name>/fullchain.pem /var/snap/anbox-cloud-appliance/common/traefik/tls/cert.pem sudo cp /etc/letsencrypt/live/<your domain name>/privkey.pem /var/snap/anbox-cloud-appliance/common/traefik/tls/key.pem sudo snap start anbox-cloud-appliance.traefik EOF sudo chmod +x /etc/letsencrypt/renewal-hooks/post/001-start-traefik.sh
In this way, the SSL certificate auto-renewal is in place.
The appliance will face a short downtime during the renewal of the SSL certificate but will come back online once the process is completed.
Use the AWS Certificate Manager
If you run the Anbox Cloud Appliance on AWS, you can use the AWS Certificate Manager to provision and manage your TLS certificate.
Before you start, make sure the following requirements are met:
-
You have a domain name for use with the Anbox Cloud Appliance registered, either through Amazon Route 53 (see Register a new domain in the Amazon Route 53 documentation) or through another domain provider.
Note:The screenshots in the following instructions use an example domain name that is not owned or controlled by Canonical. Replace it with your own domain name when following the setup instructions.
-
The Anbox Cloud Appliance is installed and initialised.
Then complete the following steps.
1. Configure routing information and name servers
You can skip this step if you registered your domain name through Amazon Route 53.
If you want to use a domain name that was not registered through Amazon Route 53, you must manually create a public hosted zone for it, and then make your domain use Amazon Route 53 as its DNS service. A public hosted zone contains routing information for the domain, and Amazon Route 53 uses it to determine to which machine it should route the traffic to your domain.
In the case of the Anbox Cloud Appliance, we want the traffic routed to the AWS load balancer (which we will set up in step 3.
-
To create a public hosted zone, follow the instructions in Creating a public hosted zone in the Amazon Route 53 documentation.
The following example shows a public hosted zone for an example domain name. The two DNS records are added automatically after creation:
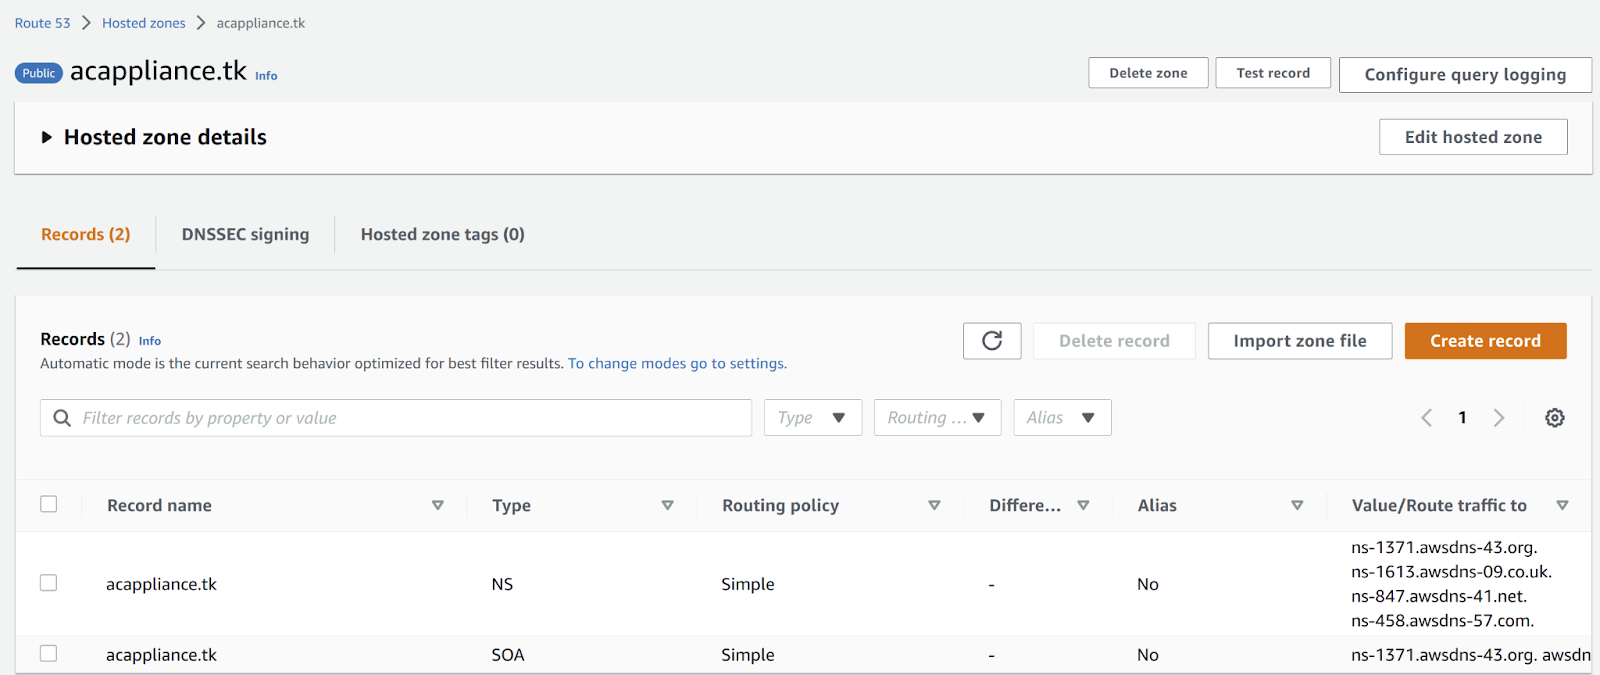
-
To change the DNS service for your domain registration, you must specify the custom name servers that Amazon Route 53 allocated for the domain name. You can find them in the “NS” record for your public hosted zone.
The following example shows the custom name servers for the example domain:
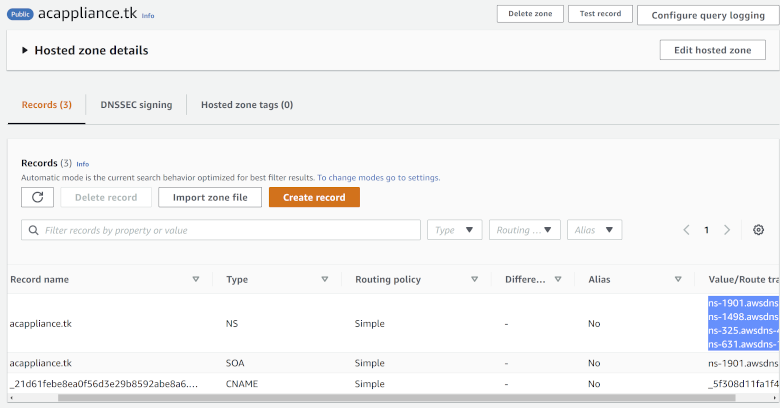
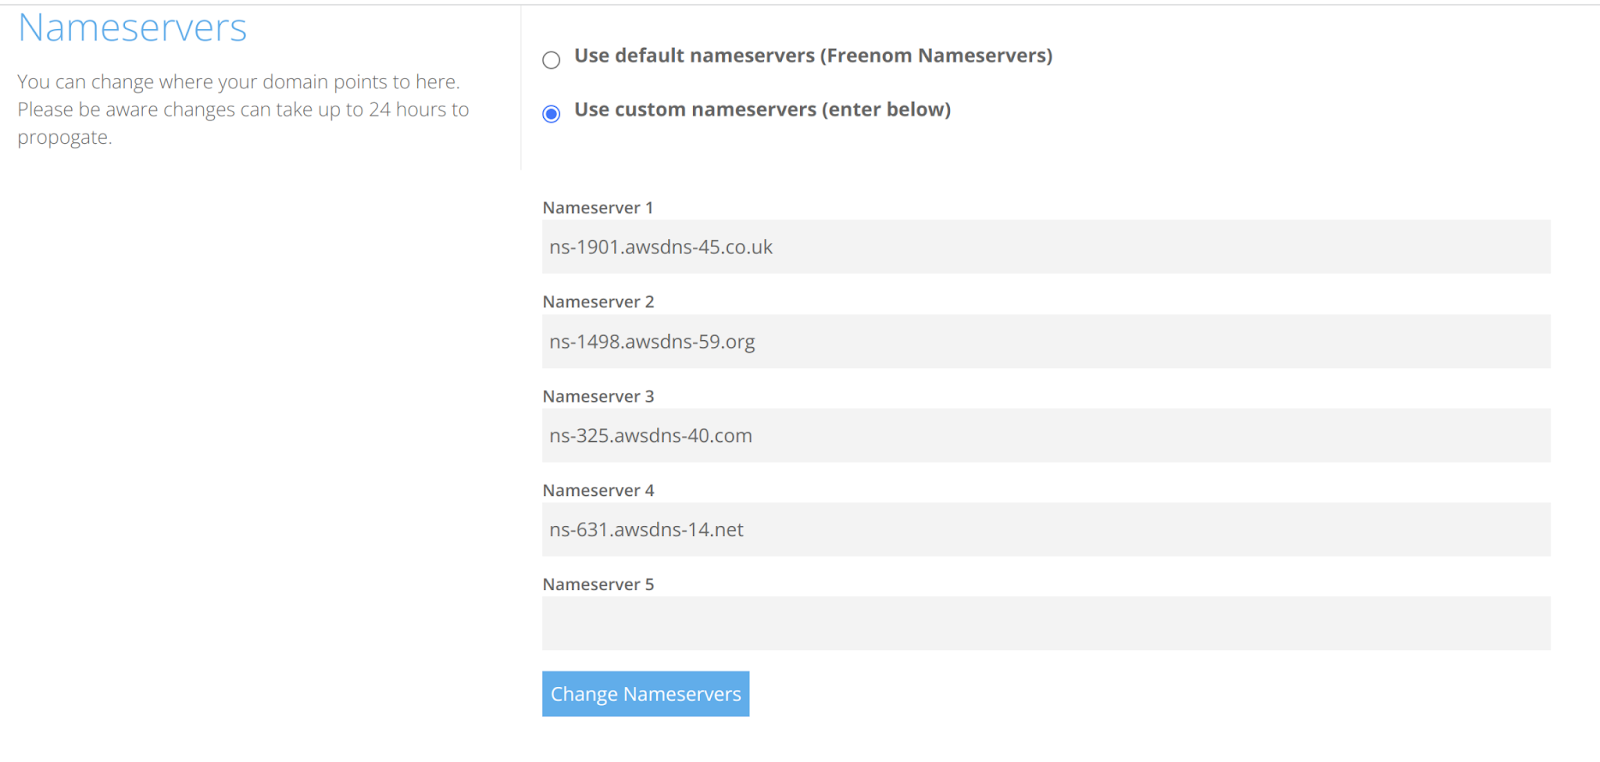
Go to your domain provider and configure the DNS settings for your domain there. Specify the name servers listed in Amazon Route 53 as the custom name servers.
The following example shows this configuration for the example domain:
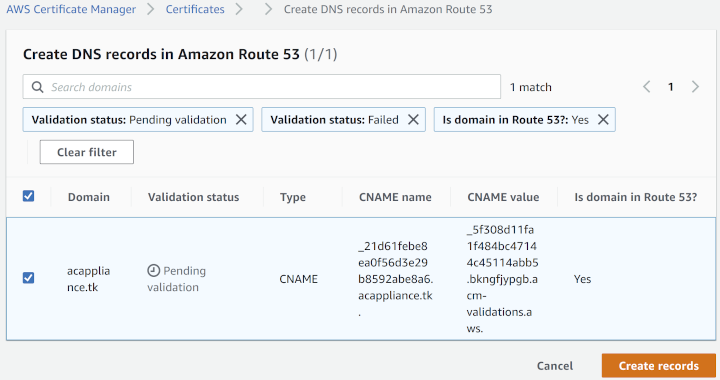
2. Create a public certificate
To create a public certificate using the AWS Certificate Manager, you must first request a certificate and then validate that you own the domain that the certificate applies to.
-
To request the public certificate, follow the instructions in Requesting a public certificate in the AWS Certificate Manager documentation.
The following example shows a certificate for the example domain name that is pending validation:
-
To validate the certificate, follow the instructions in Validating domain ownership in the AWS Certificate Manager documentation.
Since you have a public hosted zone for your domain in Amazon Route 53 (see step 1), you can follow the steps for creating records in Route 53.
DNS propagation usually takes a while. When it completes and the validation is successful, the status of the certificate changes to issued, and it is ready to use.

3. Create a load balancer
To use the Anbox Cloud Appliance through your domain name, AWS must route the HTTPS traffic for your domain to the Anbox Cloud Appliance. To ensure this, you must create a load balancer that listens for traffic and routes it to the appliance.
-
Go to the Load balancers page in the EC2 dashboard.
-
Click Create load balancer.
-
Choose
Application Load Balanceras the load balancer type. -
For the Basic configuration, keep the default options (scheme: internet-facing, IP address type:
IPv4). -
For the Network mapping, select the appropriate Availability Zones.
-
For the Security groups, use a new group with an inbound rule that allows only HTTPS traffic and the default outbound rule that allows all traffic.
-
For Listeners and routing, create a listener that will route traffic to the AWS instance that hosts the Anbox Cloud Appliance:
-
Select
HTTPSas the protocol. -
Click Create target group.
-
Select
Instancesas the target type for the new target group. -
Enter a name for the target group.
-
Select
HTTPSas the protocol and specify port443(this is the destination port to which the traffic coming from the AWS load balancer is routed). -
For the remaining settings, leave the default values.
-
Click Next to go to the Register targets page.
-
Select the instance that runs the Anbox Cloud Appliance.
-
Click Include as pending below.
-
Review the target.
The following example shows a target for the Anbox Cloud Appliance:
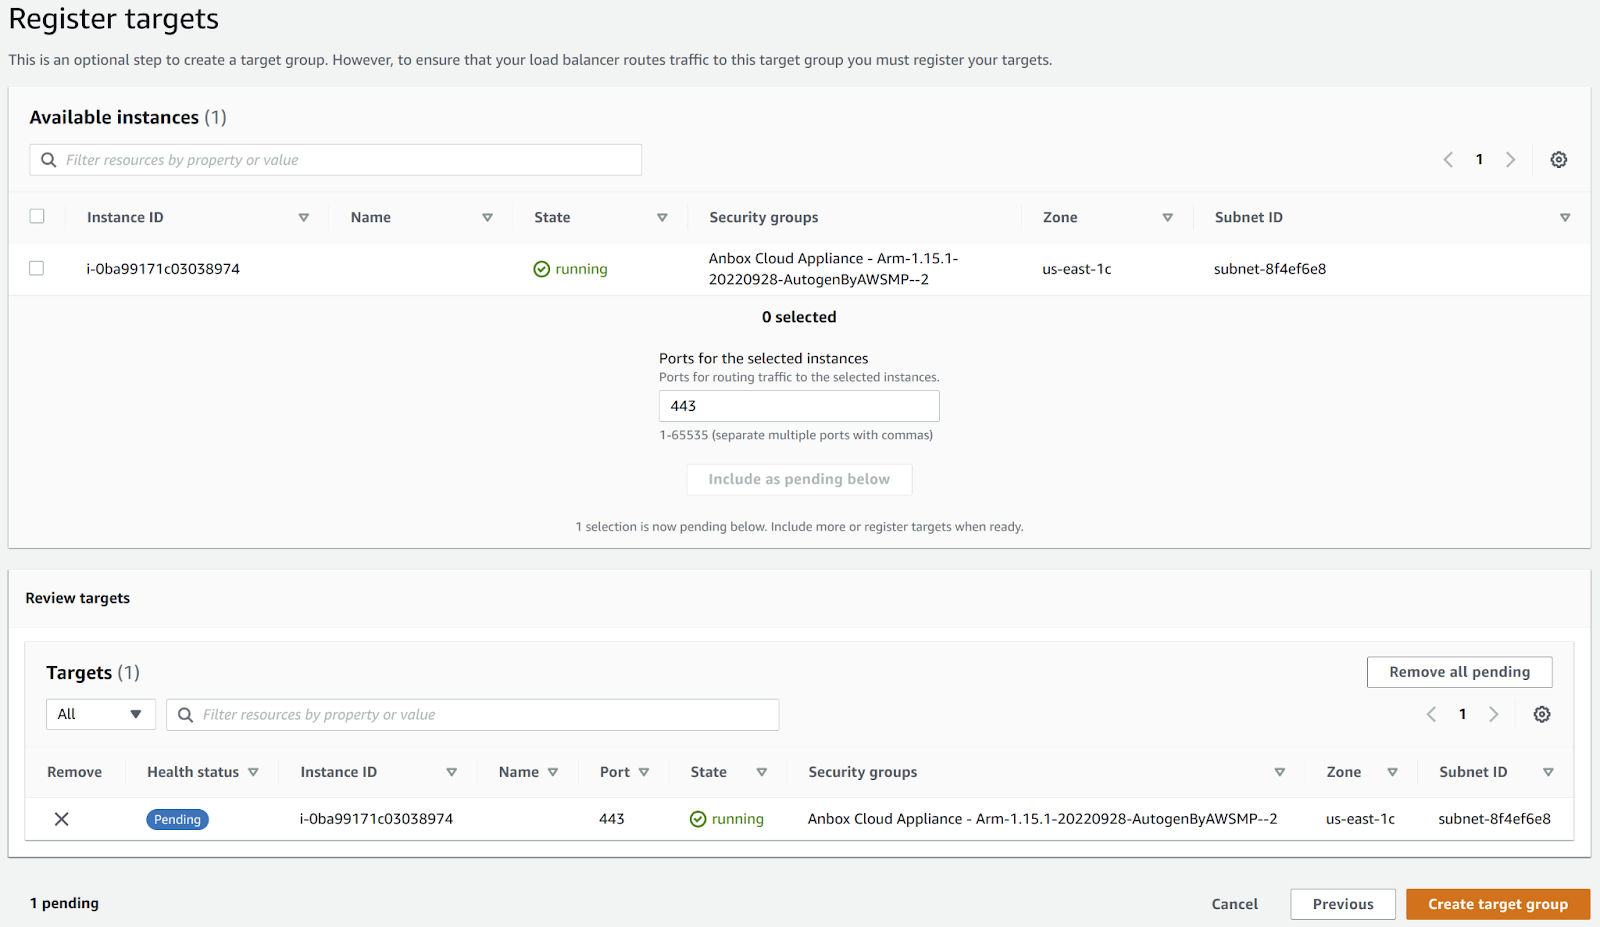
-
Click Create target group to finish the target group creation.
-
-
Back in the Listeners and routing sections on the load balancer creation page, select the target group that you just created for the default action.
-
In the Secure listener settings section, select the public certificate that you created through the AWS Certificate Manager.
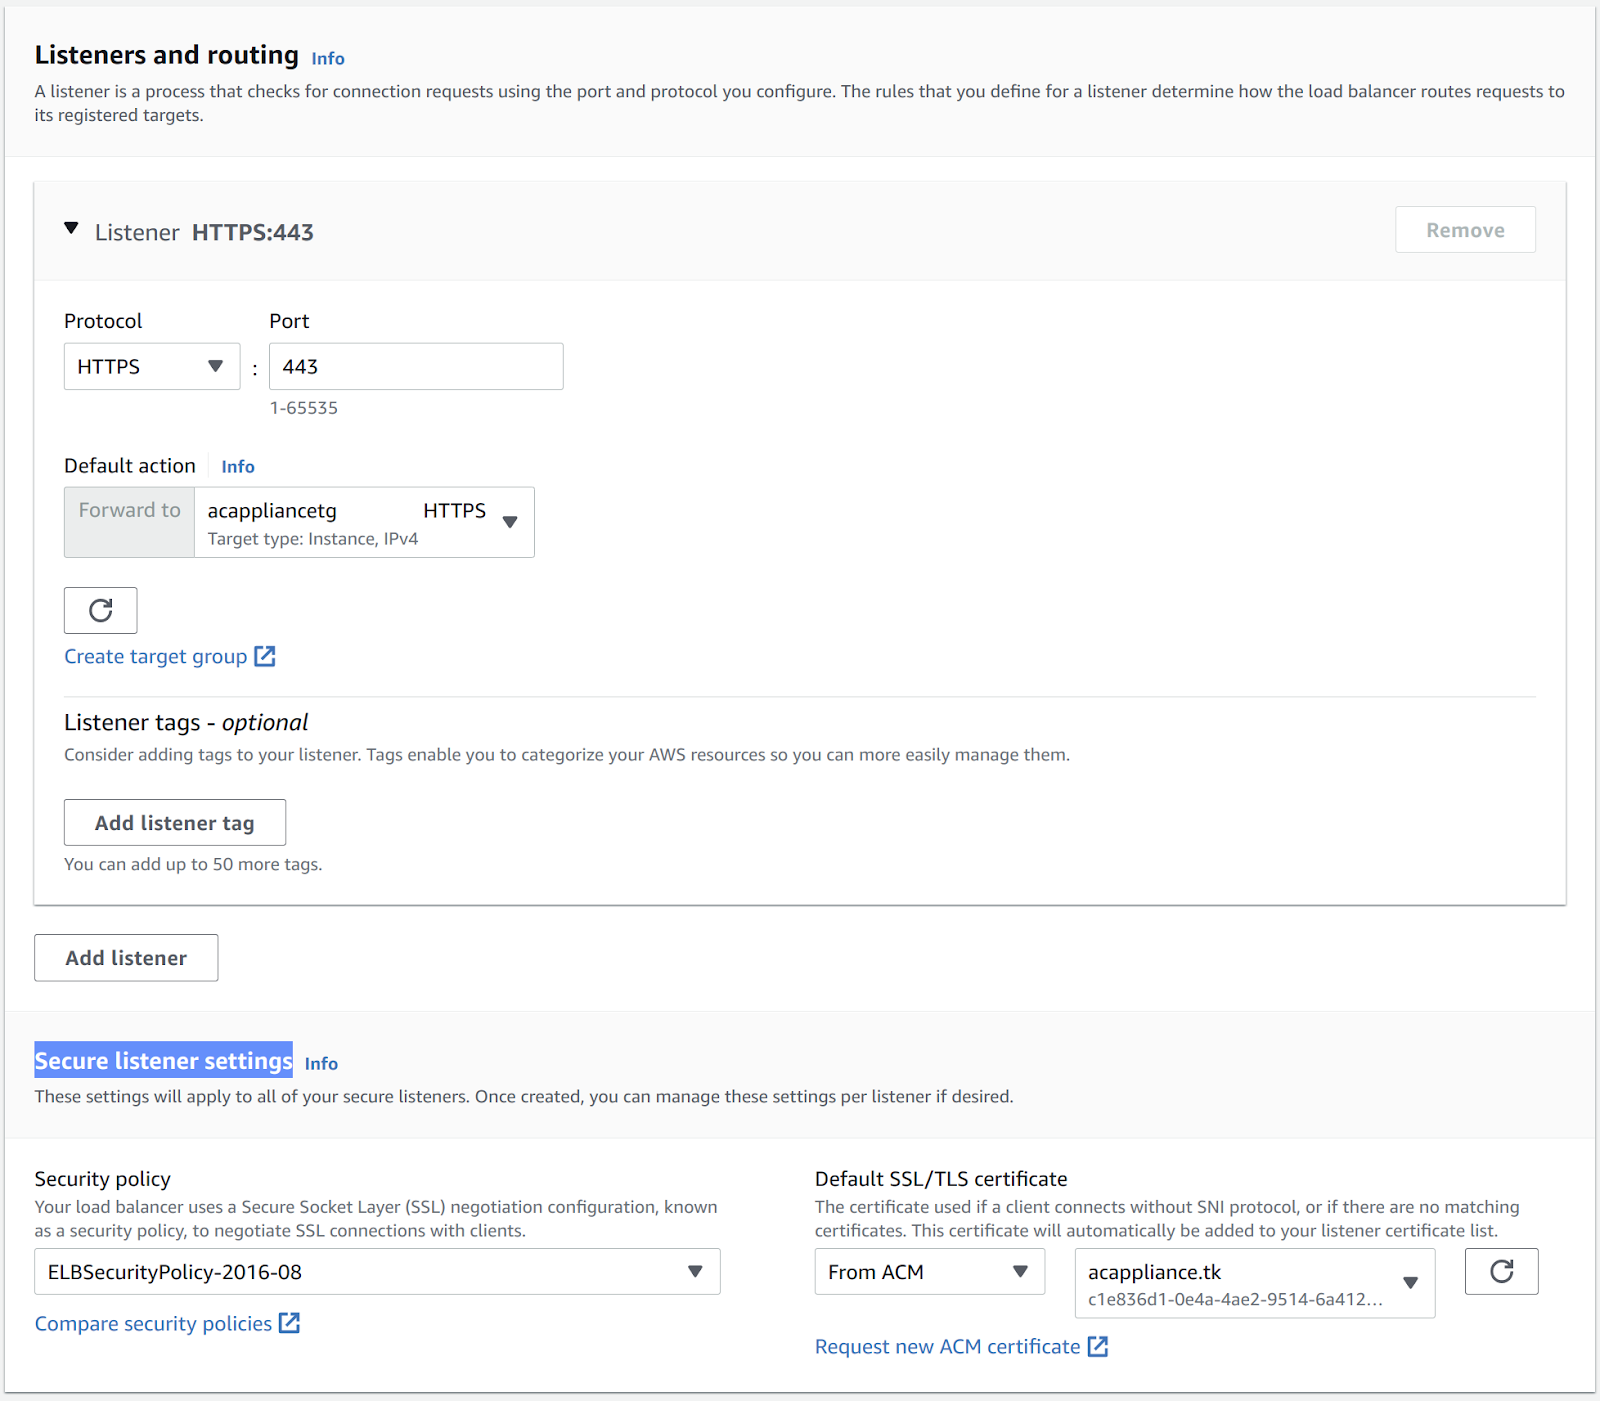
-
Check the Summary, and if everything looks correct, click Create load balancer.
4. Direct traffic from your domain to the load balancer
When the load balancer is created, AWS assigns it an automatic DNS name. The following example shows where to find it:
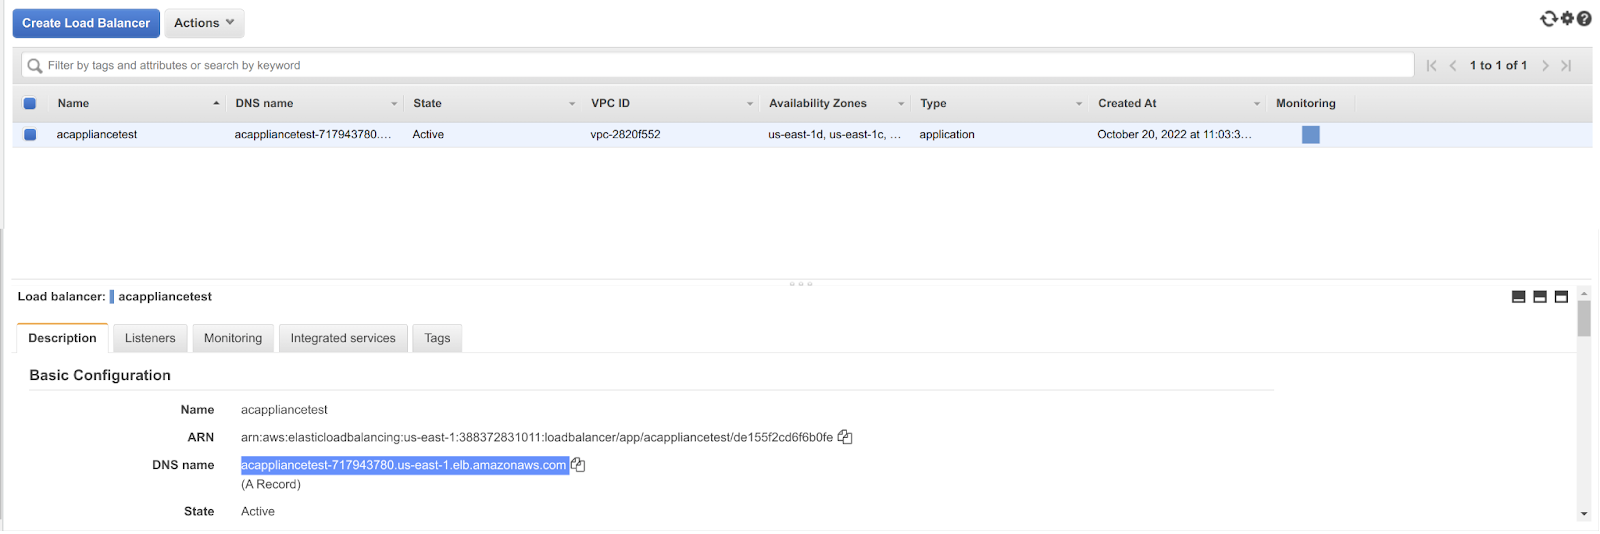
You now need to route the traffic that goes to your domain name to the load balancer.
-
Go to the Route 53 console.
-
Select your public hosted zone (which was created automatically if you registered your domain through Amazon Route 53, or which you created in step 1 otherwise).
-
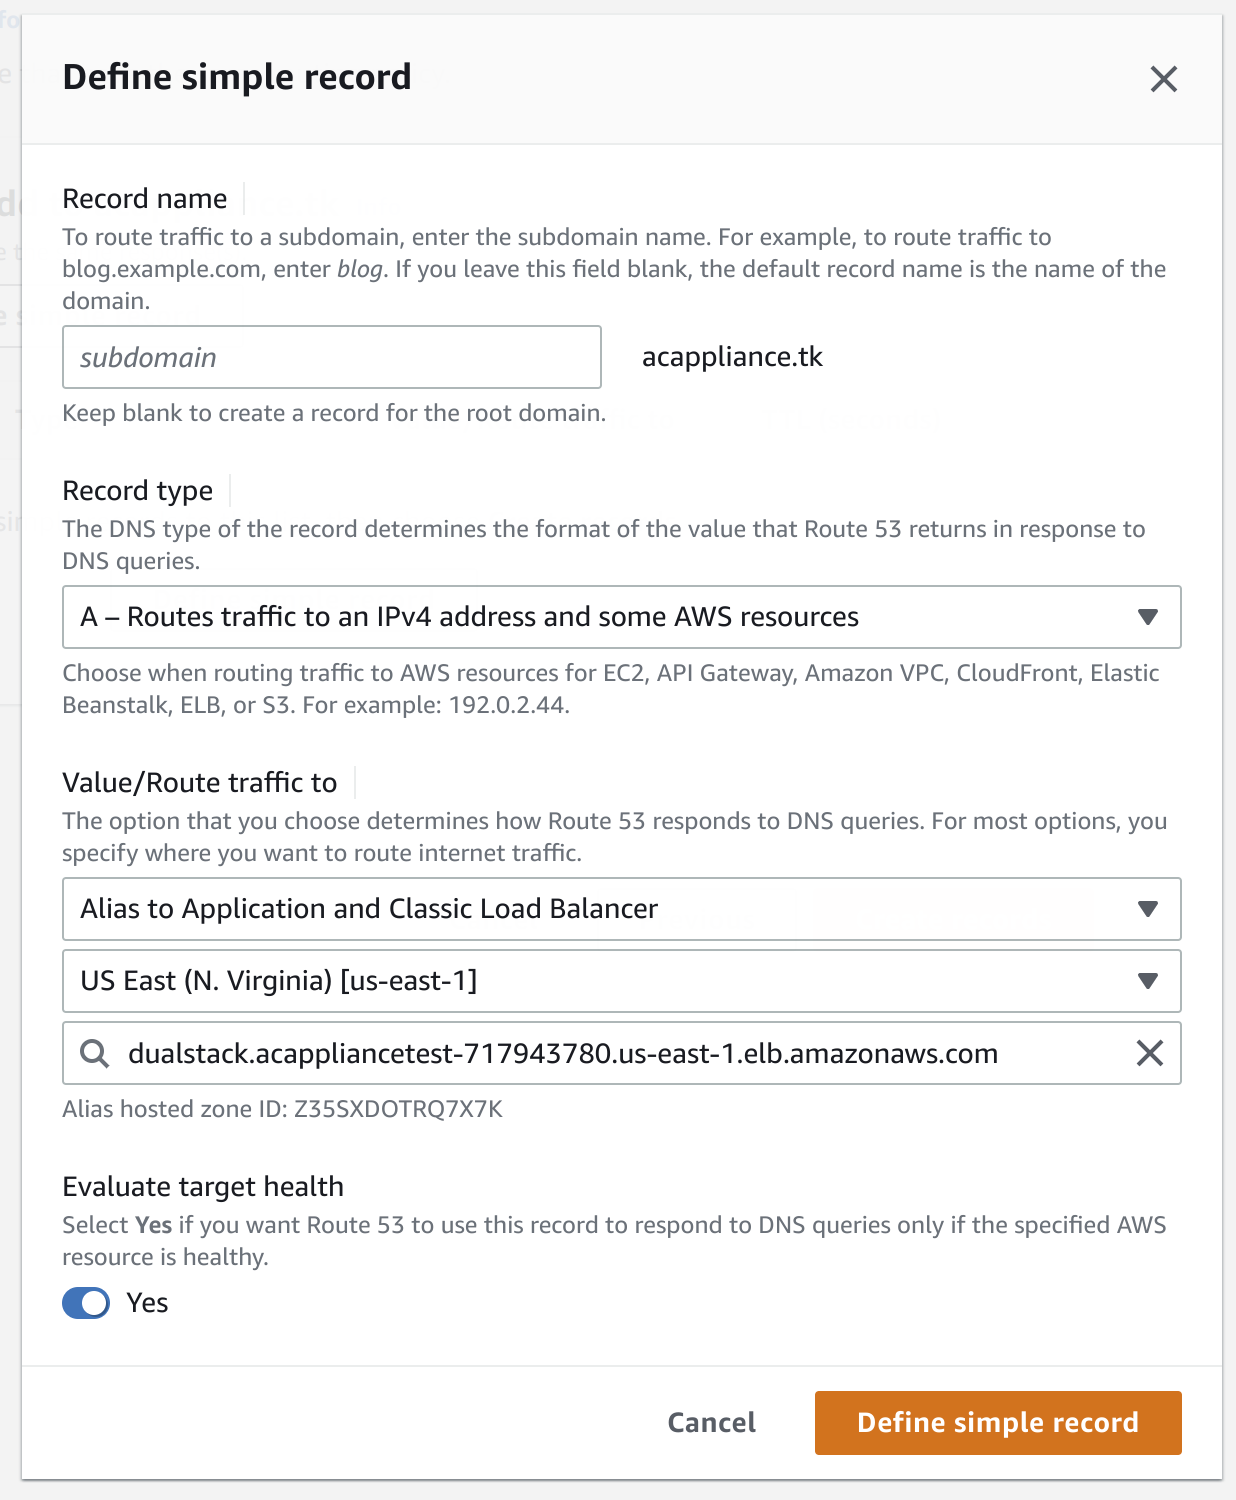
Create a type
ADNS record that routes the traffic that from the public hosted zone to the load balancer:- Click Create Record and select
Simple routing. - Click Define simple record.
- Select
A - Route traffic to an IPv4 address and some AWS resourcesas the record type. - For Value/Route traffic to, select
Alias to the application and Classic load balancer, the region where the load balancer is located and the name of the load balancer.
The following example shows the record creation for the example domain:
- Click Create Record and select
-
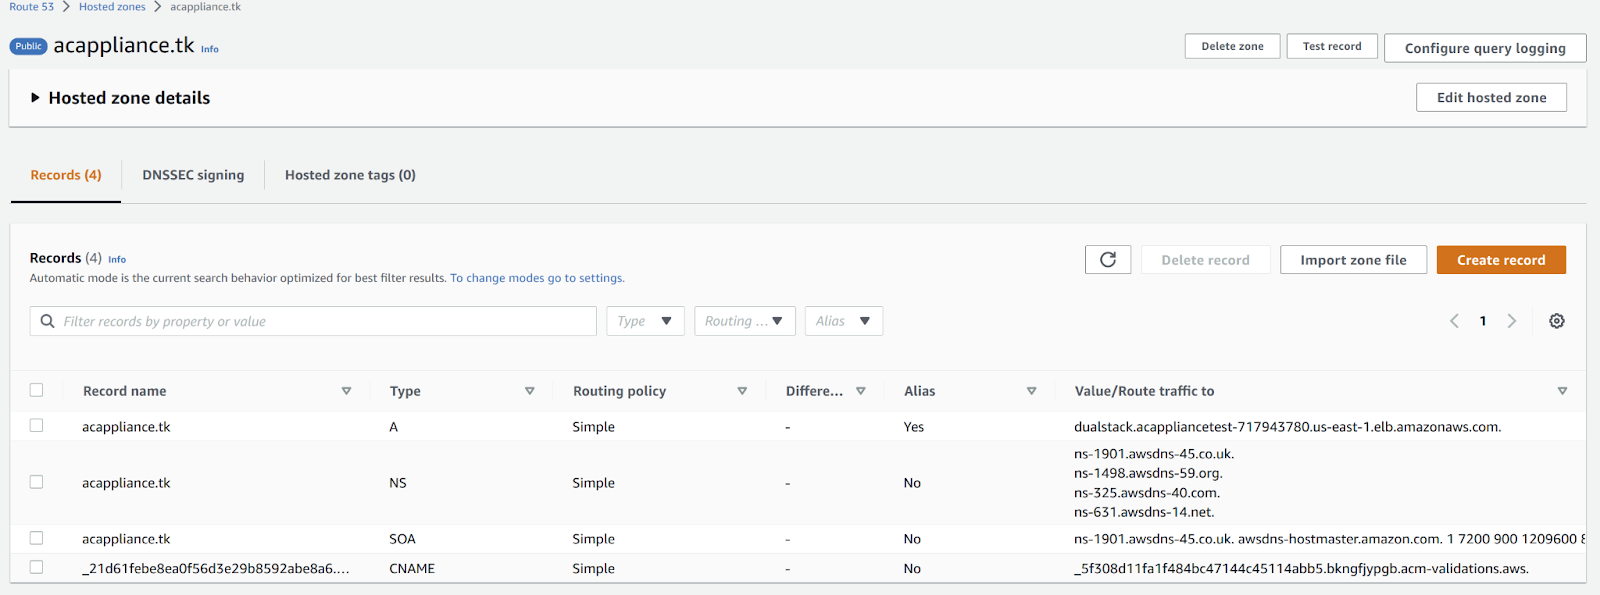
Click Define simple record to create the DNS record for your public hosted zone.
The following example shows the DNS record with type A for the example domain:
5. Configure the appliance to use the domain name
Finally, configure the Anbox Cloud Appliance to use the domain name that you prepared.
-
Use SSH to connect to the AWS instance where the Anbox Cloud Appliance is running.
-
Run the following command to configure the location of the appliance:
sudo snap set anbox-cloud-appliance experimental.location=<domain_name> -
Start the
reboot-checkerservice to let the core services (for example, the stream gateway) use the new domain name:sudo systemctl start snap.anbox-cloud-appliance.reboot-checker.service
You can now use the new domain name to access the Anbox Cloud Appliance.
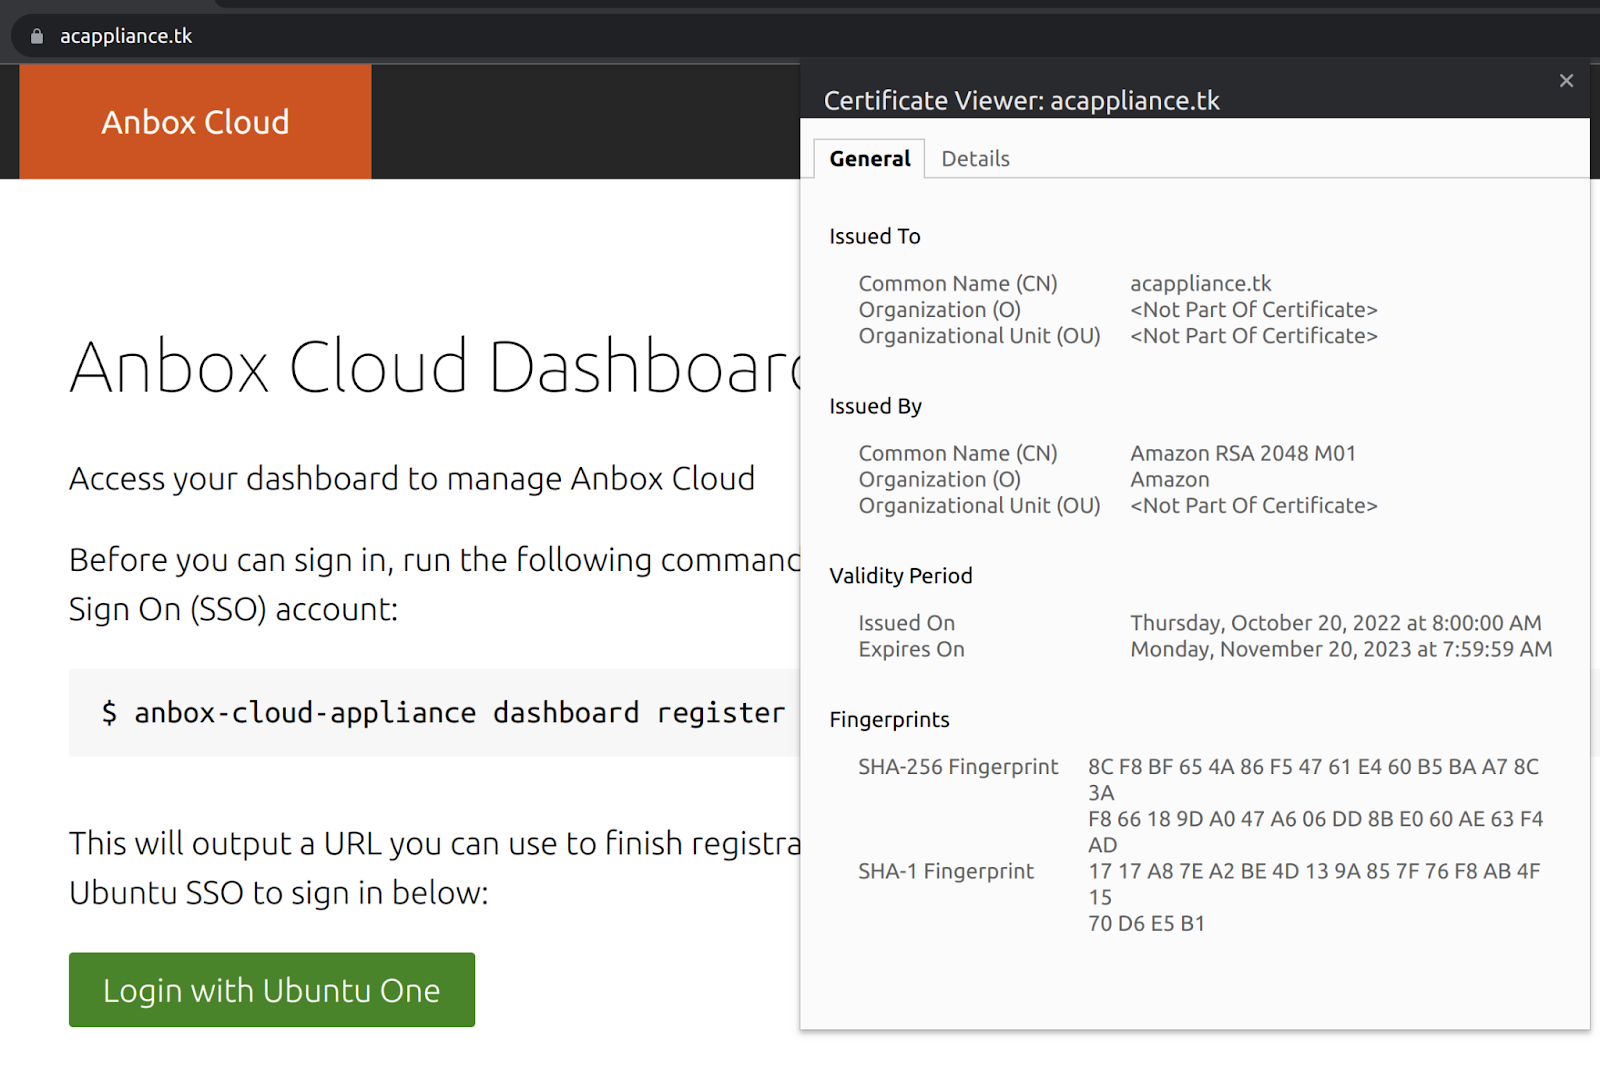
The following example shows the certificate for the example domain: