ⓘ NOTE: This doc is not being maintained anymore. Please see instead Install Ubuntu on WSL2 and get started with graphical applications
| Key | Value |
|---|---|
| Summary | Install a complete Ubuntu terminal environment in minutes on Windows 10 with Windows Subsystem for Linux (WSL). |
| Categories | wsl2 |
| Difficulty | 2 |
| Author | oliver.smith@canonical.com |
Overview
Duration: 1:00
ⓘ NOTE: As of November 2022, the Windows 10 version of WSL has migrated to support the Windows Store application, bringing feature parity across Windows 10 and Windows 11. Please check out our updated Install Ubuntu on Windows 10 and Windows 11 tutorial for the latest information. This tutorial is now deprecated.
Windows Subsystem for Linux (WSL) allows you to install a complete Ubuntu terminal environment in minutes on your Windows machine, allowing you to develop cross-platform applications without leaving Windows.
In this tutorial, we’ll show you how to get up and running with Ubuntu on WSL. These instructions will work on both Windows 10 or Windows 11.
ⓘ Whilst WSL is a powerful tool for all users, some features, such as the ability to run graphical Linux applications, are only available on Windows 11. Please check out our Windows 11 tutorial for more information.
Install WSL
Duration: 7:00
Installing WSL is now easier than ever. Search for Windows PowerShell in your Windows search bar, then select Run as administrator.

At the command prompt type:
wsl --install
And wait for the process to complete.
For WSL to be properly activated, you will now need to restart your computer.
Download Ubuntu
Duration: 4:00
WSL supports a variety of Linux distributions, including the latest Ubuntu release, Ubuntu 20.04 LTS and Ubuntu 18.04 LTS. You can find them by opening the Microsoft store app and searching for Ubuntu.
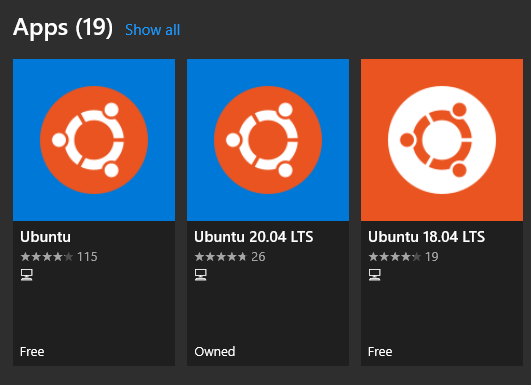
Choose the distribution you prefer and then click on Get as shown in the following screenshot:

Ubuntu will then install on your machine.
The one line install!
There is a single command that will install both WSL and Ubuntu at the same time.
When opening PowerShell for the first time, simply modify the initial instruction to:
wsl --install -d ubuntu
This will install both WSL and Ubuntu! Don’t forget to restart your machine before continuing.
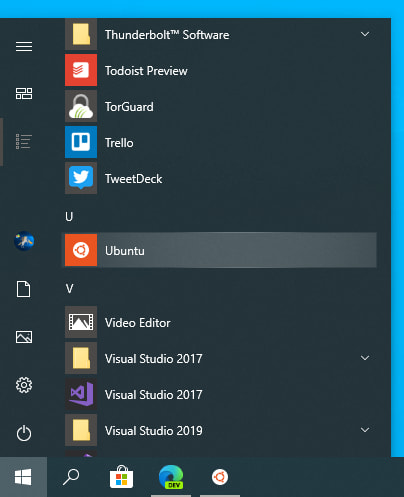
Once installed, you can either launch the application directly from the store or search for Ubuntu in your Windows search bar.
Configure Ubuntu
Duration: 4:00
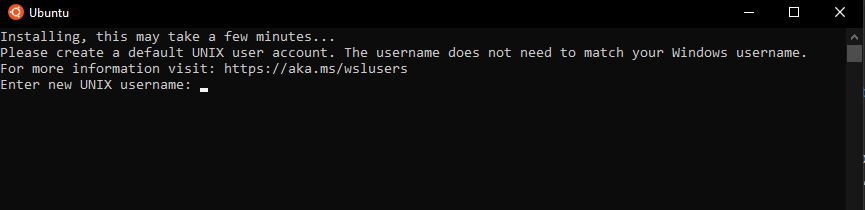
Congratulations, you now have an Ubuntu terminal running on your Windows machine!
ⓘ If Ubuntu returns an error during this initial installation, then the most common issue is that virtualisation is disabled in your device’s BIOS menu. You will need to turn this on during your device’s boot sequence. The location of this option varies by manufacturer, so you will need to refer to their documentation to find it.
Once Ubuntu has finished its initial setup you will need to create a username and password (this does not need to match your Windows user credentials).
Finally, it’s always good practice to install the latest updates with the following commands, entering your password when prompted.
sudo apt update
Then
sudo apt upgrade
Press Y when prompted.
Install your first package
Installing packages on Ubuntu is as easy as using a single command. Below, you will see how to install bpython, a simple python interpreter for trying out ideas, featuring some nice usability features like expected parameters and autocompletion.
To check that you have the latest package lists, type:
sudo apt update
Then install bpython:
sudo apt install bpython
To run the application type:
bpython
And you’re ready to go!

Customising your Terminal with Windows Terminal Preview
Duration: 2:00
Since you’re likely to be using your Ubuntu terminal a fair bit, it’s always nice to do some customisation. We recommend installing Windows Terminal Preview to get the most user-friendly setup. You can find it in the Microsoft Store.

Windows Terminal allows you to open multiple Terminal instances as tabs, so you can have PowerShell running alongside Ubuntu. It also includes a number of customisation options. In the below screenshot, we’ve changed the tab name and colour, and configured the terminal appearance to use the Tango Dark theme and the Ubuntu font!
These customisations can be applied universally using the Appearance menu in Settings or to individual profiles which each have their own Appearance menu. Try it yourself to find something you feel comfortable with!

Enjoy Ubuntu on WSL!
Duration: 0:30
That’s it! In this tutorial, you’ve seen how to install WSL and Ubuntu, set up your profile, and install your first package. You also got some tips on how to customise your experience.
We hope you enjoy working with Ubuntu inside WSL. Don’t forget to check out our blog for the latest news on all things Ubuntu.
