Create a bootable USB stick on macOS

Key Value
Summary How to write a USB stick with macOS.
Categories desktop
Difficulty 2
Author Canonical Web Team webteam@canonical.com

Overview

Duration: 1:00

With a bootable Ubuntu USB stick, you can:

  • Install or upgrade Ubuntu, even on a Mac
  • Test out the Ubuntu desktop experience without touching your PC configuration
  • Boot into Ubuntu on a borrowed machine or from an internet cafe
  • Use tools installed by default on the USB stick to repair or fix a broken configuration

Creating a bootable USB stick is very simple, especially if you’re going to use the USB stick with a generic Windows or Linux PC. We’re going to cover the process in the next few steps.

Apple hardware considerations

There are a few additional considerations when booting the USB stick on Apple hardware. This is because Apple’s ‘Startup Manager’, summoned by holding the Option/alt (⌄) key when booting, won’t detect the USB stick without a specific partition table and layout. We’ll cover this in a later step.

Requirements

Duration: 1:00

You will need:

  • A 2GB or larger USB stick/flash drive
  • An Apple computer or laptop running macOS
  • An Ubuntu ISO file. See Get Ubuntu for download links

Prepare the USB stick

Duration: 5:00

To ensure maximum compatibility with Apple hardware, we’re going to first blank and reformat the USB stick using Apple’s ‘Disk Utility’. But this step can be skipped if you intend to use the USB stick with only generic PC hardware.

  • Launch Disk Utility from Applications>Utilities or Spotlight search
  • Insert your USB stick and observe the new device added to Disk Utility
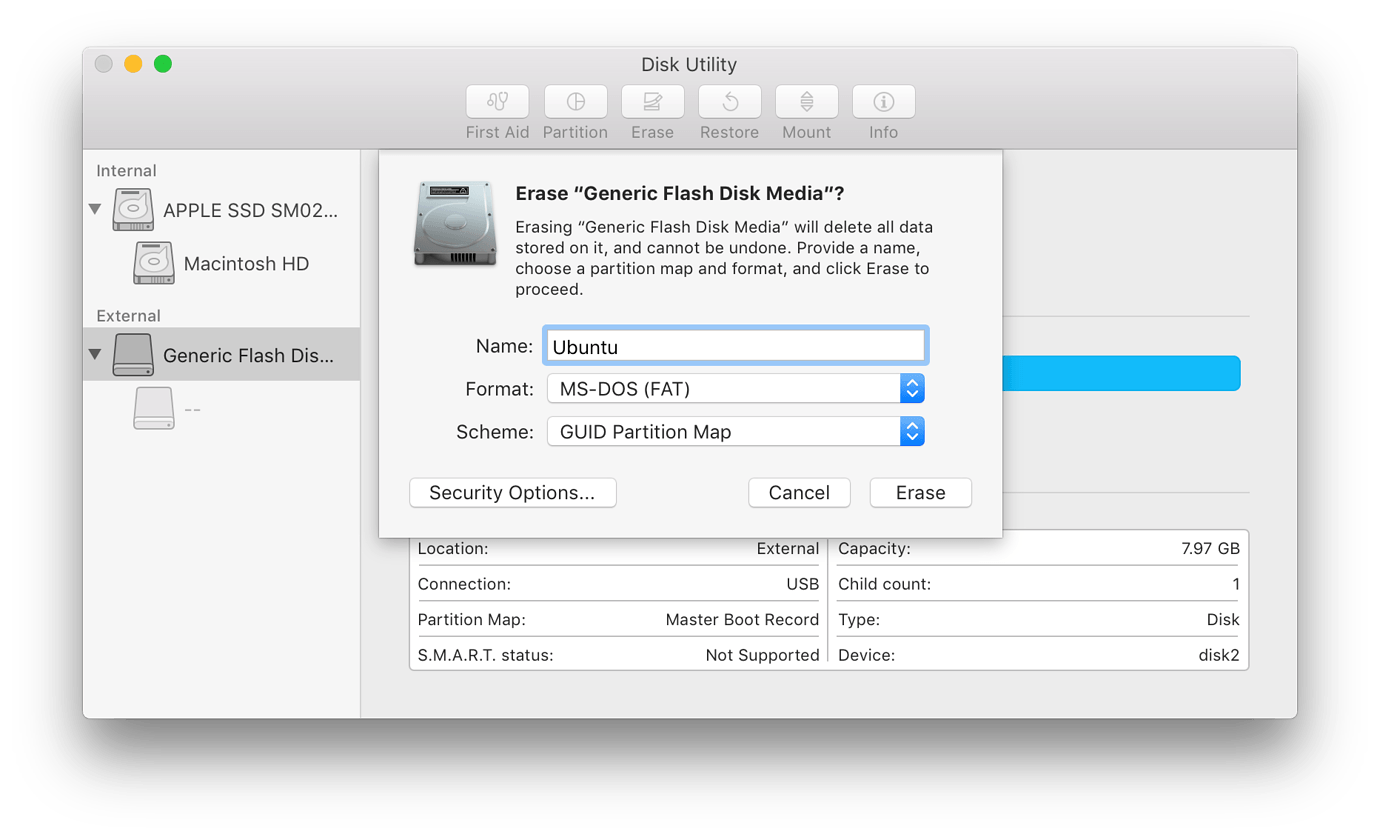
  • Select the USB stick device (you may need to enable the option View>Show All Devices) and select Erase from the tool bar (or right-click menu)
  • Set the format to MS-DOS (FAT) and the scheme to GUID Partition Map
  • Check you’ve chosen the correct device and click Erase

ⓘ Warning: Disk Utility needs to be used with caution as selecting the wrong device or partition can result in data loss.

Install and run Etcher

Duration: 2:00

To write the ISO file to the USB stick, we’re going to use a free and open source application called Etcher. After downloading this and clicking to mount the package, Etcher can either be run in-place or dragged into your Applications folder.

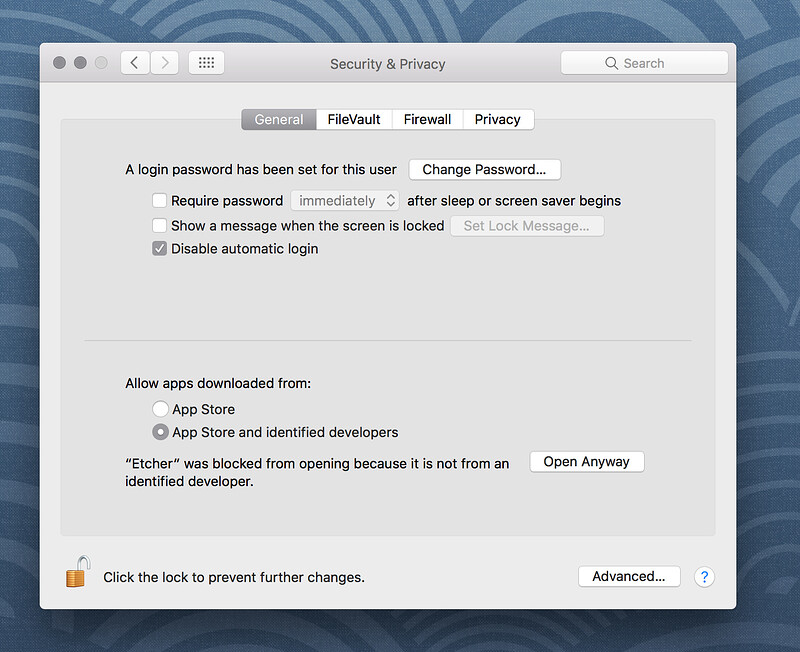
By default, recent versions of macOS block the running of applications from unidentified developers. To side-step this issue, enable ‘App Store and identified developers’ in the ‘Security & Privacy’ pane of System Preferences. If you are still warned against running the application, click ‘Open Anyway’ in the same pane.

Etcher configuration

Duration: 2:00

Etcher will configure and write to your USB device in three stages, each of which needs to be selected in turn:

  • Select image will open a file requester from which should navigate to and select the ISO file downloaded previously. By default, the ISO file will be in your Downloads folder.

  • Select drive, replaced by the name of your USB device if one is already attached, lets you select your target device. You will be warned if the storage space is too small for your selected ISO.

  • Flash! will activate when both the image and the drive have been selected. As with Disk Utility, Etcher needs low-level access to your storage hardware and will ask for your password after selection.

Write to device

Duration: 3:00

After entering your password, Etcher will start writing the ISO file to your USB device.

The Flash stage of the process will show progress, writing speed and an estimated duration until completion. This will be followed by a validation stage that will ensure the contents of the USB device are identical to the source image.

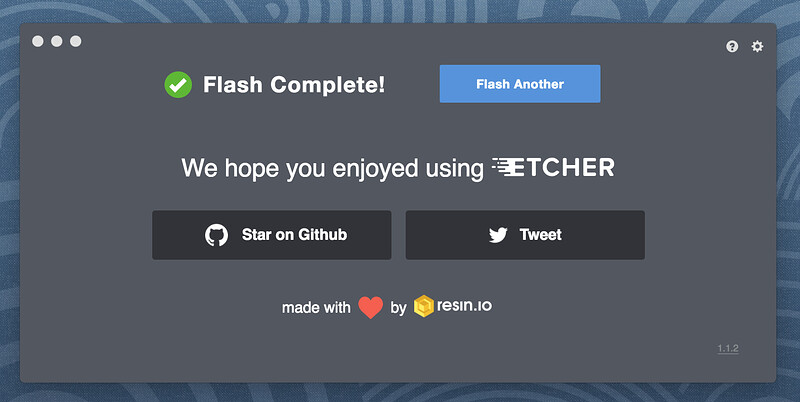
When everything has finished, Etcher will declare the process a success.

Congratulations! You now have Ubuntu on a USB stick, bootable and ready to go.

ⓘ Warning: After the write process has completed, macOS may inform you that ‘The disk you inserted was not readable by this computer’. Don’t select Initialise. Instead, select Eject and remove the USB device.

Boot your Mac

Duration: 3:00

If you want to use your USB stick with an Apple Mac, you will need to restart or power-on the Mac with the USB stick inserted while the Option/alt (⌄) key is pressed.

This will launch Apple’s ‘Startup Manager’ which shows bootable devices connected to the machine. Your USB stick should appear as gold/yellow and labelled ‘EFI Boot’. Selecting this will lead you to the standard Ubuntu boot menu.

Finding help

If your Mac still refuses to boot off your USB stick you may find it easier to boot and install off an Ubuntu DVD instead. See our How to burn a DVD on macOS for further details.

Alternatively, if you feel confident using the macOS command line, see the community documentation on How to install Ubuntu on MacBook using USB Stick for a more manual approach.

If you want to install Ubuntu, follow our install Ubuntu desktop tutorial.

Finally, if you get stuck, help is always at hand:
2 Likes

Update to the tutorial:

The Etcher utility mentioned in the tutorial is now known as “balenaEtcher” and can be found at https://www.balena.io/etcher/. In order to use this utility in MacOS, you must be logged in to Mac OS as a user with administrative privileges.

Other than the change in name, the balenaEtcher utility looks and performs pretty much as it did when it was just called Etcher. As of 2020-02-20, the latest version of balenaEtcher is v1.5.79. Versions seem to be updated fairly regularly.

2 Likes

The USB stick needs to be bigger than 2GB now.

We don’t necessarily want to install to a Mac, just because we created the bootable USB stick on a Mac. I need to re-install to a Dell XPS-13 Linux computer, because its update program trashed my settings and removed my network drivers. So I had to use a different computer, a Mac, to create my ISO.

4 GB stick is a good minimum.

When I used it, balenaEtcher phoned home on startup, before you are prompted.

Note that balenaEtcher phoned home even in opt-out mode.

Given the casual disregard for user privacy, it might be a good idea to find a different app. People recommend usbimager. It’s certainly much smaller!

1 Like

Thanks for finding this cross-platform alternative! Please feel free to rewrite the tutorial using this application instead of Etcher. I’d do it myself but I don’t have a Mac to test and take screenshots.

OK. May not happen until this weekend.

The tutorial worked when I flashed the Ubuntu 18 ISO on to my USB drive. However, the tutorial did not work when I flashed Ubuntu 20.

It NEEDS to be said in the first step that if you skip the step of formatting the drive then you must backup all the files on the USB stick. The text But this step can be skipped if you intend to use the USB stick with only generic PC hardware. is VERY misleading and this whole tutorial assumes:

  1. Nothing is on the drive
  2. The user knows that Etcher will completely erase the drive anyway and the files will not be recoverable.
  3. The user backs up their files before this entire process.

Reading the tutorial, I thought Etcher created a bootable USB alongside my other files. Their documentation does not say this anywhere. I skipped the first step and I used the USB (my only USB) to create a bootable ISO for my PC using my Mac only to find that the files that were on it (the backups from over a decade of backups) are all gone and not recoverable. Extremely frustrating as this is, I hope this comment saves some souls and better instructions can be made.

It’s important to add a instruction to close Disk Utility after using it. If the application is still open, Etcher will complain that the disk is busy

1 Like

It is worth noting that I had to quit Disk Utility before Etcher would work. Otherwise I got an immediate error that something had gone wrong. Quit Disk Utility -> worked immediately.
Maybe if I had just highlighted another disk? But some kind of note would be good.

1 Like

(1) On macos Catalina, the “Scheme” option in the disk utility is no longer available.
(2) with the bootable USB stick inserted, the choices for startup disk include TWO orange EFI disks.

DO NOT FOLLOW THESE INSTRUCTIONS.

You should NEVER EVER run anything from “unidentified developers” - Apple force developers to identify themselves and pay a mere $100 to submit their apps for signing, and Apple CHECK THEIR CODE IS NOT MALICIOUS before allowing it to run.

Everyone trustworthy - especially huge people like Ubuntu - have no problems with that.

Anyone who refuses to do that IS COMPLETELY UNTRUSTWORTHY - they don’t care about your security, they don’t care that everyone else can infect their work with malware, and more-often-than-not, these people ARE DISTRIBUTING MALWARE.

This entire article needs to be deleted or re-written - it’s totally unacceptable in 2021 that Ubuntu is promoting such dangerously unsafe computing practices!

Could this please be updated or could some documentation be put up about how to make the USB persistent? The guide works excellent, but I can’t find any official documentation on how to make the USB persistent. For a distro as big as Ubuntu, I would have liked to see some documentation on this. Thanks!

I tried making an Ubuntu install USB using balenaEtcher and macOS 11. All it gave me was an unusable USB thumb drive that could not be recognized or re-formatted. I had to throw it away. I ended up making my install USB using Rufus on a Windows computer at work. In my experience, Etcher was garbage.

Thanks for the information.

I could not get the USB to work after following this tutorial. I did not try out usbimager tho. Running OSX you can create a bootable USB stick with a couple of simple lines in the terminal:

First download the iso image

Convert to img.dmg file (.dmg suffix is added automatically

hdiutil convert ubuntu-20.04.1-live-server-amd64.iso -format UDRW -o ubuntu-20.04.1-live-server-amd64.img

Run diskutil

diskutil list

Insert USB stick and run diskutil again (to verify which device is the USB)

diskutil list

Unmount USB

diskutil unmountDisk /dev/disk2

Add image to USB

sudo dd if=ubuntu-20.04.1-live-server-amd64.img.dmg of=/dev/rdisk2 bs=1m

Eject USB

diskutil eject /dev/disk2

This bricked my USB. It’s no longer formattable by Disk Utility or recognizable on Windows. Definitely not bootable.

The above step is impossible (no Scheme options) most of the time. Users need at least to unmount the disk, and probably to destroy the current BIOS scheme in order for that option to show up.

e.g.

    diskutil unmount /Volumes/PFSENSE/
    sudo dd if=/dev/zero of=/dev/disk2 count=16

STOP TELLING PEOPLE TO DISABLE THEIR SECURITY and run any old unsigned apps - there is a VERY GOOD REASON why Apple block the lazy idiots who release unsigned apps (and block viruses, malware, ransomware, and other malicious code) - if any developer is too tight to shell out the $100 to buy a certificate and IDENTIFY THEMSELVES to Apple, and allow their code to be check for evil, then those developers need to blacklisted. There’s hundreds of legit and safe ways to make disk images, and putting all your users at dire risk is NOT THE ONE YOU SHOULD BE USING.