Note: With the latest 1.23.0 release, the Anbox Cloud documentation is moved to https://documentation.ubuntu.com/anbox-cloud/en/latest/. Hence, the information in this discourse post may be obsolete. The documentation posts on discourse will be unlisted and archived shortly.
Discourse will still be used for user engagement and release announcements.
This guide covers the usage of the Streaming Stack and assumes that you know how to get access to the Stream Gateway API.
Streaming stack overview
The streaming stack is based on WebRTC and integrates with GPUs from different vendors to enable low latency video encoding mandatory for any real time streaming use case. It is highly customisable but requires some functional understanding.
WebRTC is a peer to peer protocol, but clients must first find each other through a central server. The server does not need to know about the content of the messages between the clients, it only has to forward the messages from one peer to another.
The stream gateway exists to enable clients find each other through sessions. Sessions contain user data, application information and more, but most importantly, they provide an entry point for both the client and the instance to start a communication process called signalling. Signalling is a process by which both peers exchange messages and establish optimal codecs, network routes and content types.
Each component of the stack plays a specific role:
Stream gateway
The stream gateway provides the initial place where a client and an instance can start a peer to peer discussion. These ‘chat rooms’ are called sessions and are central to the rest of the stack. The gateway manages these sessions in order to connect the user and the instance and while doing so, it selects and makes available the best machines for the user based on the availability and geographical location of the machines.
Stream agent
The stream agent is the middleware between the stream gateway and the Anbox Management Service (AMS). It is responsible for securing access to AMS, launching instances, relaying status information and more.
AMS
AMS is the management component of Anbox Cloud and is responsible for managing the applications and instances.
Coturn
A STUN/TURN server needed for WebRTC to work behind NATS and firewalls.
NATS
A messaging queue to allow components to communicate.
The following illustration shows how the streaming stack components interact with each other when streaming visual output from an instance:
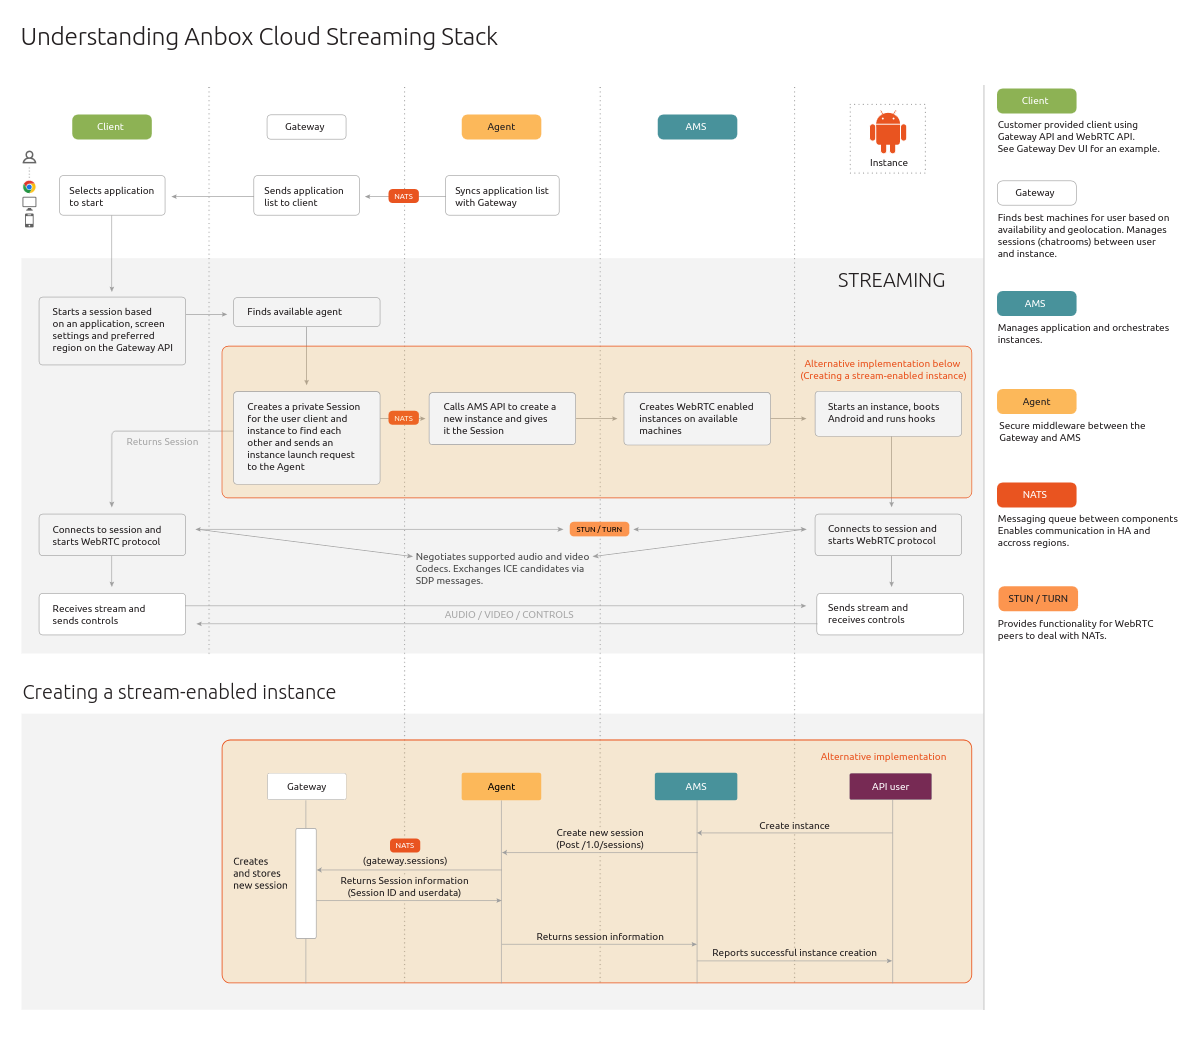
Streaming an application by creating a session
While streaming an application, session creation can happen in two ways as illustrated in the diagram above. Until the 1.22.0 release, a session had to be first created on the stream gateway to be able to create Anbox Cloud instances that can be streamed. Once the session was created, the instance creation will be triggered as detailed in the process below:
1. Creating the session
A session is created by calling the gateway API at POST /1.0/sessions. The returned object contains information about the created session as well as a web socket url that is necessary to start the signalling process.
2. Starting the signalling process
Using the session information, the signalling process between the client and the instance starts:
- The instance creates an offer containing the desired streams (video, audio, binary) as well as codec information.
- The client replies to that offer by accepting or refusing it.
- Now both peers have agreed on a media type, but do not yet know how to communicate with each other. Remember that, so far, all communication is happening through a web socket on the gateway.
- The peers use the ICE protocol and interact with STUN/TURN servers to establish an optimal path.
- Each network path is bundled in an
ICE candidate. There are usually multiple ICE candidates per peer and both sides negotiate the best candidate pair. - Both peers agree on the best network path (
ICE candidate) and start the actual streaming. At this point, they stop communicating through the gateway web socket and communicate directly with each other.
Details about messages exchanged between the client and the instance are not covered in this guide, but you can find more information on Mozilla Developer Network.
3. Establishing the stream
When optimal ICE candidates have been selected and codec capabilities have been agreed upon, the actual tracks are sent. These tracks can be either video, audio or binary. The binary data channel can be useful to send arbitrary data-like controls.
The streams can then be consumed to display the final content.
Streaming an application by creating a stream-enabled instance
Starting from 1.22.0, Anbox Cloud offers a much simpler way to create instances that can be streamed. This is the alternative implementation depicted in the streaming stack diagram.
You can request AMS to create an instance and AMS will be able to dynamically create a session for the newly launched instance by contacting the stream agent. The agent mediates communication between stream gateway and AMS and provides the necessary session information to the AMS. The AMS proceeds with successfully creating an instance that can be streamed.
If you do not enable streaming when launching the instance, you cannot enable it on that instance later. You will have to launch a new instance with streaming enabled.