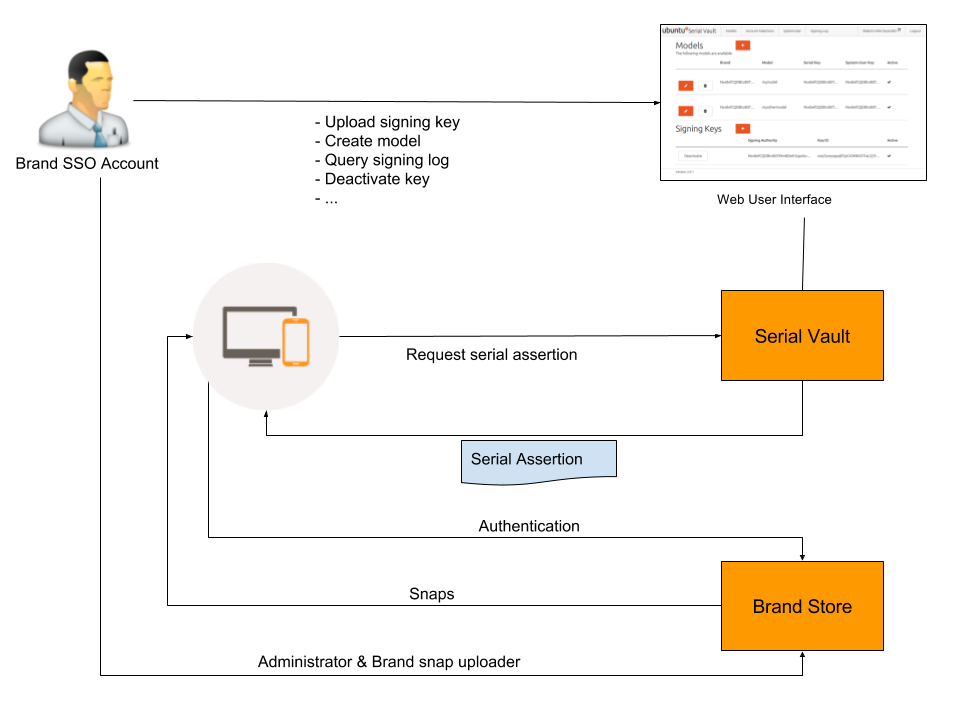
The Serial Vault is a Canonical-hosted web service which must be used if you want to maintain a secure Brand Store. The Serial Vault provides:
- Signed serial assertions to authenticated systems of a given brand/model, which then use it to access a secure Brand Store.
- Signed system-user assertions, which allow creating a system user account from a USB drive on an Ubuntu Core system which currently has no system user set. For additional information, see here.
After Canonical creates your Serial Vault account, you can login here: [https://serial-vault-partners-admin.canonical.com]
Serial Vault tasks include:
- Generating and uploading new serial keys.
- Creating new models and associating them with a key and your brand.
- Reviewing serial signing logs.
- Optionally creating system user assertions.
The Brand SSO account is used for all brand activities, including generating the serial key, as explained here.
Please contact Canonical to request a Serial Vault user account. The account must be associated with the Brand SSO account of your Brand Store. Canonical will need the following:
- The Username of the brand SSO account from https://login.ubuntu.com/
- The Brand SSO account ID from https://dashboard.snapcraft.io/dev/account/
- The email address of the Brand SSO account from https://dashboard.snapcraft.io/dev/account/
Gadget snap
Systems requesting a serial assertion must have a gadget snap. That snap includes a prepare-device hook script where details of the system and Serial Vault connection such as the URL, API key, and serial number are defined.
The following table explains the configuration settings that need to be in the prepare-device hook:
| snapd setting | Description | |||
|---|---|---|---|---|
| device-service.url | The base API URl for the Serial Vault, ending in a trailing slash ("/"). <br>{=html} This value must be set to: https://serial-vault-partners.canonical.com/v1
|
|||
| device-service.headers | The API key defined as an HTTP header in JSON string format. This value must match the one configured for this device model in the SerialVault Admin portal web user interface. <br>{=html} You can generate a valid API key with $pwgen 64 1 and then copy it into the Serial Vault when creating your Model. Or, you can auto create the API key in the Serial Vault when creating a Model and copy it into the prepare-device hook script. |
|||
| registration.proposed-serial | The unique serial number of the device. How to get this serial depends on the device platform. |
Getting the account-id of your Brand SSO account
Requirements:
- snapd must be installed.
- snapcraft must be installed.
- Must be snapcraft logged on as Brand SSO account.
You need to generate a key used by the Serial Vault to sign serial assertions and system-user assertions. These keys must be generated under the Brand SSO account. After generating a key, you register it, encrypt it, and upload it to the Serial Vault. These are all brand activities performed under the Brand SSO account.
Throughout the following tasks, you need to use the account-id of your Brand SSO account in various places. You can display this account-id as follows:
- Login to snapcraft with Brand SSO account credentials:
<!-- -->
snapcraft login
You will be prompted for the email address and password - be sure to use the email and password of the vendor SSO account.
- Display the SSO account’s account-id:
<!-- -->
snapcraft whoami
This should return information in the form:
email:        vendor.sso@example.com
developer-id: enAn0ZFfJUhbdHt2T7AjNeCI65vPt2iY
The developer-id listed here is the account-id of the Brand SSO account.
Providing a key
You need to generate a snapcraft key, register it, encrypt it, and upload it securely to the Serial Vault.
Generating a key
Generate the keys for signing serial and system-user assertions as follows:
Keys used for brand purposes are critically important assets that should not be lost. Snapcraft keys are created in ~/.snap/gnupg/. Ensure you back this directory up to a secure external medium. Registering the key does not upload the key and therefore does not support key recovery.
snap create-key serial
You will be prompted for a passphrase. In this case, the passphrase MUST BE BLANK so just press Return twice.
Note that it takes some time to create the key.
After completion, verify creation with the following command:
snapcraft list-keys
This will return a list of the known keys. At the moment, the key you just added will be marked as ‘not registered’.
    Name    SHA3-384 fingerprint
-   serial   yOkSks8x1OICgx60WW-YEKehTeWvQpE2qA17ZM-RT8i0u7YYrIOjSp1DARkv4Cuu
(not registered)
Registering the key
Register the key to the Brand SSO account as follows:
snapcraft register-key serial
You can confirm the key has been added with the command:
snapcraft list-keys
…which will now list the key with an asterisk (*) denoting that it is registered:
    Name    SHA3-384 fingerprint
*   serial   yOkSks8x1OICgx60WW-YEKehTeWvQpE2qA17ZM-RT8i0u7YYrIOjSp1DARkv4Cuu
Exporting the key
Before uploading the key, it must be encrypted. Export the key using ASCII armored encryption, as follows:
gpg --homedir ~/.snap/gnupg --armor --export-secret-key serial > serial.asc
In this example, serial.asc is the serial key file to upload to Serial Vault. You name a key used to sign system-user assertions differently.
Uploading the key to the Serial Vault
- Login to the Serial Vault as the Brand SSO account.
- Select Models.

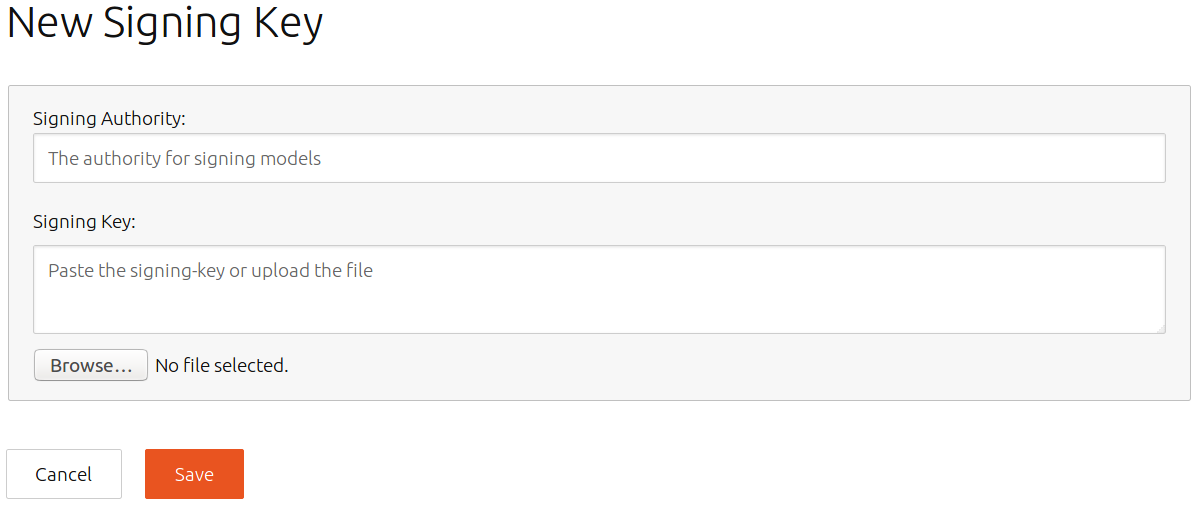
- Enter account-id of the Brand SSO account as the Signing Authority.
- Under Signing Key, click Browse, then find and select the previously created ASCII-armored serial key file…
- Click Save. The list of models and signing keys displays, including this new one.
Creating a model
You need to create a model. This corresponds to the model previously used when building an image. (Every system has a model.) At runtime, the system sends the model to the Serial Vault, which uses it to authenticate the system before generating a serial assertion.
The model contains key data that must exactly match data in the model in the deployed system, including:
- brand-id: this is the account-id of the Brand SSO account
- model name
Also, the system itself must have a gadget snap whose prepare-device hook defines required snapd variables. See “Gadget Snap” section below for details on these variables.
Create a model as follows:
- Click Models. On first use, you have no models.
- Click the “+” button to the right of Models:

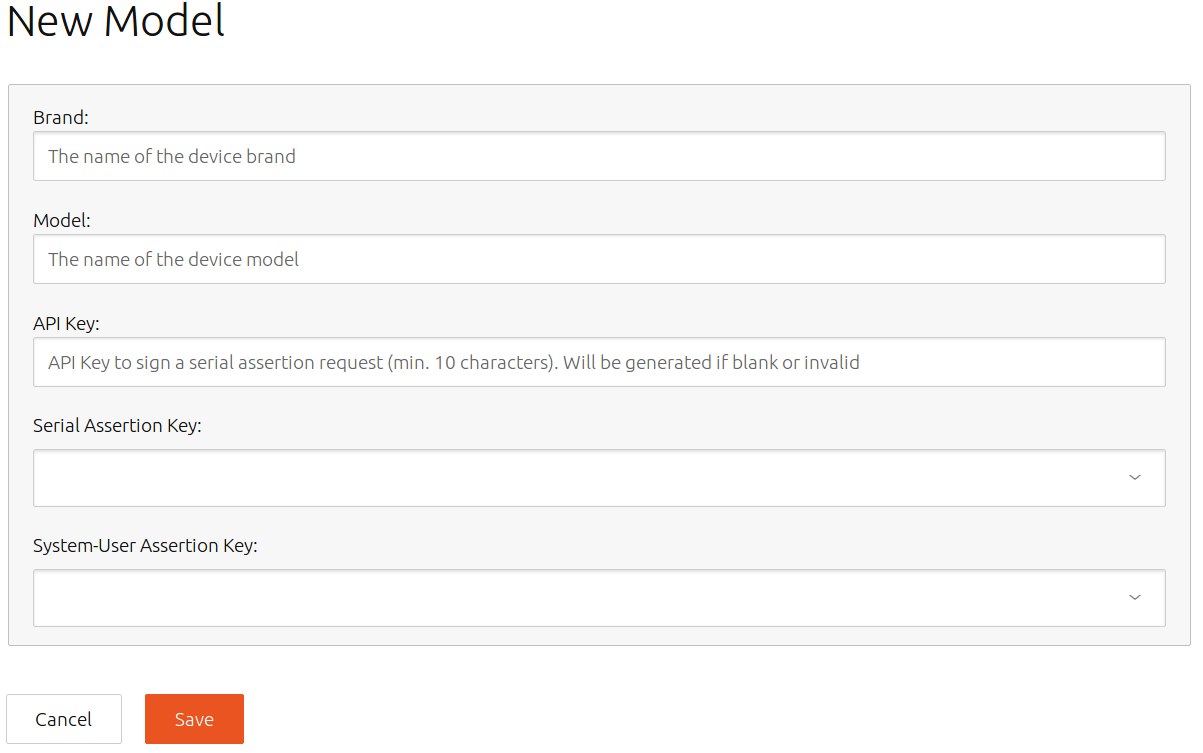
- Enter the account-id of your Brand SSO account into the Brand field.
- Enter the model name (from your system’s model assertion) into the Model field.
- The API Key must match the setting in your gadget snap prepare-device hook (see Gadget Snap section above). If you leave this field empty, an API key is generated and you must use this new value in your gadget snap prepare-device hook script. If your gadget snap prepare-device hook already defines the API key, you must copy it from the hook into this field.
- Select the Serial Assertion Key corresponding to the serial key you previously uploaded.
- In System-User Assertion Key, select a key you previously uploaded. This can be the serial key, or another one.
- Click Save.
This model is now active. The Serial Vault responds to requests from systems that match with a signed serial assertion that the system then uses to access a secure Brand Store.
The Models page now lists your model:
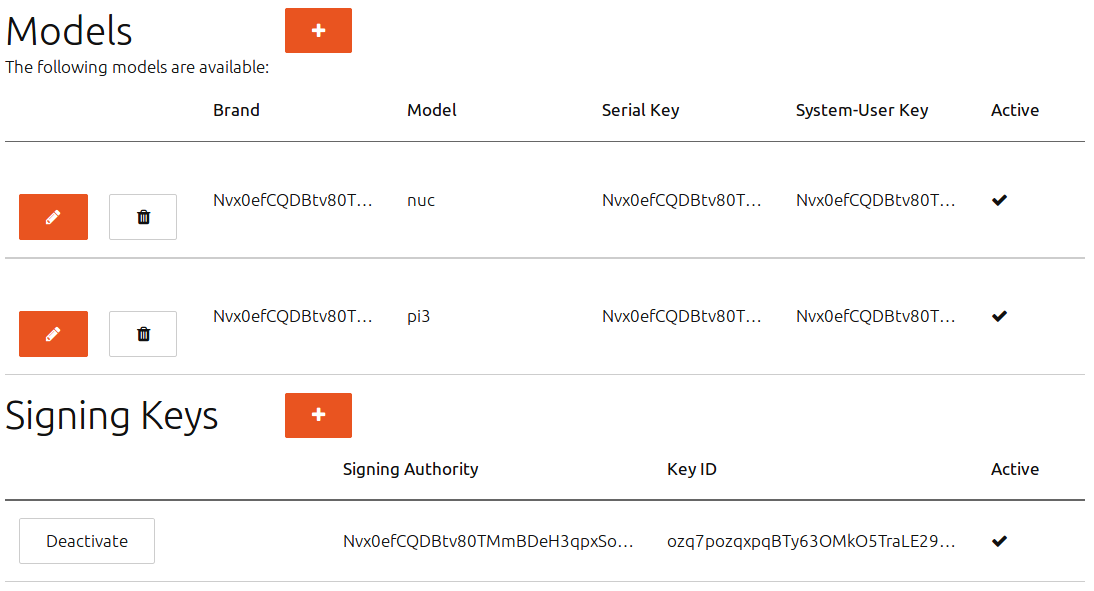
You can edit an existing model by pressing a model’s pencil icon button.
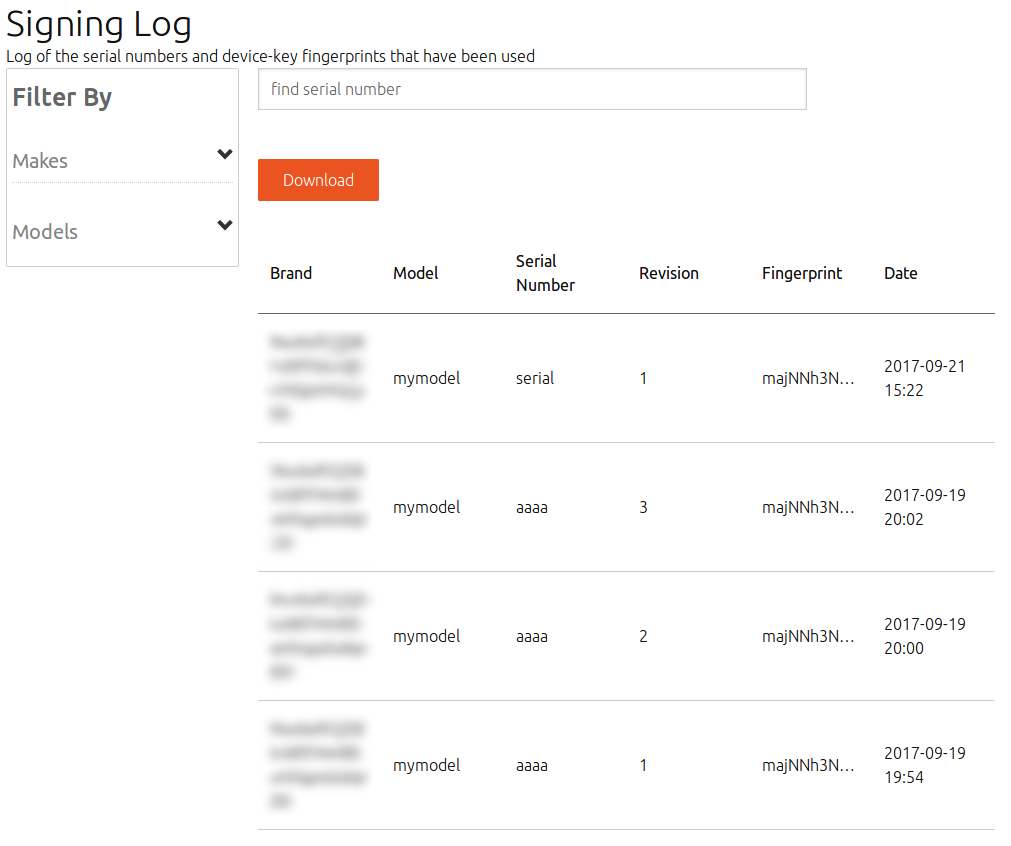
Checking the Signing Log
You can review the Signing Log to check whether serial assertions have been signed and issued.
The Signing Log displays the list of serial numbers and device keys that have been used to sign serial assertions. You can also filter the log.
Creating system-user assertions
A system-user assertion allows you to create a user on an unmanaged Core system. The system-user assertion can be pre-populated into an image, or it can be auto-imported from a USB drive. See here and system user and system user assertions.
The system-user assertion is signed by a key you create, register, export and upload to the Serial Vault just like the serial key. See the the content elsewhere in this doc for detailed instructions.
The System-User menu lets you create system user assertion for a certain brand /model, as follows: 1. Click System-User. 1. Enter the email of the system user into Email field. 1. Enter the desired login name of the system user in Username field. 1. Enter the system user password in Password field. 1. Enter complete name of the user in Full Name field. 1. Select the model of the device this user is being created from Model combo box. 1. Set date and time in UTC since this assertion is valid in Since (UTC) field.
[note]
This date must be after the date on which the key used to sign the system user assertion was registered.
[/note] 1. Press Create to generate the assertion.
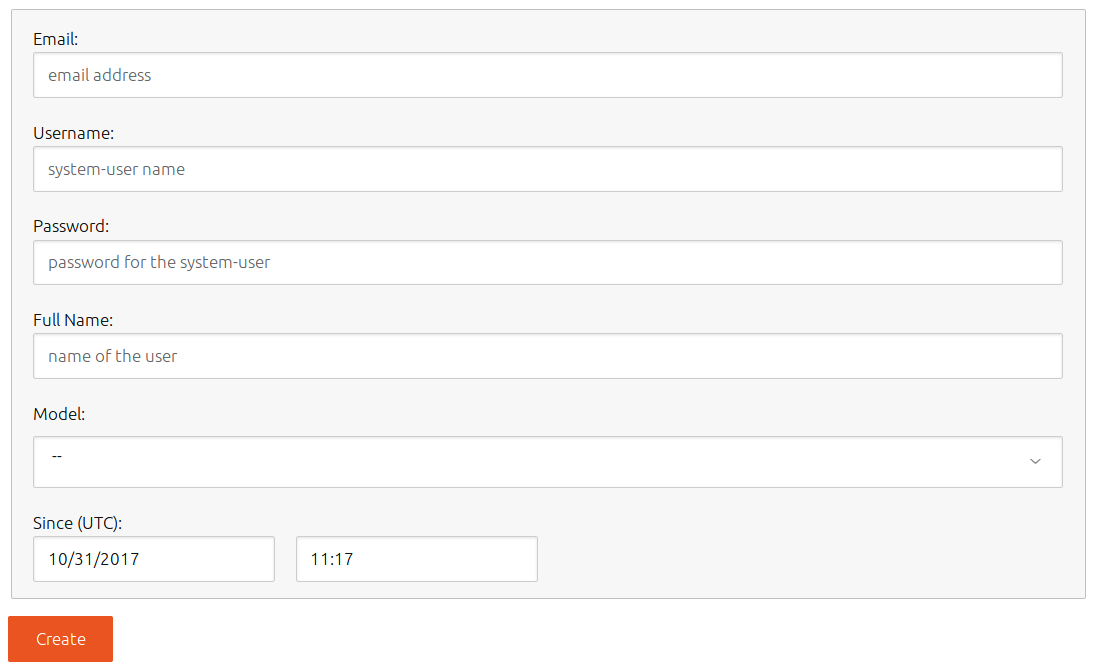
After pressing Create, the generated assertion is displayed. Click Download to save it to a local file.
As explained in linked documents, you can place this file in the root directory of a USB drive and named auto-import.assert. If the USB drive is inserted in an unmanaged Core system, the assertion is imported and the system user is created.
Verifying a system obtained a serial assertion
You can verify from a terminal session on a system if a serial assertion has been retrieved from the Serial Vault in various ways.
If the Core system does not have a user so you cannot get a terminal session into the device, you can create one with a system-user assertion as explained elsewhere in this document.
Verifying serial with snap known serial
Display the system’s serial assertion, if any, as follows:
snap known serial
The output should show a variety of information, including the serial identifier:
type: serial
authority-id: canonical
brand-id: mybrand
model: rpi3
serial: 381d1f99-749f-41f5-a667-608f698a4a4a
device-key:
    AcbBTQRWhcGAARAAzFqvP/235lVcpelVL2RxxHnDwi0viTLFdk3QxrSDfmLlTrP/griNH5zfDPHH
Qf7mCC2yrjPLgSPmDvZm58Mnh3y+TFL9dF6lF6L0qXM865LO07sD1nZKE9lvl61jt+opmHviwTvb
...
If there is no output from this command, the system does not have a serial assertion assigned.
Checking `Initialize device` transaction with snap changes
The system reports transactions with snap changes. The Initialize device transaction includes Serial Vault operations. If snap known serial does not output a serial assertion, you can troubleshoot further as follows:
- Display snap changes with the command:
<!-- -->
snap changes
This lists the transactions in reverse chronological order (most recent first), labelling each with an ID:
ID   Status  Spawn                 Ready                 Summary
1    Done    2016-12-01T10:50:30Z  2016-12-01T10:55:26Z  Initialize system
state
2    Doing    2016-12-01T10:50:52Z  2016-12-01T10:54:53Z  Initialize device
- Display the detail about the initialize device change with its ID, as follows:
<!-- -->
snap change 2
Any status other than Done indicates that the transaction has not yet been able to complete successfully:
Status  Spawn               Ready               Summary
Done    2017-10-23T14:33:10Z  2017-10-23T14:50:53Z  Run prepare-device hook
Done    2017-10-23T14:33:10Z  2017-10-23T14:50:53Z  Generate device key
Doing   2017-10-23T14:33:10Z  -                     Request device serial

......................................................................
Request device serial

2017-10-24T05:31:31Z ERROR cannot retrieve request-id for making a request for
a serial: Post https://serial-vault-partners.canonical.com/v1/request-id: dial tcp 10.50.182.5:443: connect: network is unreachable
2017-11-02T13:22:43Z ERROR cannot retrieve request-id for making a request for
a serial: Post https://serial-vault-partners.canonical.com/v1/request-id:
net/http: request canceled while waiting for connection (Client.Timeout
exceeded while awaiting headers)
<!-- LINKS -->
<!-- IMAGES -->