Executive summary
From manufacturing to agriculture, healthcare, logistics and beyond, robots are becoming an increasingly common sight, and an increasingly critical value driver across verticals. Industrial use cases alone account for more than 500,000 new robots each year, and that number is only growing. But despite this widespread adoption, using robots securely still presents a major challenge.
Modern robots are typically designed to be open, robust, and easy to operate and repair. However, many of these systems are not adequately secured against threats – particularly given that robots are often accessible via the internet for remote operation, creating a uniquely large attack surface.
There is no silver bullet when it comes to robotics security. Instead, the best approach is defense in depth (DiD), combining multiple layers of protection.
This whitepaper will address an essential security layer, whose key role is easily overlooked: your robot’s underlying operating system (OS). We’ll discuss the easy steps you can take to secure your robot by building on top of Ubuntu, and how Ubuntu Core provides you with enterprise-grade security for your robot out of the box.
Introduction
Opportunistic attacks are the most prevalent threats, and the majority of breaches involve attackers finding an easy target. This paper will help you protect your robot against those opportunists. Of course, there are also advanced persistent threats (APTs), which are attacks that are highly customised to a particular organisation or institution. Comprehensive security against APTs is beyond the scope of this whitepaper, although some items in this whitepaper should help you against APTs.
For this step-by-step hardening exercise, we will secure your robot for deployment to a production environment. The focus will be on securing the underlying operating system beneath your ROS or ROS 2 application running on top of Ubuntu 22.04 LTS or Ubuntu Core 22. Therefore, we assume that you have already developed your application and are ready to deploy.
Most of the suggestions in this whitepaper are agnostic to CPU architecture. If there are nuances related to a particular architecture, those are named explicitly in the material that follows.
Let’s start by taking a closer look at the OS we’ll be using.
Ubuntu Desktop and Ubuntu Core
The paper will focus on the steps for securing Ubuntu Desktop and Ubuntu Core.
Ubuntu Desktop is the operating system for general purpose computers, such as a tower PC or a laptop. For more than a decade, it has been crucial for developing robotics applications. Ubuntu is the foundation for several open source projects for robotics, like ROS, PX4, Autoware and more.
While Ubuntu Desktop is an ideal OS for robotics development, several of its components, like its graphical user interface (GUI), are not always necessary in production. Additionally, features such as strict confinement (a high degree of isolation between an application and the underlying system resources) are not the default for most applications.
To address the specific requirements of production robotics use cases, we created Ubuntu Core. Ubuntu Core is a minimal OS optimised for devices. It is based fully on snaps – containerised software packages that bundle applications together with their dependencies, which are immutable, confined and lightweight. Ubuntu Core carries only packages and binaries you choose for your single-purpose appliance.
For a side-to-side comparison between Ubuntu Desktop and Core see table 1 below.
| Ubuntu Desktop | Ubuntu Core | |
| Use cases | Recommended for development / daily use | Best for Production |
| Footprint | Larger footprint (>1GB)
*1793 Packages (v. 22.04) |
Small footprint (~500MB)
*260 Packages (v. 22) |
| Packages | Supports DEBs or Snaps | Supports Snaps |
| OS Architecture | Classic | Fully containerised (snaps) |
| Package security | DEB: Traditional FSfile system security
Snaps: classic (and strict) isolation |
Strict isolation (confinement) |
| FDE | Available with
no HW Support |
Available with \
HW TPM Support |
| Secure boot | Enabled | Enabled
For ARM and x86 SoCs |
| Updates | Automatic/Manual updates for Debs
Automatic updates for Snaps |
Automatic updates for Snaps |
| UI | Xorg / MIR / Wayland | Ubuntu Frame |
Table 1 - Side by side comparison
*Latest version available at the time of this writing
A note about Ubuntu Server
Ubuntu Server is the operating system based on Ubuntu for server machines. Ubuntu Server brings economic and technical scalability to datacenters, public or private. Whether the goal is to deploy an OpenStack cloud, a Kubernetes cluster or a 50,000-node render farm, Ubuntu Server delivers the best value scale-out performance available.
As Ubuntu Desktop and Server share the same operating system paradigm, we will exclude Ubuntu Server from this guide.
Installing Ubuntu Desktop
To get started with Ubuntu Desktop, follow the steps described in the Ubuntu documentation, which will include downloading an official image and setting up a bootable USB stick. Select the 22.04 LTS release to receive the longest period of support and updates for your OS.
Then set up your connectivity and select the appropriate netplan configuration example that applies to your wifi network.
Installing Ubuntu Core
There are 2 ways to start using Ubuntu Core. The first is to download, for testing purposes, an Ubuntu Core reference image, and follow the installation steps. Once you have finished the installation, you will be able to access your device via Secure Shell (SSH) and install your desired applications. As a reference image, this method is for those developers looking at testing Ubuntu Core.
The second option is to build your production-grade image. This is the intended way of using Ubuntu Core; creating a production image with your final application on it. To achieve this, you will need to create a model assertion, which is a digitally signed document that describes the content of your image. Then, using ubuntu-image, you can create your own production image ready to be installed under manufacturer requirements in production lines.
For more information see Build your own Ubuntu Core image Documentation and Build and write an image | Ubuntu Core.
As you can see, Ubuntu Core is not an environment for development, but an OS for deploying production devices.
Secure your base Ubuntu OS
Now that Ubuntu is installed, there are 6 easy steps you can take to significantly enhance the security of your robot – and if you are using Ubuntu Core, many of these measures are implemented by default.
The recommendations below are grouped into logical categories based on generally recognised good security practices, as they apply to your robot’s OS. These are:
-
Secure connections to your robot
-
Limit network access
-
Limit physical connectivity
-
Customise user access
-
Keep up to date with security patches
-
Harden your kernel configurations
Let’s dive in.
1. Secure connections to your robot
Configure firewall
The ideal robotics network would be an isolated Virtual Local Area Network (VLAN) with Access Control Lists (ACL) limiting inbound and outbound traffic. With the truly distributed nature of robots, this is not often the case. Robots must coexist with other WiFi guests. In this case, it is necessary to apply a rule set, allowing in only SSH.
If you’re using Core, first install the ufw snap
$ sudo snap install ufw
Then run
$ sudo ufw limit OpenSSH; sudo ufw enable

Rules updated

Rules updated (v6)
Note that “ufw allow ssh” would also work, but using “ufw limit”, we get an extra benefit. This way, the firewall will stall brute-force password attacks because it will start throttling new connections if it receives too many.
SSH hardening
SSH is the de facto method for connecting to a Linux server. SSH, as most know, allows for encrypted communication between client and server. However, since it does allow remote access, it also is a target for attackers. Attackers will try to perform brute force password attacks aimed at SSH connections. This is prevalent in attacks like those of the Mirai Botnet that tried a static list of 60 usernames and passwords to compromise hosts.
To prevent this type of attack, you can configure two types of mitigation: requiring SSH keys, and a tool for detecting and blocking these attacks.
First, you need to generate an SSH key on your workstation and install the public SSH key on the robot. On the workstation, run the ssh-keygen command:
$ ssh-keygen -t rsa -b 4096
Make sure to use a key passphrase when prompted. This will encrypt the key on disk with that passphrase, which means if someone stole your private key, they would still need to know your passphrase to use it.
Next, you need to distribute the new SSH key to your robot, and you do that via a command called “ssh-copy-id”
$ ssh-copy-id -i ~/.ssh/id_rsa.pub yournewuser@robot
Now that you have a key on the robot, you can proceed with configuring SSH daemon options in “/etc/ssh/sshd_config”. The daemon allows for extensive configuration. To get a better understanding of the available options, run “man sshd_config”. To secure your SSH sessions, set the following options:
PermitRootLogin no

X11Forwarding no

PasswordAuthentication no
If you have users with no shell access, you can additionally disallow Transmission Control Protocol (TCP) and agent forwarding. Keep in mind that users with shell access can install their own forwarders.
AllowTcpForwarding no

AllowAgentForwarding no
Restart sshd
$ sudo service ssh restart
If you have made a mistake you may no longer be able to SSH into the robot. In the event this happens, you can attach a keyboard and monitor to the Raspberry Pi and revert the changes made in sshd.
Next, you will want to install “sshguard” to prevent users from performing SSH brute force attacks. Why is this necessary after requiring keys? A Denial of Service (DoS) can be achieved by continual login attempts from a password attack. A tool like sshguard will block the requests to login at the firewall after several failed logins over a short period.
$ sudo apt install sshguard
Secured remote connections are the default in Ubuntu Core
By default, Ubuntu Core runs an OpenSSH server which is configured for security to accept PubkeyAuthentication only. See how this setup works and integrates with your UbuntuOne account.
Disable Bluetooth
Bluetooth is a convenient way to connect devices wirelessly, but it is not without vulnerabilities and, naturally, exploits. For example, BlueBorne doesn’t even need to pair with a Bluetooth device or even need the device to be discoverable. There are also known exploits for the zero-click kernel-level vulnerability BleedingTooth, which allows unauthenticated attackers to execute arbitrary code with kernel privileges on vulnerable devices. If your robot is not using Bluetooth for any function, you should disable it.
Disable Bluetooth on Ubuntu Desktop
You can manage services such as Bluetooth via the systemd daemon. Use the systemctl utility to disable Bluetooth and configure it to not start when system boots:
$ systemctl disable bluetooth.service
No Bluetooth connectivity by default on Ubuntu Core
If you are using Ubuntu Core, Bluetooth will be disabled by default. In order to enable Bluetooth on Core, you will need the BlueZ protocol stack snap installed, the Bluetooth daemons running, and the corresponding plugs and slots connected (thanks to Snaps’ interfaces mechanism). The lower-level part of it comes with the kernel snap, but the user-space portion has to be installed as a separate snap. This is one less open service to worry about.
2. Limit network access
Disable WiFi
If your production robot is stationary and uses an ethernet connection instead of wireless, you should disable the wireless chip on all versions of Ubuntu. You can do that by using the rfkill command line tool.
rfkill block wlan
Disable ethernet
If your production robot uses a WiFi connection instead of wired, then disable the wired connection. You can use the Network Manager utility to detect and disconnect any ethernet devices from your system. Install the Network Manager snap, then check which devices are connected and disconnect each one explicitly:
$ sudo snap install network-manager

$ nmcli dev

$ nmcli dev disconnect <dev_name>
If you want to permanently disallow the use of ethernet, you could also blacklist the ethernet driver of your device. For example, for a driver named “lan78xx”, you need to add the following lines in “/etc/ modprobe.d/blacklist.conf” and reboot.
blacklist lan78xx
Disable IPv6
By default, all interfaces come up with an ipv6 address. If you are not using ipv6, you should disable it. Not because there is anything wrong with ipv6, but because you want to reduce the number of pathways through which your robot could be attacked.
$ ip addr show eth0

2: eth0: <BROADCAST,MULTICAST,UP,LOWER_UP> mtu 1500 qdisc mq state UP group default qlen 1000

     link/ether bc:a8:a6:fd:43:be brd ff:ff:ff:ff:ff:ff

     inet 192.168.128.46/24 brd 192.168.128.255 scope global dynamic noprefixroute eth0

        valid_lft 48058sec preferred_lft 48058sec

     inet6 fe80::ae66:f8fd:c277:efba/64 scope link noprefixroute

        valid_lft forever preferred_lft forever
To disable ipv6 add the following lines into “/etc/sysctl.conf” in Desktop, or “/etc/sysctl.d/10-ipv6-privacy.conf” in Core:
net.ipv6.conf.all.disable_ipv6= 1

net.ipv6.conf.default.disable_ipv6 = 1
And then run:
$ sudo sysctl -p

net.ipv6.conf.all.disable_ipv6 = 1

net.ipv6.conf.default.disable_ipv6 = 1
Verify that ipv6 is gone:
$ ip addr show eth0

2: eth0: <BROADCAST,MULTICAST,UP,LOWER_UP> mtu 1500 qdisc mq state UP group default qlen 1000

     link/ether bc:a8:a6:fd:43:be brd ff:ff:ff:ff:ff:ff

     inet 192.168.128.46/24 brd 192.168.128.255 scope global dynamic noprefixroute eth0

        valid_lft 48058sec preferred_lft 48058sec
Network access is optional by design in Ubuntu Core
In Ubuntu Core, where every application is a snap, you have an extra security layer in terms of network access. By design, you have control over whether each snap will get network access as defined in their interfaces or not. Learn more about snaps’ confinement types in the Snapcraft documentation.
3. Limit physical connectivity
Disable USB
Universal Serial Bus (USB) has been around for a long time as a convenient and quick way to expand system peripherals and transfer data among disconnected systems. This easy expansion, unfortunately, made way for USB devices that can be used for malicious intent. Examples of USB attack platforms are PoisonTap, Responder or P4wnP1, which can run on a Raspberry Pi Zero, Hack5 Turtle, or USB Armory. Some dangerous USB-based attacks have included BadUSB and RubberDucky, which when plugged in will have the computer recognise the device as a keyboard, leaving an open door for executing commands remotely.
Disable USB on Ubuntu Desktop
If you are using Ubuntu Desktop, one way to prevent USB abuses on your robot is to disable various USB types of devices if you are not using them. To check if you can disable individual USB types of devices, run:
$ egrep -e “USB_NET_DRIVERS=” -e “USB_STORAGE=” -e “USB_HID=” -e “USB_SERIAL=” /boot/config-`uname -r`

CONFIG_USB_NET_DRIVERS=y

CONFIG_USB_HID=y

CONFIG_USB_STORAGE=y

CONFIG_USB_SERIAL=m
Anything marked with a “=m” can be disabled, and anything marked with a “=y” can’t because “y” means that the driver is compiled into the kernel. The example above is from a TurtleBot3 with a RaspberryPi 3+, and unfortunately, those modules need to be compiled into the kernel. The only things we could disable are the serial devices, but the TurtleBot3 uses that module for the LiDAR communication.
We’ll return to the Raspberry Pi based TurtleBot3, but if your robot is based on a different architecture, the kernel options could be different. For example, the options on the x86_64 architecture are below.
user@x86_64:~$ egrep -e “USB_NET_DRIVERS=” -e “USB_STORAGE=” -e “USB_ HID=” -e “USB_SERIAL=” /boot/config-`uname -r`

CONFIG_USB_NET_DRIVERS=m

CONFIG_USB_HID=m

CONFIG_USB_STORAGE=m

CONFIG_USB_SERIAL=m
USB drivers are compiled as modules, therefore, we can disable individual types of devices. Starting with Human Interface Devices (HID), if you want to prevent someone from plugging in a keyboard or other HID devices, then block the module from loading.
user@x86_64:~$ sudo rmmod usbhid

user@x86_64:~$ echo “blacklist usbhid”| sudo tee -a /etc/modprobe.d/ blacklist.conf
To prevent someone from plugging in a storage device such as a USB disk or a flash drive, block off the modules from loading. Copy this script into your console and run it:
for i in usb-storage usb_storage; \

   do sudo rmmod $i ; echo “blacklist $i” | sudo tee -a /etc/modprobe.d/blacklist.conf;\

done
Disallow USB serial devices by blacklisting the USB serial driver:
user@x86_64:~$ sudo rmmod usbserial

user@x86_64:~$ echo “blacklist usbserial”| sudo tee -a /etc/modprobe.d/blacklist.conf
Disallow USB networking devices by blacklisting USB networking modules:
find /lib/modules/`uname -r`//drivers/net/usb -type f -name *.ko | xargs basename -s .ko | sed s’/^/blacklist /’ | sudo tee -a /etc/modprobe.d/blacklist.conf
Disallow all USB devices, effectively disabling USB functionality:
for i in $(find /lib/modules/`uname -r` -name usb -type d);\

   do find $i -name *.ko | sed ‘s/.ko$//g’ | awk -F/ ‘{print “blacklist”,$(NF-0)}’;\

done | sudo tee -a /etc/modprobe.d/blacklist.conf
While you can perform the above steps to disable the loading of all USB device modules, there are some limitations that you should take into consideration. If you recall the kernel configuration, some crucial modules are compiled into the kernel.
CONFIG_USB_NET_DRIVERS=y

CONFIG_USB_HID=y

CONFIG_USB_STORAGE=y
Therefore, we can’t prevent someone from plugging in HID devices, and we can’t preclude storage devices from being added. There is a bit more of a grey area for network devices. While the “USB_NET_DRIVERS” compiles the “usbnet” module into the kernel, we can’t blacklist it. But usbnet is only a “base” driver, and a network device will require an additional chip-specific driver. And those you can blacklist, see above on the topic of “blacklisting USB networking modules”. Keep in mind that the Raspberry Pi 3+ ethernet interface is connected to the internal USB bus. If you blacklist all USB network modules, your ethernet will also be disabled.
As we can’t prevent people from plugging in storage and HID devices with blacklisting since modules are compiled in, what other options are there? You can turn off the USB port power on your robot. Get the hub-ctrl utility. You will have to compile it from source. If you compile the software on the robot it is best practice to remove the compiler before deploying the robot. By leaving compilers on the robot, an attacker who gained system level access would have the ability to compile malicious software.
Now that you have the binary on your robot, to turn off the power on Hub 1 to USB Port 2 and 3, for example, run:
user@x86_64:~$ sudo ./hub-ctrl -h 1 -P 2 -p 0

user@x86_64:~$ sudo ./hub-ctrl -h 1 -P 3 -p 0
Try plugging in a keyboard or a flash drive; nothing should happen. Try plugging in a keyboard or a flash drive; nothing should happen. See the diagram below to determine the location of Port 3 on Raspberry Pi3 +.
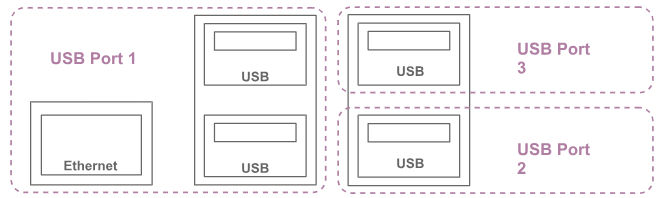
Raspberry Pi3 + Port Location
On to the remaining two USB plugs on the left. That’s where you should connect the LiDAR and the OpenCR board. The ethernet, OpenCR, and LiDAR will all be on the USB Port 1, and you should physically prevent tampering with the two plugged cables. This is where another limitation of Raspberry Pi3 + comes into play. You cannot turn off the power with hub-ctrl to USB Port 1, because for that to work, no devices can actually be plugged into the port when you turn off the power. If a device is plugged in, the USB system will just reinitialise the device, so the port won’t actually lose power. But it’s not possible to unplug all devices on Port 1. The ethernet device is electrically wired internally to Port 1; thus, it prevents the power from being turned off to Port 1. And because port 1 has two USB plugs, those two plugs will always be powered. Therefore, they will require some physical anti-tampering method.
USB is less problematic on Ubuntu Core
If your robot is using Ubuntu Core, individual applications are sandboxed via a policy-based system that restricts access to the filesystem, network interfaces, serial devices, external hardware, system calls and other kernel features. This mechanism by default keeps in check the access that each system component can have. Learn more about how applications are confined in Ubuntu Core and how Snap confinement works.
In addition, Core can defend against software corruption or running unauthorised applications via its integrated code authenticity validation, such that unauthorised or malicious code cannot be introduced.
4. Customise user access
Remove any default users
Part of gaining access to a system remotely is attacking default usernames and simple passwords. Default users are one way to make it easier for an attacker to access the system. Removing default usernames and switching to named user accounts also has the added benefit of accountability of user actions. When an account is shared it is difficult, if not impossible, to determine who exactly performed the actions that may have led to a disruption in service. It is also a good idea to install “libpam-passwdqc”, which will ensure that user passwords meet a minimum security requirement. Run the commands below to install passwdqc, create a new user, add the user to the sudo group (if required), logout as “ubuntu” user, login with the new user, and remove the default “ubuntu” user.
ubuntu@robot:~$ sudo apt install libpam-passwdqc

ubuntu@robot:~$ adduser yournewuser

ubuntu@robot:~$ sudo usermod -aG sudo yournewuser

ubuntu@robot:~$ su yournewuser

yournewuser@robot:~$ sudo deluser --remove-home ubuntu
No default users on Ubuntu Core
Because Ubuntu Core is designed as a user-less system, your device does not have a default username and password in the first place. This mechanism does away with the need to monitor for common defaults, making your life easier as you work to reduce your attack surface.
For development, Ubuntu Core’s reference images provide the console-conf system to allow automatic provisioning of a user account linked to an existing Ubuntu One account. The public SSH key of the Ubuntu One account is automatically copied to the device, allowing for secure remote connections to the device via SSH.
For production devices, Core has a secure system available (system-user assertions) that can be used to securely trigger user account creation on devices in the field.
User permissions
Access to any data stored in your robot by existing users should be carefully handled following the principle of least privilege. The default home directory permissions on Ubuntu allow users to share files in their home directories. To prevent users from accessing other users’ files, you can make the following changes:
sudo chmod 0750 /home/*

sudo sed -i.orig -e ‘s/=0755/=0750/’ /etc/adduser.conf
In addition, file creation and access race conditions are a way users could escalate their access beyond what they were granted. To help mitigate that, make sure to use “umask”. Users “umask” sets the file mode creation mask of processes; you can use it to restrict access to the content a given user generates. To prevent users from accessing each others files, run:
echo “umask 077” >> /etc/profile
Since not all shells interpret the “/etc/profile” file, you should also add the following line into “/etc/pam.d/login”:
session optional pam_umask.so umask=0077
While the options above set the umask for children of “bash” or PAM sessions, don’t rely on your parent process umask in your ROS code – always set your process umask explicitly (type “man 2 umask” or “man pam_umask” in your console for more information on using umask in your code).
Permissions are restricted by default on Ubuntu Core
When using Ubuntu Core, you have the ability to control how each snap will interact with your home directory. All of the software in Core is delivered via strict snaps, and snap strict confinement leverages AppArmor to lock down the filesystem. Permissions for snaps and Core are handled via interfaces, and the home interface is not automatically connected when a snap is installed. Manual connections give you complete control over what kind of access you allow. Dedicated snap stores also offer the ability for companies to declare snap connections for snaps hosted in their own private store.
Check which interfaces a given snap currently uses with:
snap connections <snap-name>
If needed, the ‘snap connect’ command will connect Ubuntu Core and the snap via the home interface, allowing it to save files to your home directory.
snap connect <snap-name>:home :home
You can even configure a user’s home directory to be something other than /home with a simple system command line option.
Finally, to control access to specific files, snaps also offer the ‘personal-files’ interface. This interface provides read and/or write access to privileged files in a user’s home directory. Once you’ve defined this interface for a directory with restricted access, you can enable it for a specific snap:
snap connect <snap-name>:restricted-dir
5. Keep up to date with security patches
Unattended upgrades
Part of overall security hygiene is to patch security vulnerabilities in a timely manner. As ROS is based on Ubuntu, you can keep up to date with security patches by enabling unattended upgrades. All you have to do is make sure that the options below are uncommented in “/etc/apt/apt.conf.d/20auto-upgrades”:
APT::Periodic::Update-Package-Lists “1”;

APT::Periodic::Unattended-Upgrade “1”;
This will periodically refresh the package list and upgrade packages that have security patches available. Although auto-upgrade for most packages will require no reboot, there are going to be updates that require restarts. To see if any upgrades need a reboot, you can periodically check by running the command below:
ls -l /var/run | grep reboot-required
If a reboot is required, there will be a file such as “reboot-required.pkgs”. Run “cat /var/run/reboot-required.pkgs“ to check which ones.
Easily enable kernel updates on Ubuntu Core
In Ubuntu Core, snaps update automatically, and the snapd daemon will by default check for updates 4 times a day. You can alternatively specify the time ranges for the updates to occur by setting a system-wide timer option:
snap set system refresh.timer=4:00-7:00,19:00-22:00
In addition, the kernel and base operating system are handled as snaps, and so will receive regular and consistent updates the same way as all installed applications. This also includes graceful error handling with automatic rollbacks on improperly updated kernels. This means an easy way to keep your entire system up to date.
It is also possible to build a device-agent which can control updates on a Core device, so you can have more control over the timing of updates.
6. Harden your kernel configurations
Set secure IPv4 configurations
Sysctl is an interface to modify kernel settings at runtime. Use sysctl to harden your device by applying secure configurations related to network and system settings.
To see the current values of the sysctl variables you can run:
sudo sysctl -a
The recommended way to change the variables is to edit “/etc/sysctl.conf” in Desktop, or “/etc/sysctl.d/10-network-security.conf” in Core, which will make the changes persist after reboot.
Modify the following variables in the corresponding sysctl file to log packets which have “impossible” addresses, spoofed and source-routed packets, and redirects which could be a sign of adversarial network activity:
net.ipv4.conf.all.log_martians = 1

net.ipv4.conf.all.accept_source_route = 0

net.ipv4.conf.default.accept_redirects = 0

net.ipv4.conf.default.secure_redirects = 0
Furthermore, these configurations can be used to protect your device against potential SYN flood attacks, a form of Denial of Service (DoS) attack where many SYN requests without completing the connection:
net.ipv4.tcp_syncookies = 1

net.ipv4.tcp_synack_retries = 5
Apply ASLR
Take advantage of address space layout randomisation (ASLR), a technique to prevent attackers from using knowledge of the memory address allocated to functions in a given vulnerable program to execute exploits. The ASLR configuration can have one of three values: 0 (disabled), 1 (conservative randomisation), or 2 (full randomisation). Because the effectiveness of the technique depends on the amount of randomised address space, it is recommended to apply full randomisation to reduce the likelihood of a successful attack. Full randomisation is already the default in Ubuntu; you can ensure this configuration is permanent by adding the following lines to “/etc/sysctl.conf” in Desktop, or “/etc/sysctl.d/10-kernel-hardening.conf” in Core:
kernel.randomize_va_space = 2
Apply the changes with:
sudo sysctl -p
Disable core dump
Getting a core dump from an application when it experiences a crash is a great way to debug issues in applications. The size of the core dump can vary widely from application to application; it all depends on the memory footprint of the application. The assumption is that an application would seldom experience a problem, but when it does, it will provide memory contents for the developers to look through.
While that assumption is reasonable for development, once you move your robot to production you could face a Denial of Service (DoS) attack. When a process crashes, it’s generally assumed that the process is restarted to restore the particular service. For example, the systemd will do that automatically for you. Suppose an attacker finds a way to trigger this application crash through your exported interface, or worse, if they find a way to script it. They could cause the particular service to crash and dump the core hundreds of times per second, which would fill up your storage. The entire robot then will be subject to all sorts of unpredictable consequences as all services start behaving in unexpected ways due to a lack of space. By disabling the core dump, the attacker can only affect the buggy service and not the entire robot system. To disable the core, add the following lines to “/etc/sysctl.conf” in Desktop, or “/etc/sysctl.d/10-kernel-hardening.conf” in Core:
kernel.core_uses_pid = 0
And run:
sudo sysctl -p
Remove unneeded kernel modules
The modprobe utility can be used to add or remove loadable kernel modules (LKM) to the kernel. These modules are a desirable location for an attacker to place a rootkit and gain kernel-level access. Rootkits are particularly dangerous, as they allow an attacker to compromise the core components of your OS while going unnoticed. Thus, it is a good practice to deny or disable unneeded modules from loading at boot time.
Modprobe can first help you check which LKMs are in your system, and disable any you don’t need. You can use this command to list them (by convention, they use the .ko extension, which stands for “kernel object”):
find /lib/modules/`uname -r` -type f -name '*.ko'
Then, run modinfo on a module to investigate further, and see all its dependent modules. When you are sure you can disable a module, define it as /bin/false in its .conf file, so that the module will not be loaded. This is a good convention to visualise when something is not allowed.
echo "install <module> /bin/false" > /etc/modprobe.d/<module>.conf
In addition, to increase your rootkit detection abilities, use the rkhunter (Rootkit Hunter) utility to scan for rootkits, backdoors, and possible local exploits in your robot. It achieves this by checking default files where rootkits are stored, comparing the SHA-1 hashes of critical files with known good ones, hidden files, and suspicious strings in kernel modules. It’s advisable to schedule a task to run this check automatically, including ensuring you have an updated database.
In /etc/default/rkhunter:
CRON_DAILY_RUN = “true”

CRON_DB_UPDATE = “true”

APT_AUTOGEN = “true”
Disallow dynamically loaded modules
Consider restricting dynamic loading of kernel modules more generally. Dynamically loaded modules, as much as they provide great flexibility, are especially dangerous, as they allow a rootkit to inject itself into the kernel without requiring a reboot. If you decide you can do without a dynamic kernel for your use case, just edit this parameter in “/etc/sysctl.conf” in Desktop, or “/etc/sysctl.d/10-kernel-hardening.conf” in Core:
kernel.modules_disabled = 0
Secure boot configurations will prevent kernels with unsigned modules, so there would be no way to dynamically load a rootkit. Ubuntu Core has secure boot enabled by default and thus mitigates these related attacks. It’s also possible to enable secure boot in Desktop.
You can flexibly configure the kernel on Ubuntu Core with gadget snaps
Canonical provides several reference kernel snaps that you can also configure using a gadget snap with a number of different options. Contact us to get help in setting up your Ubuntu Core Image with the gadget snap.
Conclusion
As you prepare your robot for production, security shouldn’t be an afterthought. Putting an upfront effort can, in the long run, save you resources, and the headache that comes with a security breach. The more awareness you have of the security of your robot’s essential layers such as your operating system, the better prepared you will be from the start. And Ubuntu Core provides the level of control you want for a system that is seamlessly secure.
As our world becomes more and more connected, a paradigm shift from “if we become a target” to “when we become a target” warrants a proactive approach to security. And remember, security is not a single on/off switch, but many smaller actions that build strength in numbers. More breaches than we think are simply opportunistic. If you put up enough barriers, attackers are likely to move on to a weaker target – and with Ubuntu Core, those barriers are in place out of the box.
……………………………………………………….
For more information about Ubuntu and robotics please visit our website.
You may also consider reading the following materials:
• Distributing ROS apps with snaps
• Key considerations when choosing a robot’s operating system
• ROS Expanded Security Maintenance
Need help getting to market? Contact us
……………………………………………………….