How to use this developer guide
In part 2 of our developer guide series, we saw in fine detail how to create a single snap for a complete robot stack, including things like controllers, sensor drivers, but also functionalities such as autonomous navigation.
While part 3 of our series focused on the snap store and the snap release process, this developer guide, part 4, draws from the example shown in part 2 to exemplify one specific feature of snaps, content sharing. We will therefore revisit the entire example in order to make use of this feature – after introducing it, of course.
This guide is meant for ROS snap beginners and advanced users looking for insights and guidelines on implementing ROS snap content sharing. This is not a quick tutorial, but rather an in-depth guide. Furthermore, these steps assume that you have completed part 2 of this series.
This guide is organised as follows:
- Packaging complex robotics software with multiple snaps
- Introduction and reasons behind the content sharing approach
- Requirements and setup
- Identification of robot components
- Learn how to separate a monolithic snap in multiple apps
- BringUp snap with the robot core drivers
- Teleoperation snap of for manual robot movements
- Mapping and Navigation snap for advanced autonomous robot movements
- Using content sharing
- See how you can enable content sharing in your snap
- Compare the differences before and after content sharing
Packaging complex robotics software with multiple snaps
We have established in part 2 the importance of packaging your applications for deployment. We also demonstrated this packaging by building a single snap that contains the entire software stack for the TurtleBot 3. While this monolithic solution is convenient, it also has several drawbacks such as its size and the resultant resources it consumes when installed and updated. More importantly, it also ties the whole stack to a specific robot model.
Ideally, parts of the entire software stack should be reusable on other robot models; the teleoperation application and the navigation stack are two such examples. This could be achieved by breaking down the monolithic design into several smaller snaps, each enabling a specific functionality.
For instance, we could design a single robot-specific snap, containing all of the robot-specific stack components such as drivers, controllers, robot model and so on. Alongside this snap we can add a plethora of other snaps which are robot agnostic, each enabling a given functionality. These snaps could then be used on a variety of different robots, potentially varying only slightly in their configuration.
This multi-snap design is exactly the theme of this guide. For a detailed comparison of the different architectures with snaps you can check the documentation.
Rationalising a multi-snap deployment with content sharing
A snap being self-contained is a powerful feature. But sharing resources, such as the same ROS packages, can also be useful. Not only does sharing avoid duplication, it also helps to ensure related applications share the same version of the ROS stack.
Such design – sharing a common set of libraries among multiple snaps – is readily available through a feature called content sharing. However, using it is anything but straightforward. We must make sure that all dependencies are available at build time but not shipped in the final artefact. We must also make sure that the ROS workspaces are properly sourced, wherever they are and whenever they are needed. This can quickly become a headache.
Fortunately, new ROS extensions for snapcraft have been developed precisely to enable seamless content sharing. We’ll be using those extensions in this guide.
What we will learn
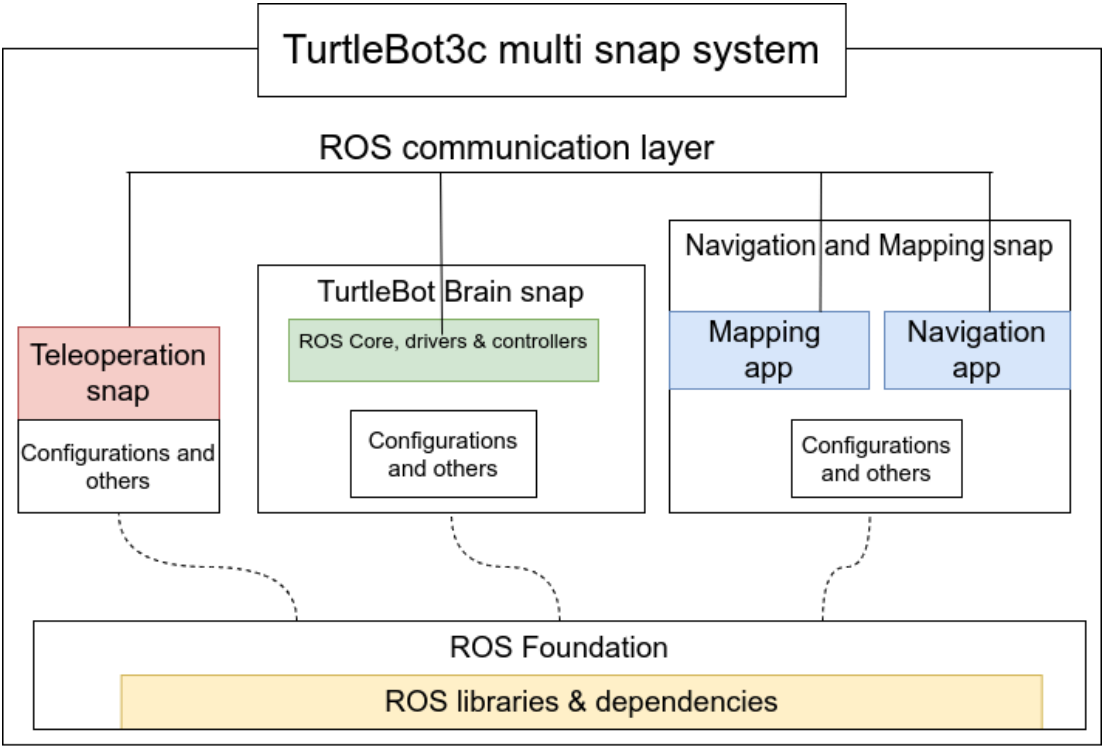
Just like in part 2, we will be deploying a robotics software stack using snaps and snapcraft. Following the TurtleBot3 example, we will divide the monolithic snap presented in part 2 into four (4) standalone snaps, namely:
- turtlebot3c-core: The robot specific snap required to bring the robot up. We may also refer to it as the ‘brain’ snap.
- turtlebot3c-teleop: A teleoperation snap allowing us to drive our robot.
- turtlebot3c-nav: A snap that contains both the mapping and autonomous navigation functionality.
- A foundational snap.
The foundational snap is the basis for the content sharing design and, as its name suggests, it’s a snap by itself. While we haven’t yet dug into the inner workings of content sharing, we briefly suggested that the common bits live outside the application snaps. As a matter of fact, they live in a separate snap of their own, a snap that only contains libraries and a few executables (think ros2 run/launch) but exposes no applications.
We will design the four snaps so that they are standalone, yet loosely integrated to one another offering some ease of use for the final user. The image below shows a preliminary idea of what we will build in this tutorial.
In this fourth part, we will learn:
- How to draw a line and separate functionalities in their own snap.
- How to build a ROS snap using content sharing.
- New snap features and concepts that will be useful in a robotics context.
Requirements
The main requirement is that you have already completed part 2 of this guide. This implies that you are familiar with ROS, Linux and snap/snapcraft.
Setup
Since we are reusing part 2 examples, the setup is the same. Please refer back for the details of the setup either on your machine or in a virtual machine.
The ROS content sharing feature we are going to employ later is only available on snapcraft version 8.x. Make sure that you have the right version of snapcraft installed with:
snapcraft version
Identification of robot components
When creating a monolithic snap for an entire robot stack, we end up placing many different applications and functionalities in the same blob. As we want to split that monolithic snap into smaller chunks that are as standalone as possible, we need to consider where to draw the line.
Fortunately, the job of identifying the high level functionalities was mostly done in part 2 where we identified the different applications to be exposed by the snap. Following the same dotted lines, we will consider the following functionalities:
- BringUp, or the obvious need to bring the robot up to a functioning state. This includes things such as spawning controllers and drivers, and advertising the robot state and model.
- Teleoperation, or the possibility to drive the robot from a keyboard, a gamepad, a virtual joystick or similar device.
- Navigation and Mapping, or the ability for the robot to create a representation of its environment and autonomously navigate in it.
As a matter of fact, we will reuse the very same TurtleBot3c project’s source code. Turtlebot3c is a collection of launch files and configuration files organised so that the aforementioned functionalities can be launched individually. This is something that is not necessarily doable out-of-the-box from the official TurtleBot3 code base.
Snapping the TurtleBot3
With the functionalities clearly identified, we shall now move on to creating the snaps.
We can follow the same template from our previous tutorial, change the names of the 3 snaps and include only the respective apps and daemons.
In the following sections we will clone the snapcraft.yaml defined in the developer guide part 2 and adapt it to generate 3 different snaps; Bringup, Teleoperation, and Navigation and Mapping.
BringUp
The full BringUp snapcraft.yaml can be found here https://github.com/canonical/turtlebot3c-snap/tree/feature/multi-snap/turtlebot3c-bringup-snap/snap.
First, change the name to turtlebot3c-bringup and adapt the summary and description based on the separation we described before.
name: turtlebot3c-bringup
summary: Turtlebot3c core snap
description: |
  This snap automatically spawn a roscore and the core components for the
  Turtlebot3 (controller, robot_state_publisher etc).
Next, we can simplify the workspace craft part because we only need to clone a specific sub-directory from a single repository.
So let’s use the source-subdir for cloning and focus only on the turtlebot3c_bringup folder.
parts:
  workspace:
    plugin: catkin
    source: https://github.com/ubuntu-robotics/turtlebot3c.git
    source-subdir: turtlebot3c_bringup
Remove everything related to the teleoperation, navigation and mapping from the original file.
In fact, in the BringUp snap we want to keep the core_launcher app and nothing else.
apps:
  core:
    daemon: simple
    environment:
      ROS_HOME: $SNAP_USER_DATA/ros
      # LD_LIBRARY_PATH: "$LD_LIBRARY_PATH:$SNAP/usr/lib/$SNAPCRAFT_ARCH_TRIPLET/blas:$SNAP/usr/lib/$SNAPCRAFT_ARCH_TRIPLET/lapack"
    command-chain: [usr/bin/ros_network.sh]
    command: usr/bin/core_launcher.sh
    plugs: [network, network-bind, raw-usb]
    extensions: [ros1-noetic]
Note that we have not enabled content sharing just yet. The snap works already by having all the required ROS dependencies inside. Let’s continue with the other 2 snaps and afterwards we will show how to enable content sharing.
Teleoperation
The full Teleoperation snapcraft.yaml can be found here https://github.com/canonical/turtlebot3c-snap/tree/feature/multi-snap/turtlebot3c-teleop-snap/snap.
Apply the snap rename and adapt the summary and the description:
name: turtlebot3c-teleop
summary: Turtlebot3c teleop snap
description: |
  This snap automatically contains a teleoperation app along with selectors for controlling the Turtlebot3 with the keyboard or a joystick.
Adapt the source-subdir:
source-subdir: turtlebot3c_teleop
We can now remove all the navigation and mapping sections, as well as the core which is now in the bringup snap.
This leaves us with the teleop, key and joy sections.
The final result looks like this:
apps:
  core:
    daemon: simple
    environment:
      ROS_HOME: $SNAP_USER_DATA/ros
      # LD_LIBRARY_PATH: "$LD_LIBRARY_PATH:$SNAP/usr/lib/$SNAPCRAFT_ARCH_TRIPLET/blas:$SNAP/usr/lib/$SNAPCRAFT_ARCH_TRIPLET/lapack"
    command-chain: [usr/bin/ros_network.sh]
    command: roslaunch turtlebot3c_teleop turtlebot3c_teleop.launch
    plugs: [network, network-bind]
    extensions: [ros1-noetic]

  key:
    environment:
      ROS_HOME: $SNAP_USER_DATA/ros
    command-chain: [usr/bin/ros_network.sh, usr/bin/mux_select_key_vel.sh]
    command: roslaunch turtlebot3c_teleop key.launch
    plugs: [network, network-bind]
    extensions: [ros1-noetic]

  joy:
    environment:
      ROS_HOME: $SNAP_USER_DATA/ros
    command-chain: [usr/bin/ros_network.sh, usr/bin/mux_select_joy_vel.sh]
    command: roslaunch turtlebot3c_teleop joy.launch
    plugs: [network, network-bind, joystick]
    extensions: [ros1-noetic]
Mapping and Navigation
Our third snap will contain the mapping and navigation bits. The steps are the same as before.
The final result is here https://github.com/canonical/turtlebot3c-snap/tree/feature/multi-snap/turtlebot3c-nav-snap/snap.
First change the name and the description:
name: turtlebot3c-nav
version: '0.1'
license: GPL-3.0
summary: Turtlebot3c mapping and navigation snap
description: |
  This snap provides apps to create a map and if a map is available run localization/planning so that the  Turtlebot3 can navigate in the map.
Adapt the source-subdir:
source-subdir: turtlebot3c_2dnav
Remove the unrelated apps and keep only the mapping and navigation apps:
apps:
  mapping:
    environment:
      ROS_HOME: $SNAP_USER_DATA/ros
    command-chain: [usr/bin/ros_network.sh, usr/bin/mux_select_key_vel.sh]
    command: usr/bin/mapping_launcher.sh
    daemon: simple
    install-mode: disable
    stop-command: usr/bin/save_map.sh
    post-stop-command: usr/bin/install_last_map.sh
    plugs: [network, network-bind]
    extensions: [ros1-noetic]

  navigation:
    environment:
      ROS_HOME: $SNAP_USER_DATA/ros
      # map server need pulseaudio
      # Defining this var here overwrite the extension definition,
      # thus we need to respecify the extension paths
      LD_LIBRARY_PATH: "$SNAP/usr/lib/$SNAPCRAFT_ARCH_TRIPLET/pulseaudio:$LD_LIBRARY_PATH"
    command-chain: [usr/bin/ros_network.sh, usr/bin/mux_select_nav_vel.sh]
    command: usr/bin/navigation_launcher.sh
    daemon: simple
    install-mode: disable
    plugs: [network, network-bind]
    extensions: [ros1-noetic]
Using content sharing
Up to this point in the tutorial, the snaps we have created are self-sufficient and are not using the ROS foundational snap.
The snaps are working and could be already used in a robot, but in order to gain the advantages of the content sharing we need to change the extensions from ros1-noetic to the ros1-noetic-robot. It’s a single line of change, but it enables a different extension that will make sure all the ROS packages contained in the ros-noetic-robot metapackage are connected from the foundational snap into your newly created multiple snaps.
-   extensions: [ros1-noetic]
+   extensions: [ros1-noetic-robot]
The Ubuntu Robotics Community maintains multiple ROS foundational variants based on REP-2001 such as ros-core, ros-base, desktop for multiple ROS distro (e.g. Noetic, Foxy, Humble).
For more details and all the possible extensions you can use as foundational please check the documentation and search for extensions with a name including “Content Sharing” (e.g. “ROS2 Humble Content Sharing”).
After changing the extension to make use of content sharing, we can re-create the snaps using snapcraft and install them. Once done, let us verify that the content sharing interface is connected. With the turtlebot3c-bringup snap as an example run,
$ snap connections turtlebot3c-bringup
Interface            Plug                              Slot                         Notes
content[ros-noetic]  turtlebot3c-bringup:ros-noetic    ros-noetic-robot:ros-noetic  -
network              turtlebot3c-bringup:network       :network                     -
network-bind         turtlebot3c-bringup:network-bind  :network-bind                -
raw-usb              turtlebot3c-bringup:raw-usb       -                            -
As we can see, the interface content[ros-noetic] is automatically connected. Our snap plug (turtlebot3c-bringup:ros-noetic) is connected to the slot (ros-noetic-robot:ros-noetic) of the ros-noetic-robot snap which provides the ROS Noetic stack.
Your ROS snap with and without content sharing
It’s worth looking more in detail at what happens when the content sharing method is used by the ros1-noetic-robot extension.
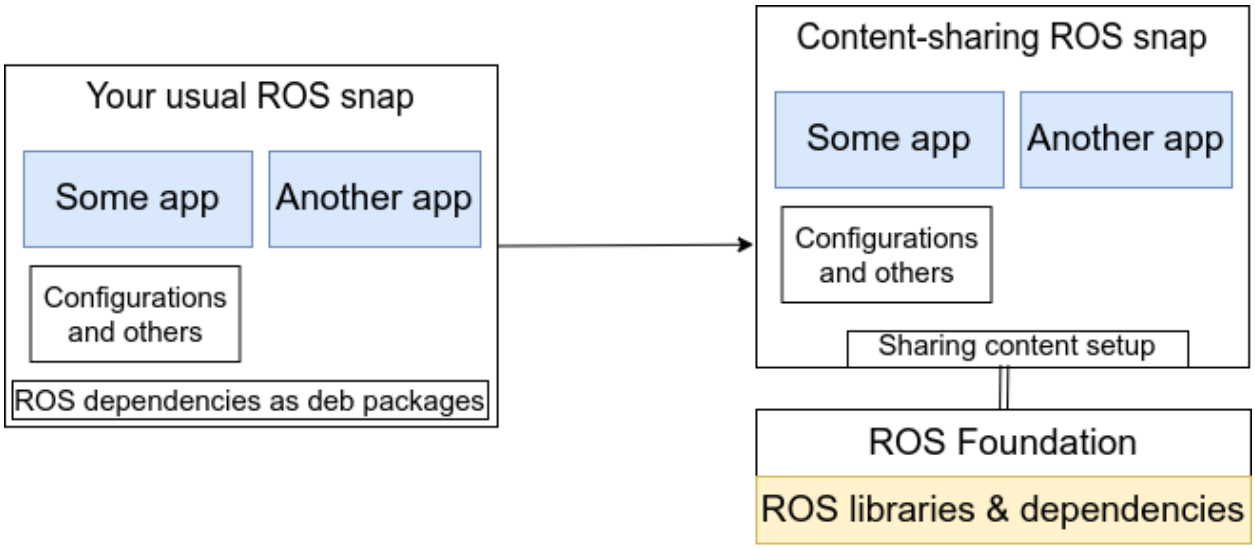
Remember that when using the ros1-noetic extension, all the dependencies of your ROS packages are read from the package.xml files and installed using apt. They will be shipped with your snap as usual.
When you switch to the new foundational snaps, such as ros1-noetic-robot, most of the basic ROS packages are already installed, so when reading the package.xml files the snapcraft process skips those and only installs the missing ones inside the snap.
When the snap is installed and started in your robot it will connect to the content from the foundational snap and get all the ROS packages in there, as if they were shipped with your own snap.
There are some very important advantages to this approach:
- The foundational snap is rarely updated, this reduces the bandwidth during OTA updates.
- Your snaps all fetch content from the same foundational snap, meaning there are no longer copies of the same packages across multiple snaps. This reduces disk usage and ensures the same versions are being used across snaps.
See below for a size comparison of the snaps before and after the use of content sharing that we described in this guide.
| Without using foundational snap | Using foundational snap | ||
|---|---|---|---|
| Name | Size (Mb) | Size (Mb) | |
| turtlebot3c-bringup | 205 | 5 | |
| turtlebot3c-nav | 296 | 61 | |
| turtlebot3c-teleop | 133 | 2 | |
| ros-noetic-robot | 161 | ||
| 634 | 229 | total |
For a deployment of the full navigation stack, a bringup and a teleop we have a size reduction of 64%.
Conclusion
We have reached the end of this developer guide that explores the use of content sharing for ROS snaps.
What have we achieved
What we achieved in the developer guide is no small feat. Starting from the example detailed in part 2 of the developer guide series, we have built a multi-snap schema to deploy the TurtleBot3 software stack. In doing so, we have practised how to split a stack into several independent, yet integrated, functionalities. This enables a clear separation of concerns and turns several of our snaps into robot agnostic functionalities that can be deployed on different platforms.
We have also learnt about the snap content sharing feature and experienced how this feature can be seamlessly employed for ROS snaps.
What’s next?
This guide is part of a larger series covering different aspects of the snap ecosystem. While you should have gone through part 2 to end up here, you may have skipped part 3 which covers the Snap Store.
The next developer guide will cover Ubuntu Core, a secure, application-centric OS for embedded devices. We will explore how we can use Ubuntu Core to create production images with our application snaps to simplify the deployment of robots to market. It will also cover various aspects of the security, operation and management of snaps.
You can also visit the robotics documentation to find out more about snaps and the other services offered by Canonical, such as ROS ESM. If you have any questions or need help, you can visit and post your question on the snapcraft forum.