Packaging complex robotics software with snaps
The first step for deploying a robotics application is to package it. Snaps are specifically designed to confine embedded Linux applications, making it easier to install and manage software versions. They offer useful features for deployment, such as over-the-air (OTA) updates, delta updates, automatic rollback, security policies, and more. While bundling all software dependencies, snaps provide a comprehensive deployment infrastructure for robotics software.
While snaps adapt to the way ROS developers work, they bring new concepts and tools that we need to understand first.
How to use this developer guide
In part 1 of our developer guide series, we introduced the main concepts and learned what snaps can do for ROS applications. We also explored the most important features of snapcraft.
In this developer guide, we will explore advanced snap topics and tools that will show you how to structure, package, and test complex robotics applications.
This guide is meant for ROS snap beginners and advanced users looking for guidelines.
This is not a quick guide nor a ROS tutorial. A new developer will take approximately one full day to cover the entire guide.
While this developer guide is meant to be read completely, a second-time reader or an experienced snapcraft developer might come back to a specific section. Some sections can be used independently to learn how to solve a specific problem.
Here are sections you can jump directly into:
- Snapping a robot, where to start?
- Know the basics of snap but wonder how it would apply to a complete robotics stack.
- How to define the architecture of a robot snap.
- Snapping
- Snap a complete robot software stack.
- Manage all the ROS workspace dependencies.
- Application scripts
- The snap filesystem and data on the host.
- Snap background application (daemon).
- Orchestration between apps.
- Use a Bash script to start an application.
- Sharing data between applications.
- Hooks
- Make a snap configurable and expose ROS parameters at the snap level.
- Trigger a script when a special action happens (install, update, remove).
- Applications debug
- Debug the building of a snap.
- Inspect the state of an installed snap.
- Debug an installed snap.
- Debug confinement violation issue.
What we will learn
Deploying robotics software is usually tackled when a project reaches certain maturity. We need a fast and reliable way to distribute software and subsequent updates. Additionally, we need the deployed software to be fully isolated in its sandbox, thus minimising security risks.
Addressing those points and more, snaps represent an ideal solution to deploy ROS applications to devices and users.
Snapping a simple talker-listener in Part 1 was good enough to see the potential of snaps. However, when packaging a more complex application, one might wonder:
- Should we build one snap for our entire robot?
- Should we have one part per ROS package?
- What should a final robot snap look like?
Snap and snapcraft contain tons of features that will come in handy when defining our robot application. This guide will help you understand these features and how to use them.
In this second part, we will learn:
- How to create a snap for a robot software stack.
- How to take the decisions that a ROS snap developer has to take to design a snap.
- We will introduce new features and concepts associated with snaps that will be useful in a robot application.
- The different means to debug a snap package and its snapped applications.
While covering the theoretical aspects of ROS snaps, we will apply all this knowledge to TurtleBot3 for a more interesting real-world scenario.
Requirements
You will need basic ROS knowledge. Ideally, you will already understand how to build packages, call a service, and know what a launch file is. You should also be familiar with the process of creating a map and using it to navigate.
A basic understanding of the Linux environment (Ubuntu) is also required.
Finally, we expect the reader to have a working knowledge of snaps. This means either previous experience with snap and snapcraft, or having followed the Deployment Guide - PART 1.
Setup
Since this developer guide builds a snap for a robot, we will need:
- TurtleBot3 Gazebo classic simulation running under ROS Noetic.
- Depending on our current OS, we can choose between the following Native setup and the Multipass setup.
Native setup
The Native setup will need Ubuntu 20.04. This is because we will need the TurtleBot3 simulation to run. We don’t intend to embed the simulation into our snap.
With the running Ubuntu 20.04, follow the next step to install all the dependencies:
- Install ROS Noetic desktop-full following the official documentation
- Install the TurtleBot3 simulation with the following command:
sudo apt install -y ros-noetic-turtlebot3-gazebo
- Make sure snapd and snapcraft are installed
- Jump to the section Setup Check
Alternative to native setup: Multipass
If a native setup is not possible, we will use a Virtual Machine. In this case, we are going to use Multipass to quickly generate an Ubuntu VM.
Install Multipass
On Ubuntu, the installation of Multipass is straightforward:
sudo snap install multipass
We can also install it on Windows and macOS by following the documentation.
Launch the VM
To launch the VM, we are going to use a cloud-init configuration stored in GitHub. In essence, we will launch the VM, and install ROS Noetic along with the TurtleBot3 simulation automatically. Note that this might take some time depending on our configuration (~15 mins).
multipass launch --cpus 2 --disk 20G --memory 4G --cloud-init https://raw.githubusercontent.com/canonical/ros_snap_workshop_part2_multipass/main/cloud-init.yaml 20.04 --name workshop-part2 --timeout 10000
The VM must now be up and running. We can verify that with:
$ multipass list

Name           State   IPv4       Image

workshop-part2 Running 10.26.1.87 Ubuntu 20.04 LTS
Attach to the VM
Multipass offers a way to attach a shell to the VM with:
multipass shell workshop-part2
Unfortunately, with this solution, we cannot forward X11 (for graphic applications).
We can connect with ssh into the VM with X11 forwarding with the command:
ssh -X ubuntu@$(multipass list --format csv | awk -F, '$1=="workshop-part2"{print $3}')
The password for the Ubuntu user is simply: Ubuntu.
Disclaimer: Using a VM with a pre-saved password is not a good practice in general. Here we only do so to make it simple to follow the developer guide. If you wish to use a VM for anything else please change the password.
In the case of a VM setup, all the commands and instructions from this guide must be executed in the VM.
Setup check
We can make sure that everything is properly installed by launching:
TURTLEBOT3_MODEL=waffle_pi roslaunch turtlebot3_gazebo turtlebot3_world.launch
We should then see the TurtleBot3 simulated in the turtlebot3_world environment:

We can now ctrl-c the Gazebo launch file.
We can also:
snapcraft --version
And it should display a version equal to or above 7.2.9.
We are now all set up for this developer guide.
Identification of robot components
While we can find many examples to snap various applications, robots might sound more complicated. A robot is usually composed of multiple applications, background services, and applications to call.
Snaps are designed to deploy applications. Thus, we must think of our robot software as an application and not as a set of launch files to call in 5 different terminals.
To start snapping our stack we first need to identify the various functionalities and applications of our robot application.
We are going to apply the methodology to the TurtleBot3. This way, we will have a clear example of the functionalities and snap entries for a robot, as well as the process to identify these entries.
For this guide, we will focus on the monolithic snap approach since it is the simplest for a first robot snap. All the possible architectures for ROS snap applications are described in the documentation.
Functionalities of our robot snap
Before defining our applications, we must define the final functionalities that the snap should bring to our robot. We want the user to do three things:
- Teleoperate the robot with a keyboard or a joystick.
- Create a map of our environment.
- Navigate into our mapped environment.
These are the three functionalities that we want our users to be able to perform with our robot.
Additionally, we don’t want our snap to be compatible only with our physical TurtleBot3. We also want our snap to be compatible with the simulation.
Note that we won’t need the snap to run the simulation itself, since the simulation is a substitute for the real robot. The snap should simply interface with the simulation.
Defining the TurtleBot3 applications
Now that we have defined the functionalities of the robot, let’s have a look at the applications we need to cover them.
We want most of it to be ready as quickly as possible on the robot. Hence, the common set of nodes for these functionalities must be always up and running. We will call it the core application.
The diagram below summarises all these different applications inside our TurtleBot3c (C for Canonical) snap and how they will be used by the final user. The TurtleBot3C snap contains all the system and ROS dependencies for our applications. We have core and teleop which are daemons started automatically at boot since they are always necessary. Joy and key apps are applications that can be called from the terminal by a user to be able to control the robot manually. Finally, mapping and navigation are background applications that can be enabled or disabled. Once enabled they will act exactly like core and simply automatically start at boot. All these applications are communicating with each other with ROS.
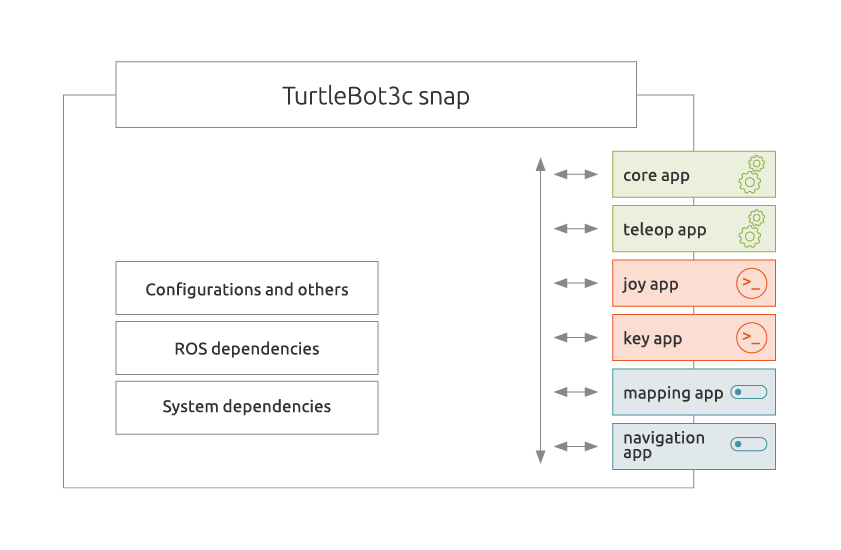
Let’s break down what each of these applications will do and the requirements they have.
Core
Core is going to be our common set of nodes always running in the background. In the case of the TurtleBot3, we are talking about all the nodes to interface with the hardware (mobile base, LIDAR, camera) as well as the robot_state_publisher to have the model of the robot available. This core snap application must be running in the background.
Teleoperation applications
TurtleBot3 should have the functionality to be teleoperated with a joystick or a keyboard. We want to be able to do that from a controller connected to the robot. We also want another computer on the network to be able to control our robot.
To be able to manage so many different ways of teleoperating the robot, we will need an application to be able to route all this traffic. Similarly to the core app enabling the common part of all functionalities, the teleop app will be starting the common part necessary for all teleoperation scenarios.
On the contrary, we don’t want the joystick or keyboard specific apps to be running all the time.
We will then need three different snap applications:
- The first one called
teleopsimply runs the teleoperation basics in the background. This way, a controller application running on the robot or remotely can always control the robot. - The second application will be called
joyand will be a command to call whenever we want to control the robot with a joystick. Meaning that every node and configuration specific to the joystick control should be launched in the application. - The third application,
key, will be similar to thejoyapplication, but for the keyboard control.
You can see all of them in the diagram above. This is an example of how we can split our applications. Depending on the use case one might decide for a different split.
With these three different snap applications, we will be able to have all the teleoperation functionality that we wanted.
Mapping
We will use TurtleBot3 to create a map of its environment. Thus, we want a mapping application that we can call to start mapping our environment. We also want this application to automatically save the map when we stop the application. This way there will be no need to manipulate any file or to call a service of any kind.
Remember that the idea is to think of creating an application for deployment. The final user of our snap will understand what creating a map of the environment means. On the contrary, our end-user might not know ROS and thus how to save a map the ROS way (calling a rosservice from the map_server).
Since the core & teleop daemons will be running, launching joy or key along with mapping will be all we need to start creating a map of any environment.
Navigation
After mapping, we navigate in our freshly mapped environment.
Hence, we will need another application called navigation. This application will be launching everything we need for the navigation (localization + navigation). This application should make sure to load the last map that we created (with the mapping application). While the mapping is done on rare occasions, the navigation will be rather standard.
Thus, our navigation should be running as a daemon in the background. With the specificity that it should be shipped as disabled (we can enable it) since we won’t have a map created on the very first install.
TurtleBot3 ROS workspace presentation
We have now seen the different applications that TurtleBot3 snap will have to make its applications easy and error-proof to use.
In the section below we covered the methodology used to define our snap application. We must think in terms of functionalities once deployed. The usage of a deployed application can differ from the usage that a developer would have of the same ROS workspace.
It’s now time to look at what’s inside the TurtleBot3 repositories. This way we will identify how to expand a traditional ROS workspace into an application-oriented workspace.
In this developer guide, we are going to work with three repositories: TurtleBot3, TurtleBot3 messages, and TurtleBot3c.
TurtleBot3
This is the official repository from Robotis, which contains most of the TurtleBot3 packages. The main packages for this demo are:
- Turtlebot3_bringup: Contains robot launch files for different configurations.
- Turtlebot3_description: Contains URDF files as well as meshes.
- Turtlebot3_navigation: Contains launch files and parameters for navigation algorithm and ROS packages (AMCL, move_base).
- Turtlebot3_slam: Contains launch files and configurations for the different SLAM algorithm (gmapping, hector slam, etc.).
- Turtlebot3_teleop: Containing the node to control TurtleBot3 with a keyboard.
All these ROS packages contain package.xml, effectively listing all the build time and run-time dependencies. Recall that these packages.xml files are used by snapcraft plugins to automatically pull dependencies. If we were to use a different robot stack we should make sure that similarly, the package.xml is properly listing the dependencies.
Since we are running ROS Noetic for this guide, we will be using the noetic-devel branch along with the corresponding Ubuntu 20.04.
TurtleBot3 messages
Additionally, the turtlebot3_msgs repository is another official repository from Robotis and contains the TurtleBot3 messages definition. The messages (Version, Sound, and SensorState) are specific to the TurtleBot3 application.
TurtleBot3c
TurtleBot3c is a collection of configurations/launch files maintained by the robotics team at Canonical created for this developer guide. The purpose of this repository is to easily expose applications-oriented launchfiles.
It is composed of four different packages:
- Turtlebot3c: The meta-package of this repository.
- Turtlebot3c_2dnav: Contains one mapping launch file, and one navigation launch file.
- Turtlebot3c_bringup: Contains a general bring-up launch file capable of launching the basic nodes to interface with the real TurtleBot3 or its Gazebo classic simulation.
- Turtlebot3c_teleop: Contains launch files as well as configuration for joystick and keyboard teleoperation.
While the first three packages are rather straightforward, the turtlebot3c_teleop package adds logic that is not present in the original TurtleBot3 repository. We indeed use a topic multiplexer called topic_tools/mux responsible for rooting the desired robot control topic to the /cmd_vel topic (see figure below). This way our TurtleBot3 could be controlled by a joystick, a keyboard, or even the navigation depending on what we desire without interfering with each other.
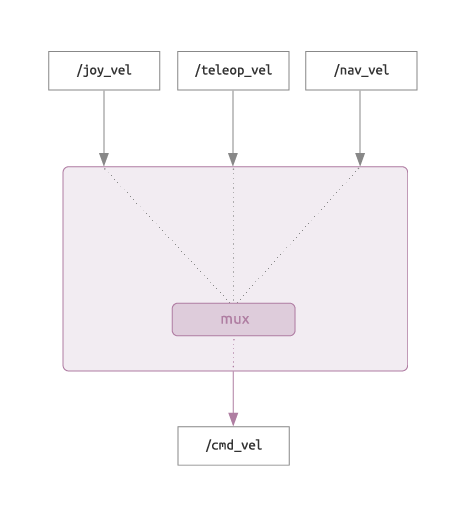
Selecting the topic which is going to be redirected, can be done with the following command:
rosservice call /mux/select "topic: 'key_vel'"
Snapping our software
In the previous section, we have defined the applications that our snap must expose. We have also seen the different repositories from TurtleBot3 that we will need to implement those applications. This is the first step to writing our snapcraft.yaml file.
The following section is going to cover how to snap applications, step by step. The final version of the snap workspace is available on GitHub. We can refer to it at any time in case we have questions regarding the content of a file.
Completing our snapcraft.yaml
Let’s create a directory for our project:
mkdir -p turtlebot3c_snap/

cd turtlebot3c_snap
And let’s initialise our snap project:
snapcraft init
This will create a snap/snapcraft.yaml file.
In this file, we first need to complete the metadata along with strict confinement and core20.
name: turtlebot3c
base: core20
version: '1'
summary: Turtlebot3c core snap
description: |
  This snap automatically spawns a roscore and the core components for the
  Turtlebot3.
confinement: strict
Everything here is self-explanatory. We start directly from strict confinement since we already know that network and network bind are the necessary plugs for ROS.
Build the workspace
As mentioned in the previous section, we will use three different repositories. turtlebot3 and turtlebot3c but also turtlebot3_msgs since TurtleBot3 messages are hosted on a different repository.
Here we will define one snapcraft part for our ROS workspace. For this snapcraft part, we will use the catkin plugin. As seen in the previous part of this guide, the catkin plugin comes in handy with the ros-noetic snapcraft extensions.
The source is used to retrieve the source tree to build. Here we have three different GitHub repositories (turtlebot3, turtlebot3c and turtlebot3_msgs). We cannot put all three in the source entry. We will use Vcstool to pull all the repositories that we need based on a rosinstall file.
A detailed explanation of this process can be found in the Vcstool and rosinstall file documentation.
Writing our turtlebot3 part
The very first thing that we need is a .rosinstall file. We will populate this file with our three repositories:
turtlebot3c.rosinstall:
- git: {local-name: turtlebot3, uri: 'https://github.com/ROBOTIS-GIT/turtlebot3.git', version: noetic-devel}
- git: {local-name: turtlebot3_msgs, uri: 'https://github.com/ROBOTIS-GIT/turtlebot3_msgs.git', version: noetic-devel}
- git: {local-name: turtlebot3c, uri: 'https://github.com/ubuntu-robotics/turtlebot3c.git', version: noetic-devel}
We will place this file at the root of our turtlebot3c_snap directory. Right next to the snap/ folder.
Now we must write the snapcraft part to lever this file with the vcs tool. We will need python3-vcstool at build time to use our rosinstall file.
Our part to build ROS workspace is going to be:
parts:
  workspace:
    plugin: catkin
    source: . # import our rosinstall file
    build-packages: [python3-vcstool, git]
    stage-packages:
      - ros-noetic-rosbash # necessary if we need rosrun
      - ros-noetic-roslaunch # necessary if we need roslaunch
    override-pull: |
      snapcraftctl pull
      # Here we are going to use the local .rosinstall file
      vcs import --input turtlebot3c.rosinstall
Here, the catkin plugin is going to use the package.xml present in the different source packages to manage the ROS dependencies. It will also build and install our packages.
Before running any kind of build, let’s declare our applications.
Building the core app
Above, we defined that we needed a core daemon responsible to launch the motor controller, advertising the sensors, uploading the robot model to the rosparam server and publishing the robot tf tree.
In the TurtleBot3c ROS world this corresponds to the launch file turtlebot3c_bringup.launch inside the turtlebot3_bringup package (installed by the part we just added). This application must be running in the background, we will thus declare it as a daemon. Remember that since it’s a ROS application we will need a ROS environment. So we will use the ros-noetic snapcraft extensions.
In our case, we will define a core application that will work with the TurtleBot3 waffle_pi model. In the launch file this is done by defining an environment variable.
The robot is managing all its hardware interfaces through USB. By default, our snap won’t have access to it. We then have to declare the usb-raw plug.
Let’s add this app to our snapcraft.yaml:
apps:
  core:
    daemon: simple
    environment:
      TURTLEBOT3_MODEL: waffle_pi
    command: opt/ros/noetic/bin/roslaunch turtlebot3c_bringup turtlebot3c_bringup.launch
    plugs: [network, network-bind, raw-usb]
    extensions: [ros1-noetic]
We have introduced a new entry to our app called environment. This way we can define environment variables that are specific to our application. We can find all the apps and services metadata in the documentation.
Building the teleop app
Along with core, the teleop should be declared as a daemon too since we want it to be running in the background. The teleop app will be running our teleoperation multiplexer. This corresponds to the launch file turtlebot3c_teleop.launch in the turtlebot3c_teleop package.
We can declare this application by adding the following to our snapcraft.yaml:
apps:
  [...]
  teleop:
    daemon: simple
    command: opt/ros/noetic/bin/roslaunch turtlebot3c_teleop turtlebot3c_teleop.launch
    plugs: [network, network-bind]
    extensions: [ros1-noetic]
This application is highly similar to the core app. Nothing to declare.
Building the key app
Using the above teleop application and adding a key application would let us effectively teleoperate the TurtleBot3. Here the key application will be a command to call.
This app must publish a /key_vel topic based on the keyboard input. This corresponds to the key.launch from the turtlebot3c_teleop package. Snaps are by default accessing the keyboard, so we won’t need any special plugs here.
We then add the following to our snapcraft.yaml:
apps:
  [...]
  key:
    command: opt/ros/noetic/bin/roslaunch turtlebot3c_teleop key.launch
    plugs: [network, network-bind]
    extensions: [ros1-noetic]
Again this is very straightforward with what we have already done.
With this new application, our snap will now make a command available called turtlebot3c.key.
Building the joy app
Very similar in terms of usage to key, but we will use a different launch file for the joystick. It’s joy.launch from the turtlebot3c_teleop package. The major differences are that this is going to be published on the /joy_vel topic and that our application will need access to the joystick. We must use the joystick interface, so our confined application will be able to access the joystick device from our host.
We then add the following to our snapcraft.yaml:
apps:
  [...]
  joy:
    command: opt/ros/noetic/bin/roslaunch turtlebot3c_teleop joy.launch
    plugs: [network, network-bind, joystick]
    extensions: [ros1-noetic]
With this new application, our snap will now make a command available called turtlebot3c.joy.
Now we have all the applications necessary for teleoperation whether we want to use a keyboard or a joystick.
Building the mapping app
For the mapping, we will need a command that we can call whenever we want to start doing a mapping. This command mapping is going to rely on the turtlebot3c_mapping.launch file from the turtlebot3c_2dnav repository. This is also straightforward.
We add the following to our snapcraft.yaml:
apps:
  [...]
  mapping:
    environment:
      TURTLEBOT3_MODEL: waffle_pi
    command: opt/ros/noetic/bin/roslaunch turtlebot3c_2dnav turtlebot3c_mapping.launch
    plugs: [network, network-bind]
    extensions: [ros1-noetic]
With this new application, our snap will now make a command available called turtlebot3c.mapping.
Note that the turtlebot3c_mapping.launch accepts ROS arguments to select a different SLAM algorithm. This is nicely compatible with our snap application, and we could imagine calling our application with the argument:
turtlebot3c.mapping slam_methods:=hector
Building the navigation app
Finally, our last application, navigation. Navigation will also be a daemon running in the background but with one specificity. It’s not going to be enabled at first. The reason is that when we first install our snap, we won’t have created any map. This way we can create our first map and then activate our navigation daemon. Daemons can be installed in a disabled state thanks to the additional app entry: install-mode: disable. Once enabled it will remain enabled even after an update.
The whole navigation stack relies on turtlebot3c_navigation.launch from the package turtlebot3c_2dnav. It will launch the localization as well as the navigation.
Let’s add the following to our snapcraft.yaml:
apps:
  [...]
  navigation:
    environment:
      TURTLEBOT3_MODEL: waffle_pi
    daemon: simple
    install-mode: disable
    command: opt/ros/noetic/bin/roslaunch turtlebot3c_2dnav turtlebot3c_mapping.launch
    plugs: [network, network-bind]
    extensions: [ros1-noetic]
Once our snap is installed, we will be able to enable this daemon with the command:
sudo snap start --enable turtlebot3c.navigation
Application scripts
So far we have defined our part as well as our different applications in our snap. Nothing there was new. It was simply an application of the basic ROS/snap knowledge to the TurtleBot3 case.
Let’s say that we want our snap navigation daemon to always use the latest recorded map. Or that we want the mapping to automatically save the map without having to manually call a ROS service to save the map.
For these, we can use additional features of snap and snapcraft. These features will make our applications much more integrated and easier for the final user. The features that we will describing below are:
- Environment variables.
- Local file parts.
- Launcher scripts.
- Daemon scripts.
Snap environment variables
Environment variables are widely used across Linux to provide convenient access to system and application properties. Both snapcraft and snapd consume, set, and pass-through specific environment variables to support building and running snaps.
There are snap environment variables, like $SNAP and $SNAP_INSTANCE_NAME used to identify the snap and its location. The Snap environment variables documentation is a great place to learn about these.
Additionally, snaps define environment variables specific to data and file storage. The Snap data and file storage documentation is a great place to learn about these.
Local files part
In order to create additional behaviour for a snap, we need to add scripts. These scripts could be for example responsible for calling the ROS node in charge of saving the map.
To import all these local files into our snap we will need an additional snapcraft part. They are used to declare pieces of code that will be pulled into your snap package.
So far we only have one part called workspace using our rosinstall file to build and install our ROS repository. This part is relying on the catkin plugin.
In order to simply import scripts into our snap we will need a different plugin, the dump plugin.
As its name suggests, the dump plugin is simply used to “dump” the specified sources in a specified location into our snap. Usually, the dumped files are scripts, configuration files, binaries etc.
Adding scripts to our snap’s part
In our case we will simply need to dump all the files that we are going to store in snap/local into the usr/bin of our snap.
We will then need to add the following part to the snapcraft.yaml:
parts:
  workspace:
    [...]
+ # copy local scripts to the snap usr/bin
+ local-files:
+   plugin: dump
+   source: snap/local/
+   organize:
+     '*.sh': usr/bin/
The organize keyword is a key/value pair, the key represents the path of a file inside the selected source of the part and the value represents the file’s destination in the stage area.
Launcher scripts
Now we have a part to import local files, but we don’t have the local files yet.
So far for our snapcraft apps, in the command entry, we have been writing the full name of the commands. For example, for our core application, we wrote:
command: /opt/ros/noetic/bin/roslaunch turtlebot3c_bringup turtlebot3c_bringup.launch
Our turtlebot3c_bringup.launch is actually taking a simulation argument. It can be set to false or true, to specify whether we want to run the bring-up for the simulation or not. Since the core application is a daemon, we cannot append anything to the specified command at launch. This means that we must give it directly in the command.
By trying we will quickly realise that we are facing an issue. The character “=” is forbidden in the snapcraft.yaml. To specify an argument to a ROS launch file we must use the syntax arg_name:=arg_value. For this reason (and actually many others that we will discuss later on) our snapcraft command entry is going to call a script containing a call to our command.
This way, we will not only be able to specify ROS arguments, but we will also be able to potentially perform some simple checks or any kind of behaviour that would not be that easy on a one-liner. For example, verifying that a file exists before calling a command.
Adding scripts’ launcher
For our TurtleBot3 snap, we will add a launcher script for core, mapping and navigation.
Let’s add these scripts into our snap/local folder.
First, we create the folder:
mkdir -p snap/local
Then we add the file:
snap/local/core_launcher.sh:
#!/usr/bin/bash

${SNAP}/opt/ros/noetic/bin/roslaunch turtlebot3c_bringup turtlebot3c_bringup.launch simulation:=true
Here we are using the $SNAP variable that we saw earlier. This way we are sure of the binary that we are calling. Also, we are assigning the simulation argument to true. We will see in the next section how to make it configurable.
Similarly, the next two scripts:
snap/local/mapping_launcher.sh:
#!/usr/bin/bash

${SNAP}/opt/ros/noetic/bin/roslaunch turtlebot3c_2dnav turtlebot3c_mapping.launch
snap/local/navigation_launcher.sh:
#!/usr/bin/bash

${SNAP}/opt/ros/noetic/bin/roslaunch turtlebot3c_2dnav turtlebot3c_navigation.launch
Since these three scripts are going to be executed. Let’s turn them into executables:
chmod +x snap/local/*.sh
Using scripts
Now, let’s use these scripts in our snapcraft.yaml instead of the “raw” commands.
Remember that with the new part we added: “local-files”, our scripts are going to be staged into usr/bin.
apps:
  core:
    [...]
-   command: opt/ros/noetic/bin/roslaunch turtlebot3c_bringup turtlebot3c_bringup.launch
+   command: usr/bin/core_launcher.sh
    [...]
  mapping:
    [...]
-   command: opt/ros/noetic/bin/roslaunch turtlebot3c_2dnav turtlebot3c_mapping.launch
+   command: usr/bin/mapping_launcher.sh
    [...]
  navigation:
    [...]
-   command: opt/ros/noetic/bin/roslaunch turtlebot3c_2dnav turtlebot3c_mapping.launch
+   command: usr/bin/navigation_launcher.sh
Our snapcraft.yaml is now using scripts for the commands. They are the first scripts of our snaps since many are coming. For now, we might think that those scripts are a complexity we could avoid. But in the next sections, we will see that we will greatly need them.
Daemon scripts
In TurtleBot3 we already have a few daemons. These snap services can use multiple new features that will come in handy for our application.
Snap and snapcraft offer great features to orchestrate daemon applications. The Application orchestration documentation is a great place to learn more about orchestration.
The orchestration features that we are going to use for the TurtleBot3 are:
- Command-chain
- We will use it to select the right multiplexer topic for controlling the robot.
- Stop-command
- We will use it for our
mappingapplication. This way we will trigger the save of the map whenever we exit the mapping. No more maps lost that took forever to create!
- We will use it for our
- Post-stop-command
- We will use it to “install” the map for our
navigationapplication. This way thenavigationwill always use the last created map.
- We will use it to “install” the map for our
Applying daemon scripts to TurtleBot3
We have already made our applications run in the background, it’s now time to automate and simplify our user experience.
Here we want to make the map creation and use as simple as it can be. We don’t want the user to have to call ROS nodes manually or even manipulate map files by himself.
To achieve this we will:
- Save the map whenever we stop the
mapping. - Use only the last map we created for the
navigationwithout having to specify the new map name. - Verify that a map is available before starting our navigation stack.
- Make the velocity command multiplexer automatically select the correct topic depending on the command we are using.
These are basic functionalities that our applications need to automate and simplify the user experience. Similarly, your application could also require implementing similar features.
Save the map
When the mapping is running, to save the map we will have to call the following ROS node:
rosrun map_server map_saver -f "PATH_AND_NAME_OF_THE_FILE"
Having to run it manually is, first, more work, but also the user must provide the correct path. Let’s make this automatic!
The stop-command will be the perfect feature to call our map server. The only thing is that our mapping is currently a command. To use stop-command we will have to turn it into a daemon.
Let’s modify our snapcraft.yaml:
apps:
  [...]
  mapping:
    environment:
      TURTLEBOT3_MODEL: waffle_pi
    command: usr/bin/mapping_launcher.sh
+   daemon: simple
+   install-mode: disable
+   stop-command: usr/bin/save_map.sh
    plugs: [network, network-bind]
    extensions: [ros1-noetic]
Now our mapping is a daemon (disabled by default, so it doesn’t start by itself on the first install). It will launch a script called save_map.sh that we will create right now.
The script is simply going to run the map saver in the $SNAP_USER_COMMON directory (read/write directory kept over the updates).
Let’s create the file snap/local/save_map.sh:
#!/usr/bin/bash

# make map directory if not existing
mkdir -p ${SNAP_USER_COMMON}/map

$SNAP/opt/ros/noetic/bin/rosrun map_server map_saver -f "${SNAP_USER_COMMON}/map/new_map"
Now our map will be saved automatically whenever we stop our mapping service (with the sudo snap stop mapping command).
The current limitation here is that every map that we create is called new_map. It would be better to keep all the maps created and simply mark one as the current one. This way we could even restore a previous one later.
Install the last map
Here we are going to make sure that we keep every map and also that current_map is always pointing to the last created map. This way our navigation will always load the same symlink file but always point to the latest map.
To do so we will have to create a script installing the last map and execute it as a post-stop-command. Once the stop-command and our service is stopped our map is created, and it’s time to install it.
Let’s modify our snapcraft.yaml to add the post-stop-command:
apps:
  [...]
  mapping:
    [...]
+   stop-command: usr/bin/save_map.sh
    post-stop-command: usr/bin/install_last_map.sh
    plugs: [network, network-bind]
    extensions: [ros1-noetic]
Now let’s create our install_last_map.sh script in snap/local:
#!/usr/bin/bash
set -e
# backup our map with the date and time
DATE=`date +%Y%m%d-%H-%M-%S`
mv ${SNAP_USER_COMMON}/map/new_map.yaml ${SNAP_USER_COMMON}/map/$DATE.yaml
sed -i "s/new_map.pgm/$DATE.pgm/" ${SNAP_USER_COMMON}/map/$DATE.yaml
mv ${SNAP_USER_COMMON}/map/new_map.pgm ${SNAP_USER_COMMON}/map/$DATE.pgm

# create symlink to use the map
rm -f ${SNAP_USER_COMMON}/map/current_map.yaml
ln -s ${SNAP_USER_COMMON}/map/$DATE.yaml ${SNAP_USER_COMMON}/map/current_map.yaml
Here we move the freshly created map files (prefixed with new_map) to new file names based on date.
Finally, we create a UNIX symlink to point to the last map.
This way we keep track of every map created and when it was created. Our navigation service is already loading the file ${SNAP_USER_COMMON}/map/current_map.yaml. So by loading the symlink our navigation is always going to load the last created map.
Navigation launcher adaptation
Here we are simply going to adapt our navigation launcher to verify that our map file exists before launching the navigation launch file.
We already created the navigation_launch.sh script in snap/local:
#!/usr/bin/bash
+if [ -f "${SNAP_USER_COMMON}/map/current_map.yaml" ]; then
   ${SNAP}/opt/ros/noetic/bin/roslaunch turtlebot3c_2dnav turtlebot3c_navigation.launch
+else
+  >&2 echo "File ${SNAP_USER_COMMON}/map/current_map.yaml does not exist." \ "Have you run the mapping application?"
+fi
The script is simply checking if the file ${SNAP_USER_COMMON}/map/current_map.yaml exists and launches the navigation. Otherwise, we simply log an error message.
Velocity multiplexer selection
In the first sections of this guide, we described that a multiplier has been set to forward only one topic (/joy_vel, /key_vel or /nav_vel). Once selected the topic is forwarded to /cmd_vel. To select a topic we must call a ROS service with the command:
rosservice call /mux/select "/joy_vel"
Every time we call the key command (to start the keyboard teleoperation) we will have to call the ROS service to select our /key_vel topic.
Let’s make this automatic every time we start any of the applications that need a specific topic. We are talking about key, joy and navigation.
Let’s add a command-chain in our snapcraft.yaml calling a selection script for all our apps that need it.
apps:
  [...]
  key:
+   command-chain: [usr/bin/mux_select_key_vel.sh]
    command: opt/ros/noetic/bin/roslaunch turtlebot3c_teleop key.launch
  [...]
  joy:
+   command-chain: [usr/bin/mux_select_joy_vel.sh]
    command: opt/ros/noetic/bin/roslaunch turtlebot3c_teleop joy.launch
  [...]
  navigation:
+   command-chain: [usr/bin/mux_select_nav_vel.sh]
    command: usr/bin/navigation_launcher.sh
Now let’s add the different scripts:
snap/local/mux_select_key_vel.sh:
#!/usr/bin/bash
$SNAP/opt/ros/noetic/bin/rosservice call /mux/select "/key_vel"
exec $@
snap/local/mux_select_joy_vel.sh:
#!/usr/bin/bash
$SNAP/opt/ros/noetic/bin/rosservice call /mux/select "/joy_vel"
exec $@
snap/local/mux_select_nav_vel.sh:
#!/usr/bin/bash
$SNAP/opt/ros/noetic/bin/rosservice call /mux/select "/nav_vel"
exec $@
Note that the exec $@ is necessary at the end of our command-chain scripts since our actual command is given as an argument of the command-chain.
Now with the help of our command-chain scripts whenever we start the joy app (or another controlling app) we are ready to control the robot with any additional commands.
Turtlebot3 configurations
In the previous section, we have seen how to add advanced behaviour to our snap by leveraging new snapcraft YAML keywords. Our final TurtleBot3 snap application must cover multiple cases. It should work with all the flavours of TurtleBot3 as well as with the simulation and the real robot.
Adding such behaviour is going to require a new feature from snap: hooks. Hooks are executable files that run within a snap’s confined environment when a certain action occurs. They are typically used for configurations. The documentation on snap configurations and hooks explains this in detail.
Adding TurtleBot3 hooks
Here there are multiple things that we want to achieve:
- Our snap must be working for the simulation but also for the real robot. We will need a
simulationconfiguration. - TurtleBot3s come in different flavours:
burger,waffleandwaffle_pi. We will then also need aturtlebot3-modelconfiguration. - We will have to declare hooks to define our configurations and make sure the new value matches the requirements.
- Additionally, we will integrate those new parameters into our different scripts.
Simulation parameter
For the simulation, the only application that is going to be impacted is the core daemon. Since the snap is not meant to run the simulation itself but simply to interface with it, there is no big challenge here.
For this first parameter, we will have to create the hook scripts first.
Hooks
The very first hook that we are going to define is the install hook. This hook is called upon initial installation only. We are going to use the install hook to declare our parameter default value.
First we create the directory:
mkdir -p snap/hooks
Let’s create a file called install inside the directory snap/hooks and add the following content:
#!/bin/sh -e
# set default configuration values
snapctl set simulation=false
We used snapctl to set the default value to false.
Additionally, we are going to create a file called configure in the snap/hooks directory.
Add the following content to snap/hooks/configure:
#!/bin/sh -e
SIMULATION="$(snapctl get simulation)"
case "$SIMULATION" in
  "true") ;;
  "false") ;;
  "0") ;;
  "1") ;;
  *)
    >&2 echo "'$SIMULATION' is not a supported value for simulation." \ "Possible values are true, false, 0, 1"
    return 1
    ;;
esac

# restart core and teleop on new config
snapctl stop "$SNAP_INSTANCE_NAME.core"
snapctl stop "$SNAP_INSTANCE_NAME.teleop"
snapctl start "$SNAP_INSTANCE_NAME.core"
snapctl start "$SNAP_INSTANCE_NAME.teleop"
Here again we used snapctl. We use it to read the parameter and make sure it contains a valid value (in our case: true, false, 0 or 1). In case the value is wrong we simply return an error.
Additionally, we made sure to restart our core and teleop daemons (meant to be always running). This way when we change a parameter we are sure that it’s taken into consideration immediately.
Since our hooks are scripts we must make sure to make them executable. We can do so with:
chmod +x snap/hooks/*
Use the configuration
Now that our snap is defining our configuration we must use it in our application.
Let’s modify our core_launcher.sh script located in snap/local:
#!/usr/bin/bash
+SIMULATION="$(snapctl get simulation)"
-${SNAP}/opt/ros/noetic/bin/roslaunch turtlebot3c_bringup turtlebot3c_bringup.launch simulation:=true
+${SNAP}/opt/ros/noetic/bin/roslaunch turtlebot3c_bringup turtlebot3c_bringup.launch simulation:=$SIMULATION
This way we read the snap configuration to store it into a variable and finally use it as a ROS argument for our launch file.
This way, when changing the configuration of the snap with the command:
sudo snap set turtlebot3c simulation=true
Our configure script is going to be called, restarting the core daemon. And finally our core_launcher.sh is going to be started with the correct configuration.
Turtlebot3 model
The TurtleBot3 has several hardware configurations. These models are burger, waffle, and waffle_pi. The different models are available for the real robot but also for the simulation. While we will mostly work with the waffle_pi simulation, the others can also be tested easily.
Similarly, we will complete our hooks and the different scripts where we must specify the model.
Hooks
First, let’s define the default value for our configuration turtlebot3-model.
Let’s add our configuration to the snap/hooks/install file:
snapctl set simulation=false

+# set default turtlebot 3 model
+snapctl set turtlebot3-model=waffle_pi
Similarly, we must complete the snap/hooks/configure hook:
+TURTLEBOT3_MODEL="$(snapctl get turtlebot3-model)"
+case "$TURTLEBOT3_MODEL" in
+  "burger") ;;
+  "waffle") ;;
+  "waffle_pi") ;;
+  *)
+    >&2 echo "'$TURTLEBOT3' is not a supported value for turtlebot3-model." \
+"Possible values are burger, waffle and waffle_pi"
+    return 1
+    ;;
+esac

# restart core and teleop on new config
snapctl stop "$SNAP_INSTANCE_NAME.core"
snapctl stop "$SNAP_INSTANCE_NAME.teleop"
Now, our hooks are correctly handling the turtlebot3-model configuration. Nothing new here we have applied what we used for the other configuration.
Use the configuration
Now let’s use the robot model configuration for our applications. So far we have specified the robot model via the environment keyword in our application. This is no longer possible since we now need to use snapctl to read our configuration. The TurtleBot3 model is read by the mean of an environment variable. We will then have to remove the hard-coded environment variable in our snapcraft.yaml and define it in our different launcher scripts.
First, let’s remove the hard-coded one in our snapcraft.yaml:
apps:
  core:
-   environment:
-   TURTLEBOT3_MODEL: waffle_pi
  [...]
  mapping:
-   environment:
+     TURTLEBOT3_MODEL: waffle_pi
  [...]
  navigation:
-   environment:
-     TURTLEBOT3_MODEL: waffle_pi
Now let’s define this TURTLEBOT3_MODEL in the launcher scripts that need it.
The first one is the core daemon. We can modify snap/local/core_launcher.sh this way:
SIMULATION="$(snapctl get simulation)"
+TURTLEBOT3_MODEL="$(snapctl get turtlebot3-model)"

+export TURTLEBOT3_MODEL
We read the parameter and then simply export the environment variable.
Now let’s do the same thing but to the navigation and mapping launcher script: snap/local/mapping_launcher.sh.
+TURTLEBOT3_MODEL="$(snapctl get turtlebot3-model)"
+export TURTLEBOT3_MODEL
${SNAP}/opt/ros/noetic/bin/roslaunch turtlebot3c_2dnav turtlebot3c_mapping.launch
And snap/local/navigation_launcher.sh:
+TURTLEBOT3_MODEL="$(snapctl get turtlebot3-model)"
+export TURTLEBOT3_MODEL
if [ -f "${SNAP_USER_COMMON}/map/current_map.yaml" ]; then
Then we can make sure that all these scripts are executable:
chmod +x snap/local/*
From now on, we can select an alternative TurtleBot3 model with the simple command
sudo snap set turtlebot3c turtlebot3-model=burger
We have finally finished defining all our snap hooks. Additionally, we have implemented every application and functionality we need for our snap. It’s time to build it and test it!
We will run all our tests in simulation, but with a TurtleBot3 robot available we could also test it on the real robot.
Applications debugging
Now that we have explored and used all these new features of snap, our TurtleBot3 snap is feature complete and ready to be tested. We have our different parts and apps defined in our snapcraft.yaml. We also defined hooks to manage our different configurations. Furthermore, we also implemented various scripts to make the user experience seamless when launching an app or managing map creation. We will perform every test with the simulation and the TurtleBot3 waffle_pi model.
By the means of testing our snap we will also discover a way to debug our snap and find out what is going on.
Keep in mind that a snap is not a good place to debug code. This section is really about debugging the packaging of our code and not the code behaviour itself or its compilation.
Debug a snap application
When developing a snap, things can go wrong. In this section, we will explore some common ways to debug a snap.
Since the build of the snap itself can go wrong. Snapcraft offers multiple ways to introspect the instance state and files. The documentation Debug snap build, is a great place to learn about this.
When the build went right and this is the run-time that is causing issues, snap also offers multiple ways to debug it. The documentation Debug a snap application, is a great place to learn about this.
Debug the core application
Testing our TurtleBot3 snap will be the perfect opportunity to apply the different debugging approaches.
Before performing any test we need our actual snap. Although now it should be clear how to build our snap, let’s see how.
First run of our snap
To build our snap, we must be located at the root of our directory next to our snap/ folder.
Then we simply run the command:
snapcraft
This will take some time but after some time we must get the file turtlebot3c_*.snap.
Then we can simply install this snap with the following command:
sudo snap install turtlebot3c_*.snap --dangerous
And that’s it. Our snap is installed and since our core and teleop apps are daemons they must be already running!
Let’s inspect the logs to see what is going on.
sudo snap logs turtlebot3c.core -n 100
And we get the following output:
turtlebot3c.core[88370]: </font>RLException: while processing /snap/turtlebot3c/x1/opt/ros/noetic/share/turtlebot3_bringup/launch/turtlebot3_robot.launch:
turtlebot3c.core[88370]: while processing /snap/turtlebot3c/x1/opt/ros/noetic/share/turtlebot3_bringup/launch/turtlebot3_lidar.launch:
turtlebot3c.core[88370]: Invalid tag: environment variable 'LDS_MODEL' is not set.
turtlebot3c.core[88370]: Arg xml is
turtlebot3c.core[88370]: The traceback for the exception was written to the log file

turtlebot3c.core[88370]: ... logging to /root/snap/turtlebot3c/x1/ros/log/fdf740ce-b920-11ed-a4a0-e5f11893ed73/roslaunch-workshop-part2-88370.log
turtlebot3c.core[88370]: Checking log directory for disk usage. This may take a while.
turtlebot3c.core[88370]: Press Ctrl-C to interrupt
turtlebot3c.core[88370]: Done checking log file disk usage. Usage is <1GB.
Turtlebot3c.core[88370]:
systemd[1]: snap.turtlebot3c.core.service: Main process exited, code=exited, status=1/FAILURE
systemd[1]: snap.turtlebot3c.core.service: Failed with result 'exit-code'.
systemd[1]: snap.turtlebot3c.core.service: Scheduled restart job, restart counter is at 5.
systemd[1]: Stopped Service for snap application turtlebot3c.core.
systemd[1]: snap.turtlebot3c.core.service: Start request repeated too quickly.
systemd[1]: snap.turtlebot3c.core.service: Failed with result 'exit-code'.
systemd[1]: Failed to start Service for snap application turtlebot3c.core.
The environment variable 'LDS_MODEL' is not set. is the guilty part. The LDS model is the model of LIDAR that is used by the TurtleBot3. The TurtleBot3 can work with two different LIDAR models, LDS-01 and LDS-02. The LIDAR model is read directly from an environment variable by the launch file. So we will have to read the snap configuration and simply export it as an environment variable. We will need an lds-model configuration.
We already set two configurations so nothing new here. Let’s add this additional configuration.
LIDAR configuration
We will first add our configuration to our different hooks, and then use the configuration in our core_launcher.sh script.
Hooks
First, let’s define the default value for our configuration lds-model.
Let’s add our configuration to the snap/hooks/install file:
snapctl set simulation=false
+# set default lidar model for real robot
+snapctl set lds-model=LDS-01
Similarly to the simulation configuration we will also complete the snap/hooks/configure:
+LDS_MODEL="$(snapctl get lds-model)"
+case "$LDS_MODEL" in
+  "LDS-01") ;;
+  "LDS-02") ;;
+  *)
+    >&2 echo "'$LDS_MODEL' is not a supported value for lds_model." \ "Possible values are LDS-01 and LDS-02"
+    return 1
+    ;;
+esac
# restart core and teleop on new config
snapctl stop "$SNAP_INSTANCE_NAME.core"
snapctl stop "$SNAP_INSTANCE_NAME.teleop"
Now, our hooks are correctly handling the lds-model configuration. Nothing new here; we applied the same method as for the turtlebot3-model configuration.
Use the configuration
Now let’s use the configuration within our TurtleBot3 snap.
Let’s do so by modifying the file snap/local/core_launcher.sh:
#!/usr/bin/bash
[...]
TURTLEBOT3_MODEL="$(snapctl get turtlebot3-model)"
+LDS_MODEL="$(snapctl get lds-model)"
[...]
+export LDS_MODEL
${SNAP}/opt/ros/noetic/bin/roslaunch turtlebot3c_bringup turtlebot3c_bringup.launch simulation:=$SIMULATION
Now, when the core daemon is going to start it will use the lds-model configuration in the launch file.
Since we already installed our snap, we must set a value manually here:
sudo snap set turtlebot3c lds-model=LDS-02
We can now rebuild the snap and reinstall it.
Once reinstalled we can now set the proper configuration:
sudo snap set turtlebot3c lds-model=LDS-01
Roscore tend to stay alive sometime, so make sure no roscore is running when you have stopped the snap. Roscore zombies create unsupported behaviour.
Teleoperate the Turtlebot3
We just fixed the previous issue regarding the lds-model. It’s now time to see if the core daemon is now running properly.
Let’s check again the logs now that we fixed the LIDAR model issue:
systemd[1]: Started Service for snap application turtlebot3c.core.
turtlebot3c.core[101438]: [ERROR] [1677843362.232445761]: An exception was thrown: open: No such file or directory
turtlebot3c.core[101437]: [ERROR] [1677843362.654190]: Error opening serial: [Errno 2] could not open port /dev/ttyACM0: [Errno 2] No such file or directory: '/dev/ttyACM0'
Our application cannot access the USB port. There are multiple reasons for that.
First, we declared the raw-usb interface but didn’t connect it. We can verify that with:
$ snap connections turtlebot3c

Interface		Plug				      Slot			Notes
Joystick		turtlebot3c:joystick 	  - 			-
network 		turtlebot3c:network 	  :network 		-
network-bind 	turtlebot3c:network-bind  :network-bind -
raw-usb		    turtlebot3c:raw-usb		  -			    -
The raw-usb plug has no slot assigned. This is because it’s not connected. Raw-usb is not auto-connect, so it has to be connected manually.
We can connect it with:
sudo snap connect turtlebot3c:raw-usb
Not that once you have connected a plug on a device for a given snap you won’t have to do it again (even over the updates).
And we can check the result with the snap connections command:
$ snap connections turtlebot3c

Interface		Plug				      Slot			  Notes
Joystick		turtlebot3c:joystick 	  - 			  -
network 		turtlebot3c:network 	  :network 		  -
network-bind 	turtlebot3c:network-bind  :network-bind   -
raw-usb		    turtlebot3c:raw-usb	      :raw-usb		  manual
We can restart our application with the sudo snap restart turtlebot3c.core command and check the logs. Unfortunately, we will see the error again, because we are not running on the real robot.
We must change the snap configuration simulation to run the simulation mode.
sudo snap set turtlebot3c simulation=true
Now the logs look better:
systemd[1]: Started Service for snap application turtlebot3c.core.
turtlebot3c.core[102917]: xacro: in-order processing became default in ROS Melodic. You can drop the option.
We can now launch the simulation with:
TURTLEBOT3_MODEL=waffle_pi roslaunch turtlebot3_gazebo turtlebot3_world.launch
And in another terminal, we can teleoperate our robot with:
turtlebot3c.key
Alternatively, if we have a joystick we can test the turtelbot3c.joy.
Since our key application is already selecting the right topic we should be able to fully control our robot with the keyboard. This means that our core, teleop, and at least key applications are working fine.
Now we can focus on our remaining applications. Let’s see if our mapping is working fine.
Save the map in the correct location
Our mapping daemon is a rather complex snap application. Indeed, we used various features of snaps to manage the saving of the map. It’s time to verify if everything works as expected.
With our simulation running and our core and teleop daemons running in the background we will simply need to run turtlebot3c.key to control our robot, but also we will need to start the mapping service.
To do so we can start the service (without enabling it) with:
sudo snap start turtlebot3c.mapping
We can then follow the logs of our application with the command:
sudo snap logs turtlebot3c.mapping -f
The logs should be similar to this:
turtlebot3c.mapping[104495]: Laser Pose= -1.65701 -0.499409 -3.13914
turtlebot3c.mapping[104495]: m_count 9
turtlebot3c.mapping[104495]: Average Scan Matching Score=303.733
turtlebot3c.mapping[104495]: neff= 100
turtlebot3c.mapping[104495]: Registering Scans:Done
This is what the normal log of the mapping should look like.
In case it’s not the case we must stop the simulation and the snap to make sure there is no roscore zombies.
We can then use our key application to move around and create the map!
Once we moved around, the SLAM should have enough data to generate the map.
We can test our “smart map saving” feature by simply stopping the map and seeing if it’s created.
We can stop the map with:
sudo snap stop turtlebot3c.mapping
We should see at the end of our mapping logs something similar to:
turtlebot3c.mapping[104749]: Waiting for the map
turtlebot3c.mapping[104749]: Received a 384 X 384 map @ 0.050 m/pix
turtlebot3c.mapping[104749]: Writing map occupancy data to /root/snap/turtlebot3c/common/map/new_map.pgm
turtlebot3c.mapping[104749]: Writing map occupancy data to /root/snap/turtlebot3c/common/map/new_map.yaml
turtlebot3c.mapping[104749]: Done
What we see in the logs is rather positive since the logs report that the map was saved.
Recall that we decided to save the map in the directory ${SNAP_USER_COMMON}/map. In this case, our user is ubuntu, and the SNAP_USER_COMMON should be pointing to /home/ubuntu/snap/turtlebot3c/common. But here we can see that the map was saved in the directory: /root/snap/turtlebot3c/common/.
Let’s check why that is.
Where is my map?
When we call a snap application command, the command is executed with the permission of our current user.
In case the user is ubuntu, calling the command MY_SNAP will run the command with the ubuntu permissions. This also means that if we call sudo MY_SNAP we will run our command with the root permissions. From that point of view, nothing is different with snaps.
One thing to know is that snap daemons are running as root. This will obviously have some impact.
Let’s jump inside our snap environment and verify some things. We can start a shell in the snap daemon environment with the following command:
sudo snap run --shell turtlebot3c.mapping
We will then enter a shell.
Let’s go to the root of our snap system.
cd $SNAP
Simply by running the ls command, we might recognize a typical Linux system:
etc/ lib/ meta/ opt/ snap/ usr/ var/
We can even see our ROS install inside opt/ros/noetic/.
If we check the content of the $HOME environment variable we will see:
$ echo $HOME

/root/snap/turtlebot3c/x
So the home of our snap when run as root is this specific directory.
We can run:
echo $SNAP_USER_COMMON
As we can guess it will give the value:
/root/snap/turtlebot3c/common
And this is where our maps are saved. This then explains the location of our map. It’s simply saved in our root user home since we are running a daemon.
We can exit this terminal by typing exit.
Back to our machine, we can verify that our maps are present with the command:
ls -l /root/snap/turtlebot3c/common/map
We can see our map files as well as our symbolic link.
Our mapping application was then perfectly working. In the future we might want to be careful regarding the $SNAP_* variable since they might point to different directories depending on the user or if it’s a daemon or not.
Let’s now see if the navigation works!
Fix the navigation application
The mapping application successfully created map files. Let’s see if our navigation application starts and loads the correct files.
We will still need the simulation up and running.
Let’s keep the logs in a dedicated terminal by typing:
sudo snap logs turtlebot3c -f
We can then start our navigation service with:
sudo snap start turtlebot3c.navigation
Then we can see that something is going wrong. We get this log:
systemd[1]: Started Service for snap application turtlebot3c.navigation.
turtlebot3c.navigation[106426]: prev_topic: "/nav_vel"
turtlebot3c.navigation[106455]: /snap/turtlebot3c/x2/opt/ros/noetic/lib/map_server/map_server: error while loading shared libraries: libpulsecommon-13.99.so: cannot open shared object file: No such file or directory
A shared library is missing. It’s libpulsecommon.
A missing library in a snap is a very common problem when building a snap.
Let’s stop our application since anyway it’s crashing:
sudo snap stop turtlebot3c.navigation
Let’s debug our application to give an overview of how to debug such cases.
Debug the missing libpulsecommon library
Our application is crashing because of a missing shared library. This is a very common problem in snaps since the confined environment only contains what was explicitly declared.
Let’s quickly jump into our application environment to verify what is going on:
sudo snap run --shell turtlebot3c.navigation
We are now in the exact same condition that our snap is right before calling navigation_launcher.sh.
Let’s see if our map_server application is missing a library.
We can do so by typing:
ldd /snap/turtlebot3c/current/opt/ros/noetic/lib/map_server/map_server
Here we are using ldd to print the shared object dependencies.
We can then see that in the middle of all the different links and found libraries we have:
libpulsecommon-13.99.so => not found
So our map_server is depending on a library libpulsecommon that it cannot find.
Let’s see if we can find this missing library inside our snap. Type the following command:
find $SNAP -type f -name "libpulsecommon-13.99.so"
It will search for the library file that our map_server is not finding inside our snap.
Surprisingly, we find it in our snap:
/snap/turtlebot3c/x2/usr/lib/x86_64-linux-gnu/pulseaudio/libpulsecommon-13.99.so
This means that our library is installed already in our snap, just that our application is not finding it.
Now we must verify why our library is not found while being present in our snap. On Linux, like in a snap, there are several mechanisms used to search for a dynamic library. The most common is the $LD_LIBRARY_PATH environment variable.
If we run:
echo $LD_LIBRARY_PATH
we will see that $SNAP/usr/lib/x86_64-linux-gnu/ is listed but not with the subdirectory pulseaudio.
We can now exit this snap shell by typing exit.
The simplest solution would be to extend the $LD_LIBRARY_PATH environment variable with the additional directory.
To do that we must modify our snapcraft.yaml:
  navigation:
+  environment:
+    # map server need pulseaudio
+    LD_LIBRARY_PATH: "$LD_LIBRARY_PATH:$SNAP/usr/lib/x86_64-linux-gnu/pulseaudio"
   command-chain: [usr/bin/mux_select_nav_vel.sh]
The environment keyword lets us define environment variables for our application. Here we extend the $LD_LIBRARY_PATH with the additional pulseaudio path relative to our snap.
We can now rebuild and reinstall the snap!
At the end of the build we will see this warning:
CVE-2020-27348: A potentially empty LD_LIBRARY_PATH has been set for environment in 'navigation'. The current working directory will be added to the library path if empty. This can cause unexpected libraries to be loaded.
In our case, we can ignore this warning since we set the $LD_LIBRARY_PATH to a non-empty value.
We can now retest the navigation application.
Navigation test
Once our snap is properly rebuilt and reinstalled we can test our navigation app. With our last modification, our application should now find every library it needs.
We must make sure to restart the simulation after reinstalling the snap.
Once up and running, let’s run the navigation again:
sudo snap start turtlebot3c.navigation
This time we will see that the logs look fine.
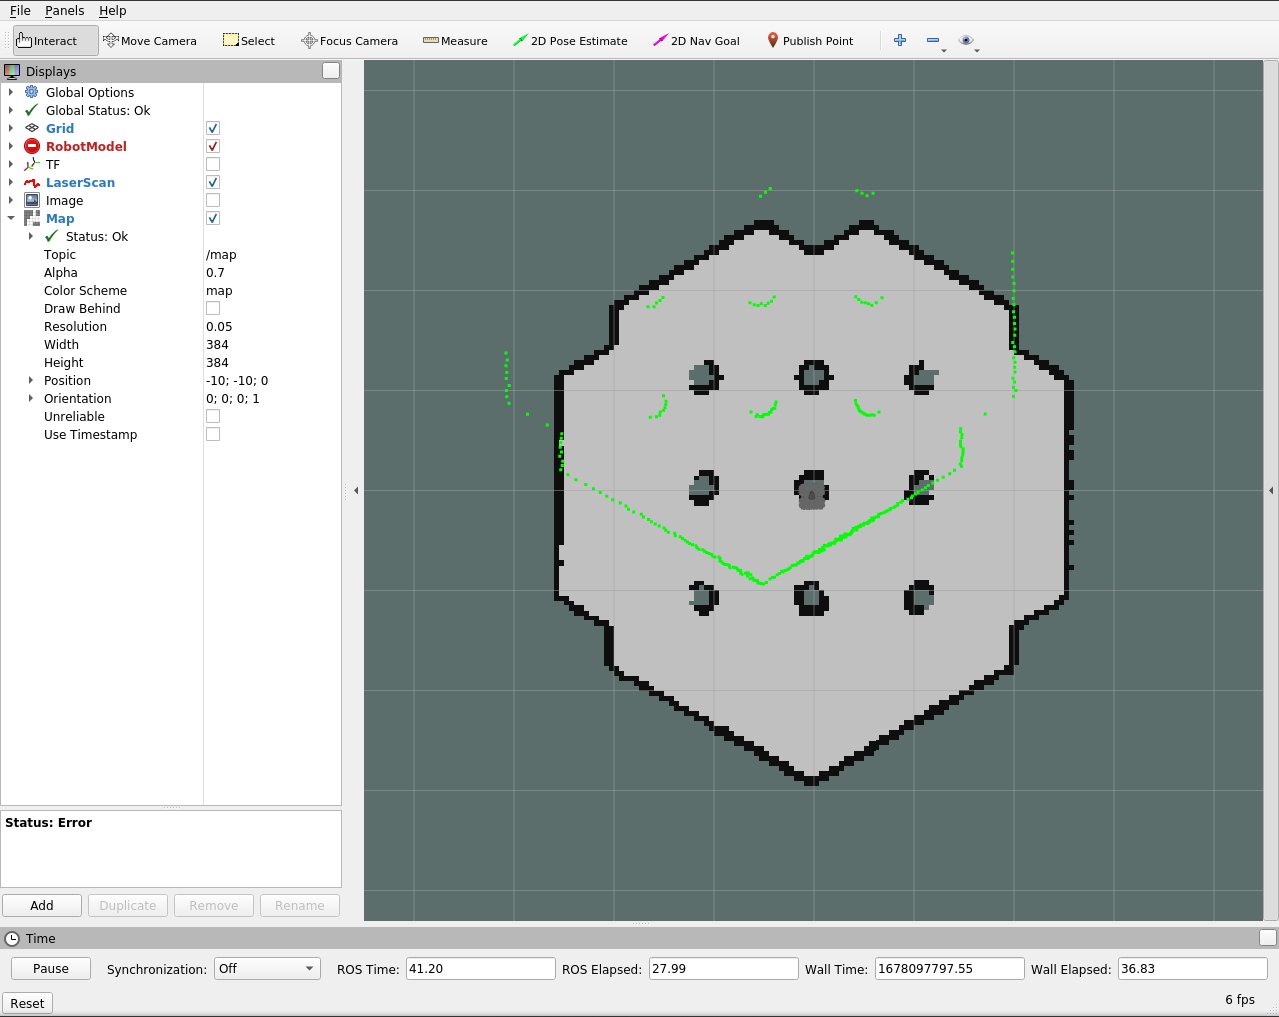
We can then run RViz and see if we can navigate. RViz is a debug/visualisation tool, so it doesn’t have to be included inside our snap.
We can run RViz with the TurtleBot3 configuration with the following command:
rviz -d /opt/ros/noetic/share/turtlebot3_slam/rviz/turtlebot3_gmapping.rviz
We should see something like this:
Let’s select the “2D Pose Estimate” and select the actual position:
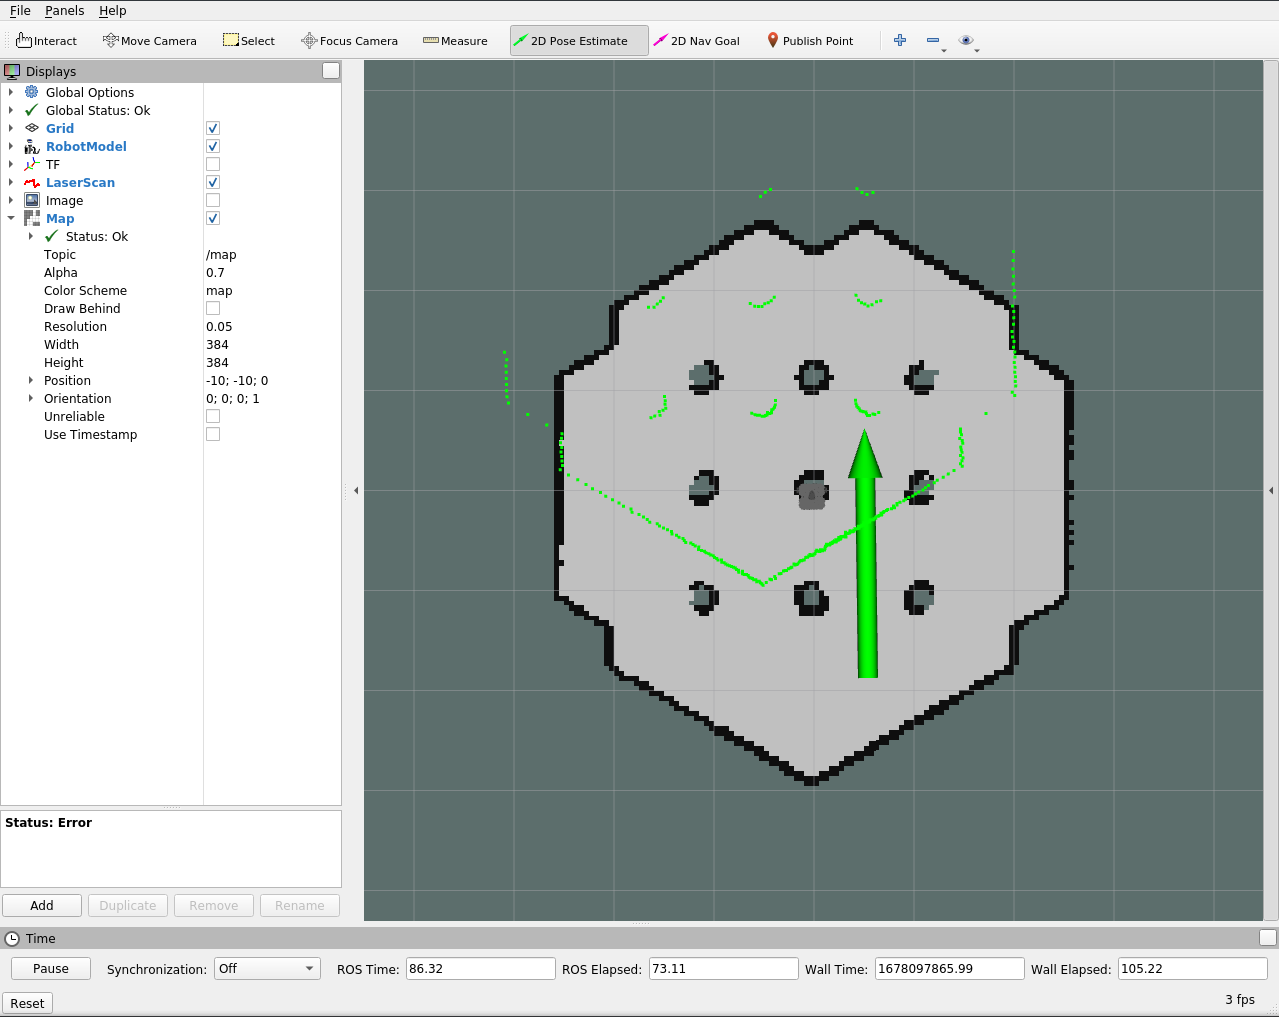
We can now check with the “2D Nav Goal” to send a goal to our navigation:

Our robot is now navigating. This means that the navigation daemon is running properly but also that our core and teleop daemons are also working fine.
Now our whole software stack is running!
Final detail
We have now tested our whole stack and every feature was properly working. There is still a final detail to look at before we run a final test.
During the test we could have noticed this warning in the mapping and navigation logs:
[rospack] Warning: cannot create rospack cache directory /root/.ros: boost::filesystem::create_directory: Permission denied: "/root/.ros"
Rospack doesn’t use the $HOME environment variable but uses the password structure to get the home directory. By default, snaps make sure that the environment variable $HOME is pointing to a writable directory, but unfortunately, rospack is not using it. The good news is that rospack first tries to read the $ROS_HOME. We could make the error disappear by defining the $ROS_HOME to $SNAP_USER_DATA/ros.
Since ROS logging is also using $ROS_HOME too, to have the logs of every app and daemon in the same directory we will apply the environment variable change to every app and daemon.
We can do that by modifying the snapcraft.yaml:
  core:
+   environment:
+     ROS_HOME: $SNAP_USER_DATA/ros
[...]
  teleop:
+   environment:
+     ROS_HOME: $SNAP_USER_DATA/ros
[...]
  joy:
+   environment:
+     ROS_HOME: $SNAP_USER_DATA/ros
[...]
  key:
+   environment:
+     ROS_HOME: $SNAP_USER_DATA/ros
[...]
  mapping:
+   environment:
+     ROS_HOME: $SNAP_USER_DATA/ros
[...]
  navigation:
    environment:
+   ROS_HOME: $SNAP_USER_DATA/ros
We can then rebuild our snap!
By solving this last little detail, we made sure that all the logs are written properly and in the same location. Snaps rely on the standard usage of Linux. Any solution not following the standard might need adjustment.
Final test
Now that we have solved every problem, we can do a final test of everything.
Since we did multiple tests, our writable directories already have data. To reproduce the first install of our snap, we can remove and purge our snap. This will not only remove our snap and previous revisions, but it will also clean all its data.
To do so:
sudo snap remove turtlebot3c --purge
We can now proceed to a complete test, from installation to navigation.
Let’s go through the following steps:
- Install the snap –
sudo snap install turtlebot3c_*.snap --dangerous - Set the simulation parameter –
sudo snap set turtlebot3c simulation=true - Start the simulation –
TURTLEBOT3_MODEL=waffle_pi roslaunch turtlebot3_gazebo turtlebot3_world.launch - Start the
mapping–sudo snap start turtlebot3c.mapping - Roam around with the
keyapplication -turtlebot3c.key - Stop the
mapping–sudo snap stop turtlebot3c.mapping - Start the
navigation–sudo snap start turtlebot3c.navigation - Start
RViz-rviz -d /opt/ros/noetic/share/turtlebot3_slam/rviz/turtlebot3_gmapping.rviz - Test the navigation
We now have a complete snap that is completely tested.
We created a map, we can now make sure the navigation daemon starts automatically at boot by enabling the service.
Let’s call the following command.
sudo snap start --enable turtlebot3c.navigation
In case we want all the turtlebot3c daemons to stop and not start again, we can disable the snap with:
sudo snap disable turtlebot3c
This will prevent any application and daemons from starting. Additionally, it will also prevent updates.
By checking the output of:
snap info turtlebot3c
We can confirm that all the daemons are stopped and disabled. Of course, we can enable it later with the snap enable command.
We have now presented every single step to snap a TurtleBot3 software stack. We went from application identification to actual snapping and finally added some advanced behaviour to automatize the map management tasks.
Exercise
Now that we have learned the ins and outs of the TurtleBot3 snap, we can apply some of our fresh knowledge for a quick exercise. The exercise as well as the solution are available in the Developer guide part 2 - exercise.
Conclusion
We are reaching the conclusion of this developer guide. This developer guide addressed almost any topic that one might need to ship a robot software as a snap.
The final version of the snap workspace is available on GitHub. This is the official code that is used to publish the TurtleBot3c snap from the store. This means that the GitHub repository will keep getting updated.
What we achieved
In this developer guide, we went through the creation of the TurtleBot3 snap. We have covered all the steps that one must go through when creating a snap for a robot.
First, we identified the different applications and daemons that our snap must expose. We also identified the scope of our snap. Then we applied the knowledge of the first part of the developer guide to build the first draft of our snap. By discovering new features of snaps we were able to implement features to manage our maps and to select the right velocity topic. We implemented these features to simplify and automate the usage of the snap.
We finally covered the snap debugging aspect. This helped us to solve all the different issues we encountered while testing the snap.
Now the whole stack of TurtleBot3 for the simulation or the real robot is packed in a single snap.