| Key | Value |
|---|---|
| Summary | Launch a VM via Multipass on Ubuntu, set up Landscape in this isolated environment, and configure it to monitor and manage all your other Ubuntu VMs. |
| Categories | desktop, multipass, ubuntu, server, libvirt, landscape |
| Difficulty | 2 |
| Author | Rajan Patel rajan.patel@canonical.com |
Overview
Duration: 5:00
Multipass offers Ubuntu Virtual Machines (VMs) on demand, with a simple menu-based user interface in the system tray. Users interested in appliance images can be up and running with a curated catalogue of software, such as Adguard and Plex Media Server, in an isolated environment within their workstation. Developers benefit from being able to locally deploy cloud-style images, tuned for performance out-of-the-box, with a single multipass launch command. Sharing files and folders between the host machine and instances is equally simple, with a multipass mount command.
If developers are not using a tool to uniformly administer their virtual machines and are performing updates on a machine-by-machine basis, the ease of deploying Ubuntu virtual machines with Multipass contributes to patch drift. To counter this, Landscape delivers the benefits of profiles and policies that can be applied to groups of Ubuntu instances to maintain a consistent, predictable, and safe developer environment.
What you’ll learn
This tutorial will help you launch an Ubuntu VM within Multipass, set up Landscape in this isolated environment, and configure it to monitor and manage all the other Ubuntu VMs. Your VMs can be launched through Multipass or Virtual Machine Manager, through a point and click graphical user interface (GUI), or through a command line interface (CLI).
What you’ll need
The minimum workstation specifications to complete this tutorial successfully are:
- Ubuntu 18.04 LTS (Bionic Beaver) or higher
- 8 GB of RAM
The Landscape virtual machine will require 4 GB of RAM, and allocating more than 71% of the system RAM to a single VM is not advisable. There is a risk the host OS could be starved of RAM, when over provisioning memory. - 30 GB of free disk space
- Dual core CPU with Intel VT or AMD-V
Assigning 2 virtual processors (vCPUs) to virtual machines on a dual core CPU will adversely impact performance. Conversely, if your workstation has multiple processors or a single quad core (or higher) CPU, allocating 2 vCPUs to the Landscape virtual machine is recommended. - Virtualisation support enabled in the BIOS
To verify virtualisation support, install cpu-checker and ensure the kvm-ok output reads “KVM acceleration can be used”:
sudo apt install cpu-checker -y
kvm-ok

Install libvirt
Duration: 7:00
An Ubuntu instance for Landscape can be provisioned with a static IP address, when using libvirt.
Use virt-manager on Ubuntu Desktop
In this section, we will install Virtual Machine Manager on your Ubuntu workstation using the virt-manager package found in the universe repository.
Virtual Machine Manager is a desktop application with a point-and-click user interface for managing virtual machines. Some benefits of pairing Virtual Machine Manager with Multipass include:
- Graphs which show CPU and RAM usage over time
- An alternative graphical interface to see the internals of the virtual machines, such as the mounted disks, attached network interfaces, memory allocations, and more
Virt-manager and all of its associated libvirt package dependencies can be installed with this command:
sudo apt install virt-manager -y
Use libvirt-daemon-system on Ubuntu Server
Assuming your Ubuntu Server is not configured with a desktop environment (like Gnome), the libvirt daemon can be installed as a system service without the overhead of virt-manager’s graphical user interface. Install the libvirt-daemon-system package from the universe repository:
sudo apt install libvirt-daemon-system -y
Reboot
In order for certain libvirt processes to launch with the correct privileges, a system restart is required after this package is installed. For example, virsh net-list will require sudo to find the default network, unless a reboot is performed.
Issue the reboot command in your terminal:
sudo reboot
Create a Management Network
In this section, the libvirt command line interface will be used on your Ubuntu workstation to configure virtual networks for future virtual machine installations.
Upon restart, the default network will be visible through virsh without requiring sudo. You can list the networks managed by the libvirtd service with this command:
virsh net-list
The default network will be shown:
 Name   State   Autostart   Persistent
----------------------------------------
 default   active   yes         yes
For simplicity, we will assign Landscape a static IP address. To achieve this, a dedicated management network will be defined with an XML file located at /tmp/management-network.xml with the following contents:
<network>
  <name>management</name>
  <bridge name="virbrmgmt0"/>
  <forward mode="nat">
    <nat>
      <port start="1024" end="65535"/>
    </nat>
  </forward>
  <ip address="192.168.33.1" netmask="255.255.255.0">
    <dhcp>
      <range start="192.168.33.2" end="192.168.33.254"/>
    </dhcp>
  </ip>
</network>
Copying and pasting this multiline cat statement into your terminal will create /tmp/management-network.xml, with the required contents:
cat <<EOF > /tmp/management-network.xml
<network>
  <name>management</name>
  <bridge name="virbrmgmt0"/>
  <forward mode="nat">
    <nat>
      <port start="1024" end="65535"/>
    </nat>
  </forward>
  <ip address="192.168.33.1" netmask="255.255.255.0">
    <dhcp>
      <range start="192.168.33.2" end="192.168.33.254"/>
    </dhcp>
  </ip>
</network>
EOF
Create a new, persistent, virtual network using the settings from /tmp/management-network.xml with this command:
virsh net-define --file /tmp/management-network.xml
You will get a confirmation:
Network management defined from /tmp/management-network.xml
This network will need to be started with the following command:
virsh net-start --network management
You will get a confirmation:
Network management started
Instruct the libvirt daemon to start the network automatically upon reboot:
virsh net-autostart --network management
You will get a confirmation:
Network management marked as autostarted
You can list the existing networks:
virsh net-list --all
If they are running (active state), and configured to autostart, the network list should appear as follows:
 Name         State    Autostart   Persistent
-----------------------------------------------
 default      active   yes         yes
 management   active   yes         yes
Install Multipass
Duration: 7:00
In this section, we will install Multipass on your Ubuntu workstation using the snap package published by Canonical in the public Snap Store:
sudo snap install multipass
We want more control over VMs after they are launched, so we will instruct Multipass to communicate with the libvirt daemon.
Snap Connect on Ubuntu Desktop
When logged into your Ubuntu Desktop directly, or connected via VNC or XRDP, you do not need to run this command with sudo:
snap connect multipass:libvirt
A PolicyKit Authentication prompt will appear. Enter your password and proceed.

If you do not enter your password and click Authenticate right away, you may see the following error message:
error: cannot communicate with server: timeout exceeded while waiting for a response
If you encounter this error, simply rerun the snap connect multipass:libvirt command, type in your password, and click Authenticate without any delays.
If you have used SSH to connect to your Ubuntu desktop environment, and are performing the installation through an SSH connection, prefix the command with sudo:
sudo snap connect multipass:libvirt
Snap Connect on Ubuntu Server
An Ubuntu server environment requires prefixing the snap connect command with sudo:
sudo snap connect multipass:libvirt
Multipass driver configuration
Since this is a fresh installation of Multipass, there is no need to stop all instances. If you had Multipass previously installed, you can stop all instances with this command:
multipass stop --all
Ensure the Multipass client passphrase is set, by running this command and typing a password at the prompt:
multipass set local.passphrase
Next, ensure the Multipass client is authenticated with the Multipass service by running this command and retyping the password from the previous step:
multipass authenticate
Now, instruct Multipass to use the libvirt driver:
multipass set local.driver=libvirt
Install Landscape
Duration: 30:00
Provision Landscape’s Server
The commands to provision Landscape’s server are executed on your Ubuntu workstation.
Landscape version 19.10, the current version as of this writing, requires Ubuntu 18.04 LTS (Bionic Beaver).
If your CPU has 2 cores, or if you are performing nested virtualisation, launch a Multipass Bionic instance with only 1 vCPU:
multipass launch focal --name=landscape --cpus=1 --mem=4G --disk=20G -vvv
If your CPU has 4 cores or more, you can launch a Multipass Bionic instance with 2 vCPUs:
multipass launch focal --name=landscape --cpus=2 --mem=4G --disk=20G -vvv
Install landscape-server-quickstart
Open a shell prompt on the Multipass Ubuntu virtual machine where Landscape will be installed by running this command in the Terminal:
multipass shell landscape
Add the Landscape PPA repository:
sudo add-apt-repository --update ppa:landscape/self-hosted-23.03 -y
You will see the following prompt:
Repository: 'deb https://ppa.launchpadcontent.net/landscape/self-hosted-23.03/ubuntu/ focal main'
Description:
Dependencies for Landscape Self-Hosted release version 23.03.
More info: https://launchpad.net/~landscape/+archive/ubuntu/self-hosted-23.03
Press [ENTER] to continue or Ctrl-c to cancel adding it.
Press Enter to proceed, and install Landscape using the quickstart method:
sudo apt install landscape-server-quickstart -y
Postfix configuration extends beyond the scope of this tutorial. Selecting No Configuration is suitable at this time, because Postfix can be easily configured at a later time.

The installation process with 1 vCPU can take some time. Observing CPU and disk metrics in the System Monitor will help pass the time, because the progress bar will take several minutes to get past the 99% mark. A successful installation can be confirmed after the progress bar reaches 100%, and the following triggers are all processed:
Processing triggers for libc-bin (2.31-0ubuntu9.9) ...
Processing triggers for rsyslog (8.2001.0-1ubuntu1.3) ...
Processing triggers for ufw (0.36-6ubuntu1) ...
Processing triggers for systemd (245.4-4ubuntu3.22) ...
Processing triggers for man-db (2.9.1-1) ...
Processing triggers for dbus (1.12.16-2ubuntu2.3) ...
Issue the shutdown command to turn off the Landscape instance. You will return back to your workstation’s shell, where we will use libvirt’s command line tools to add the Landscape instance to the management network.
sudo shutdown -h now

The subsequent steps require the Landscape virtual machine to be fully shut down. We do not want Landscape to obtain an IP address dynamically from the management network, because we want to associate a fixed IP address to the MAC address of Landscape’s network interface connected to the management network. Shutting down the Landscape virtual machine helps us avoid the hassle of revoking a dynamic IP address assignment.
Observing the VM shutdown on Ubuntu Desktop
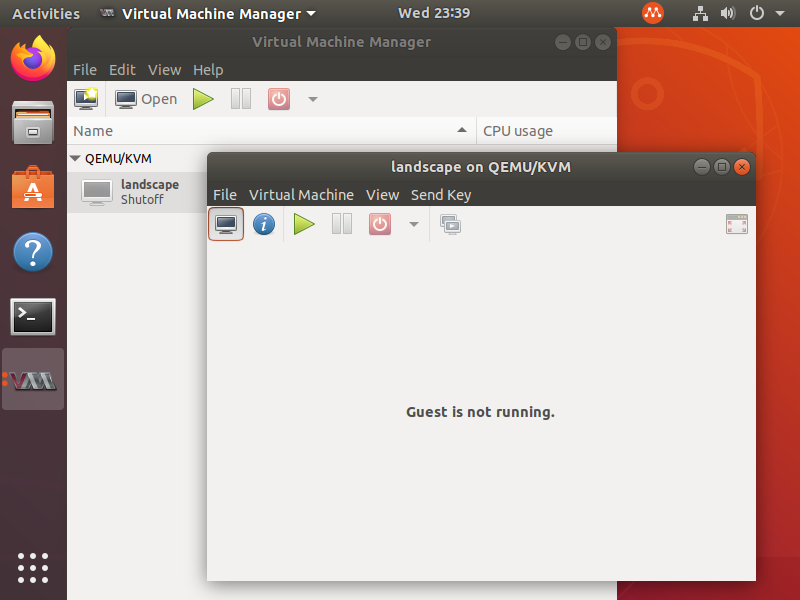
You can observe the Landscape virtual machine’s state in the Virtual Machine Manager application. It should say “Shutoff” under the virtual machine’s name when viewing the list of virtual machines, and it will say “Guest is not running” if you look at the console window within Virtual Machine Manager.
The following steps for observing the VM shutdown on Ubuntu Server are also compatible with Ubuntu Desktop.
Observing the VM shutdown on Ubuntu Server
It is possible to see the output of the console as the virtual machine performs its shutdown routine, by running this command in a separate Terminal window, or a separate SSH session:
virsh console landscape
The powered off state can be confirmed when the console prints out a “Starting Power-Off” and “Power down” message:
         Starting Power-Off...
[  158.395261] reboot: Power down
If the machine has completely shut down, the virsh console command will produce the following error message:
error: The domain is not running
You can also observe the Landscape virtual machine’s state when listing all virtual machines:
virsh list --all
It will produce an output similar to the following:
 Id   Name        State
---------------------------
 -    landscape   shut off
Configure the Landscape Network Interfaces
Configuring the Landscape network interfaces is a two-part journey:
- The virtual network configuration is performed in the Terminal of your Ubuntu workstation, which is now acting as the host machine for your virtual machines.
- The network adapter configuration is performed in a shell prompt on your Landscape virtual machine.
Virtual Network Configuration
Out of the box, only one virtual ethernet adapter is attached on all Multipass instances. This network interface is connected to the default network, with DHCP enabled. This default network should not be removed or modified, as Multipass relies on this interface for administrative purposes. Instead of configuring virtual machines with an additional virtual ethernet adapter, and binding this adapter with a static IP address, the network configuration will be managed at the host layer. IP reservations for Multipass and libvirt virtual machines are achieved by mapping the MAC addresses of virtual ethernet adapters in virtual machines to specific IP addresses on the management network. The benefit of this approach is that all the network configurations are defined in a single place on the host machine, and not within each virtual machine. Furthermore, there is a clean command line interface to manipulate libvirt network configurations.
First, let us list the unique hardware MAC address of the default virtual ethernet adapter on the Landscape instance, assigned by Multipass:
virsh dumpxml landscape | grep -i '<mac' | grep -oP "(?<=').*?(?=')"
Next, we add a second adapter, and connect it to the management network:
virsh attach-interface --domain landscape --source management --type network --model virtio --config
The following notification is printed when an interface has been successfully attached:
Interface attached successfully
Repeat the command to list MAC addresses for the network interfaces and confirm that two network interfaces exist on the Landscape instance:
virsh dumpxml landscape | grep -i '<mac' | grep -oP "(?<=').*?(?=')"
If you only see one MAC address
It is likely that thevirsh attach-interfacecommand was executed while the Landscape virtual machine was still running. If you’re cruising through these steps, you may have run thevirsh attach-interfaceinstruction while the shutdown process was still being performed.
You can verify whether the Landscape virtual machine has finished shutting down, and whether the adapter is present, through the graphical user interface of the Virtual Machine Manager application. There should be 2 NICs in the left column, and the second NIC’s network source will be “Virtual network ‘management’: NAT”. The MAC address of this second NIC will be visible in this application as well.
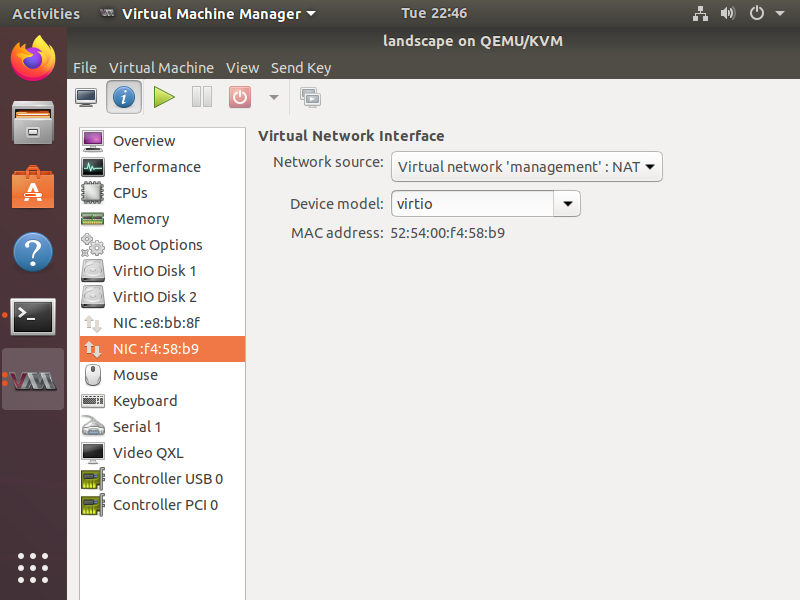
The second MAC address in the list belongs to the new interface. Your MAC address will be unique to your workstation, and will not match the screenshot in this guide.
This command prints out the MAC address for the second network interface on your Landscape virtual machine explicitly. If a second network interface does not exist, it will not print anything. (If a third network interface exists, it will be ignored, and only the second network interface’s MAC address will be displayed, because of the sed command at the end.)
virsh dumpxml landscape | grep -i '<mac' | grep -oP "(?<=').*?(?=')" | sed -n 2p
Instruct the DHCP server operating the management network to look for the MAC address of this newly added second adapter, and always assign it 192.168.33.2. This command will bind the second NIC’s MAC address to the management network:
virsh net-update management add ip-dhcp-host '<host mac="'$(virsh dumpxml landscape | grep -i '<mac' | grep -oP "(?<=').*?(?=')" | sed -n 2p)'" ip="192.168.33.2"/>' --live --config
The following notification is printed when the DHCP server responsible for the management network has accepted this new configuration:
Updated network management persistent config and live state
Confirm the new network interface on the Landscape server has been associated with a static IP address on the management network. This command filters the XML output of IP address assignments on the management network:
virsh net-dumpxml management | egrep 'range|host\ mac'
The output should look like this, with the exception of the MAC address being unique to your system:
<range start='192.168.33.2' end='192.168.33.254'/>
<host mac='52:54:00:99:90:6b' ip='192.168.33.2'/>
Now that the virtual network interface has been connected to the management network, the Landscape instance must be made aware of this addition. Boot up the Landscape instance. You can either use:
- the Virtual Machine Manager application, but you still need to run multipass shell to connect once it boots up
- or you can rely on the multipass shell command to boot up the machine and subsequently connect to it.
Option 1: boot up via the Virtual Manager Application
The primary benefit of using the Virtual Manager Application is getting a windowed view of the console output.
To start the Landscape virtual machine from within Virtual Machine Manager, click the button with the triangle/play icon:

You can observe the console output to determine when it is completely started up. When the machine is ready, you will see the login prompt:
Do not try to log in from within Virtual Machine Manager here. Instead, open the Terminal application on your workstation, and use the multipass shell command to open a shell prompt to the virtual machine:
multipass shell landscape
Option 2: boot up via Multipass Shell
Open the Terminal application on your workstation, and use the multipass shell command to open a shell prompt to the virtual machine:
multipass shell landscape
If you wish to observe the console output as the instance boots up, you can run this command in a separate Terminal window:
virsh console landscape
You can exit from the virsh console anytime by pressing CTRL + ]
Network Adapter Configuration
Once the Landscape instance is fully booted up, and you have connected to its shell prompt, list the network adapters:
ip a
This snippet from the ip a output shows that a new network adapter named “ens7” has been added, but not configured:
3: ens7: <BROADCAST,MULTICAST> mtu 1500 qdisc noop state DOWN group default qlen 1000
    link/ether 52:54:00:bb:18:2c brd ff:ff:ff:ff:ff:ff
We need to configure the network on ens7 in a way that persists across reboots. This network configuration needs to be performed in a manner that is cloud-init friendly.
Yq is a useful command line utility for updating YAML based configuration files through a terminal or shell script. Install yq as a snap with this command:
sudo snap install yq
Yq manipulates the /etc/netplan/50-cloud-init.yaml file, adds the appropriate configurations for defining ens7, and writes the output to /etc/cloud/cloud.cfg.d/50-curtin-networking.cfg.
sudo cat /etc/netplan/50-cloud-init.yaml | yq e '.network.ethernets.ens7.dhcp4 = true | .network.ethernets.ens7.match.macaddress = "'$(cat /sys/class/net/ens7/address)'" | .network.ethernets.ens7.set-name = "ens7"' - | sudo tee /etc/cloud/cloud.cfg.d/50-curtin-networking.cfg
This is a screenshot of my /etc/cloud/cloud.cfg.d/50-curtin-networking.cfg file.
If you are manually editing the configuration file, remember to use spaces and not tabs.

Upon saving this file, cloud-init should now be instructed to re-run all stages as it did on first boot. This command will abruptly disconnect the shell session on the Landscape instance:
sudo cloud-init clean -r
Cloud-init will consume the changes in /etc/cloud/cloud.cfg.d/50-curtin-networking.cfg and propagate them to /etc/netplan/50-cloud-init.yaml on startup. This process will take some time. Watching the progress in the Virtual Machine Manager console will show you when the Landscape instance is done restarting, and ready.
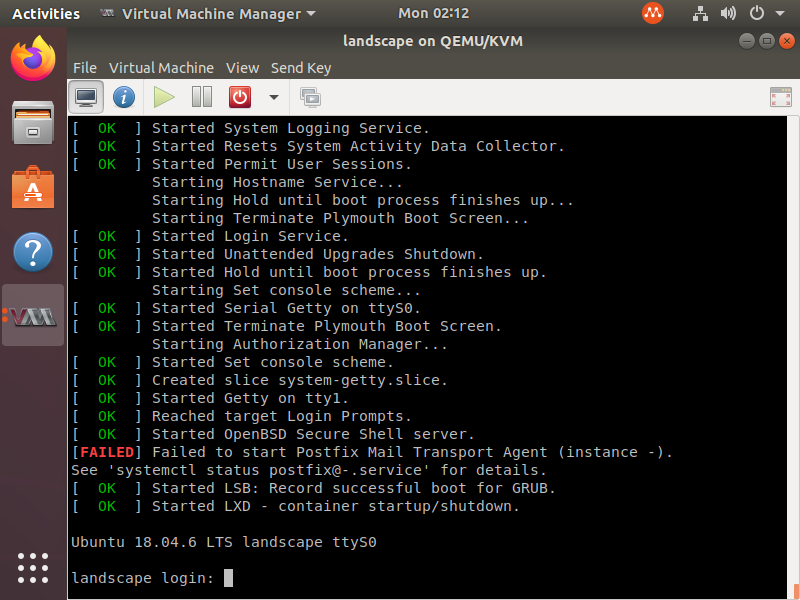
ⓘ You will see one error related to Postfix towards the tail end of the startup process
We did not configure Postfix during the course of this tutorial. This warning can be safely ignored for now.
You can watch cloud-init perform its tasks through the console, by running this command in a separate Terminal window, or a separate SSH session:
virsh console landscape
Alternatively, you can monitor the console through Virtual Machine Manager, if you installed that application earlier. This is a short video of the cloud-init step.
Once you see the “landscape login:” prompt, you can proceed to the next step. If the screen seems frozen, press Enter, and if the system is idle and ready, the login prompt will appear.
Configure Access to Landscape
Landscape should be accessible via hostname from the host machine, and from other virtual machines. For simplicity, I have set the hostname to “landscape”.
Map the Landscape hostname
Allow your workstation to find the Landscape instance by its “landscape” hostname. Mapping the “landscape” hostname to 192.168.33.2 within /etc/hosts is achieved by running this command on your Ubuntu workstation:
grep -qxF '192.168.33.2 landscape' /etc/hosts || sudo sed -i "3i192.168.33.2 landscape" /etc/hosts
The grep command’s parameters keep it quiet (-q), match the whole line (-x), and pattern match (-F). If the /etc/hosts file does not contain this entry for Landscape, it is inserted as a new third line within the file.
Set up Landscape’s Global Administrator
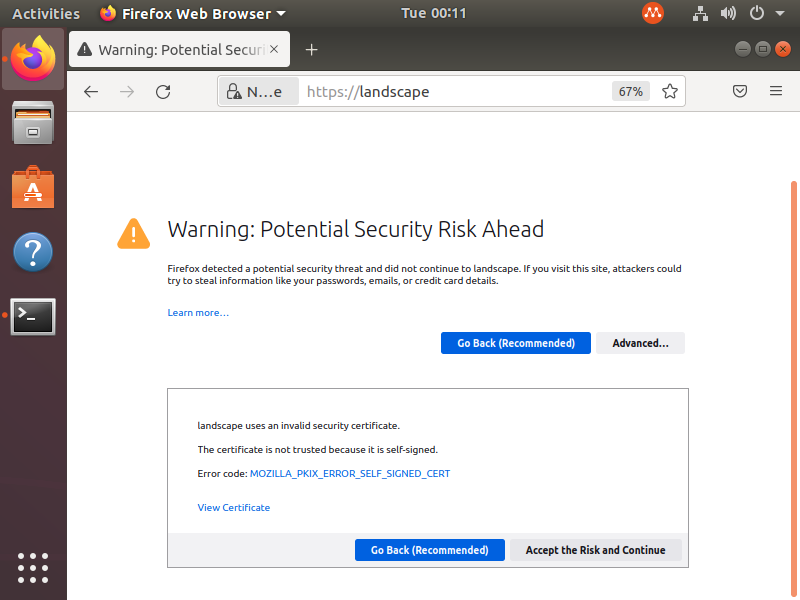
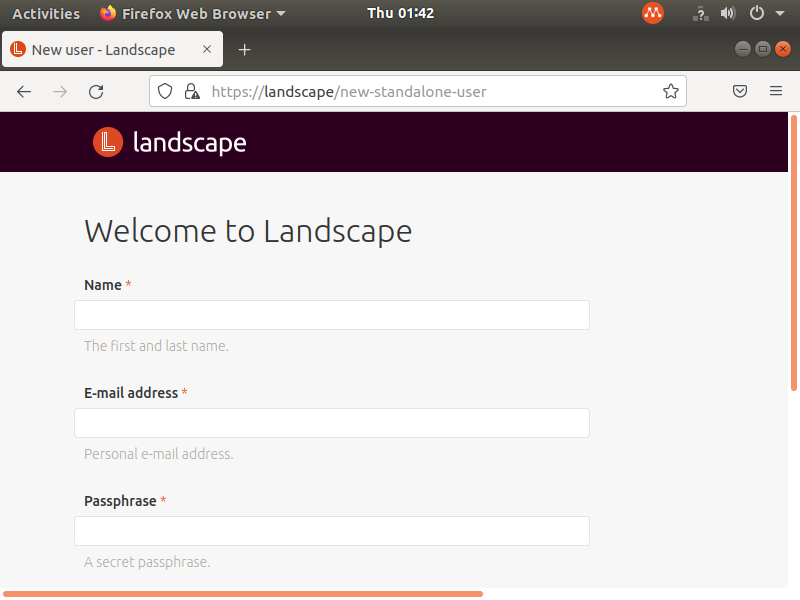
Configure Landscape via the web interface. Using Firefox, visit https://landscape.
Disregard the “Warning: Potential Security Risk Ahead”. Click Advanced to expose a second prompt, and click Accept the Risk and Continue.
When you arrive at the “Welcome to Landscape” screen, provide your name, email address, passphrase (password), and click Sign up.
In low memory systems, you may encounter an “Oops” screen, instead of a “Welcome to Landscape” screen. If this happens to you, your Landscape virtual machine needs to be restarted.
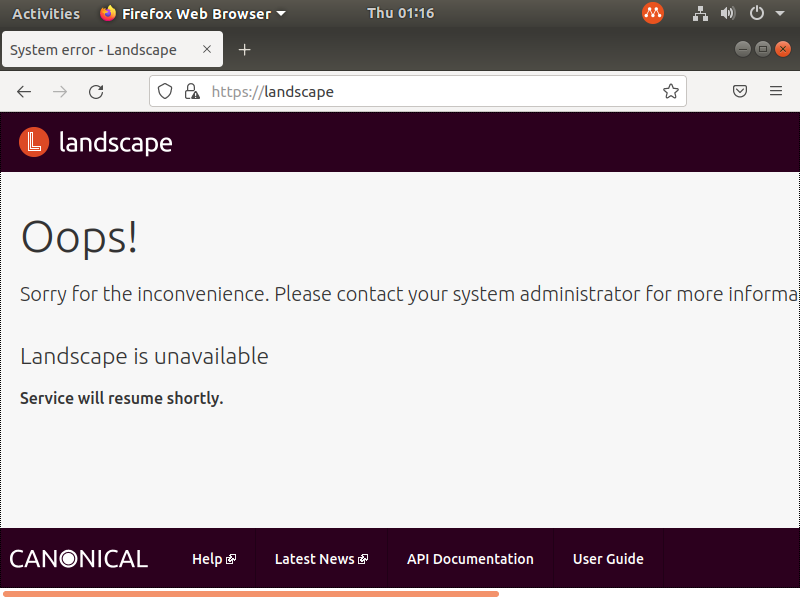
To restart, connect to the Landscape shell:
multipass shell landscape
Issue the reboot command within the Landscape virtual machine:
sudo shutdown -r now
Once the Landscape virtual machine is fully rebooted, attempt to connect to the web interface once more.
Copy Landscape’s self signed certificate
There are helpful file system integrations between your Ubuntu workstation (the host) and the Multipass virtual machines. Use these integrations to place the /etc/ssl/certs/landscape_server_ca.crt file from Landscape Server somewhere accessible on your Ubuntu workstation. From this location on the host, we will be able to copy the landscape_server_ca.crt file to the appropriate locations on each Multipass virtual machine you start up.
From within the Terminal application on your workstation, we will use Multipass to copy the /etc/ssl/certs/landscape_server_ca.crt file to your home directory on the host:
multipass mount $HOME landscape
multipass transfer -vvvv landscape:/etc/ssl/certs/landscape_server_ca.crt $HOME
multipass umount landscape
Register a Multipass VM with Landscape
Duration: 6:00
At this point, the Landscape instance is the only virtual machine on the management network. Adding other virtual machines is trivial, assuming they have been configured through Multipass or virt-manager.
Provisioning a virtual machine with Multipass
We follow the same steps, sans the static IP address assignment for all future virtual machines on the management network. The following steps walk you through creating a Multipass instance named “mp-vm-1”, and connect it to the management network.
Create the virtual machine:
multipass launch --name=mp-vm-1
Shut the virtual machine down, so that an additional network interface can be added:
multipass stop mp-vm-1
Confirm the machine has fully shut down using the Virtual Machine Manager application, or by periodically checking via the command line:
virsh list --all
The output will eventually be:
 Id   Name        State
----------------------------
 2    landscape   running
 -    mp-vm-1     shut off
Add a second adapter, and connect it to the management network:
virsh attach-interface --domain mp-vm-1 --source management --type network --model virtio --config
The following notification is printed when an interface has been successfully attached:
Interface attached successfully
Open a shell prompt on mp-vm-1. This step may take some time, because the mp-vm-1 instance needs to boot up.
multipass shell mp-vm-1
Multipass may produce one of several “shell failed” errors when the host is low on memory.
The “shell failed” errors may look similar to this:
shell failed: ssh connection failed: 'No route to host'
If this happens repeatedly, shut down all the instances with multipass stop --all and then multipass shell mp-vm-1 to launch mp-vm-1 on its own. You could also use Virtual Machine Manager to reduce the memory allocation for mp-vm-1 from 1GB to 512MB.
Install yq as a snap on mp-vm-1 with this command:
sudo snap install yq
Read the /etc/netplan/50-cloud-init.yaml file, add the appropriate configurations for defining ens7, and write the output to /etc/cloud/cloud.cfg.d/50-curtin-networking.cfg with cat, yq, and tee:
sudo cat /etc/netplan/50-cloud-init.yaml | yq e '.network.ethernets.ens7.dhcp4 = true | .network.ethernets.ens7.match.macaddress = "'$(cat /sys/class/net/ens7/address)'" | .network.ethernets.ens7.set-name = "ens7"' - | sudo tee /etc/cloud/cloud.cfg.d/50-curtin-networking.cfg
Cloud-init should be instructed to re-run all stages as it did on first boot. This command will abruptly disconnect the shell session on the mp-vm-1 instance:
sudo cloud-init clean -r
Cloud-init will consume the changes in /etc/cloud/cloud.cfg.d/50-curtin-networking.cfg and propagate them to /etc/netplan/50-cloud-init.yaml on startup. This process will take some time.
You can watch cloud-init perform its tasks through the console, by running this command in a separate Terminal window, or a separate SSH session:
virsh console mp-vm-1
Alternatively, you can monitor the console through Virtual Machine Manager, if you installed that application earlier.
You will know the instance is ready when you see “mp-vm-1 login:” printed on the screen. Some cloud-init processes may continue printing messages to the screen, but once the login prompt is printed, the virtual machine is ready for you to proceed to the next step. If the screen seems frozen, press Enter, and if the system is idle and ready, the login prompt will appear.
Enroll the VM for monitoring and management with Landscape
Step 1: Install SSL Certificate
The SSL certificate was copied to your Ubuntu workstation’s home directory earlier. It exists at ~/landscape_server_ca.crt. This certificate should be copied to mp-vm-1:
multipass mount $HOME mp-vm-1
multipass transfer -vvvv $HOME/landscape_server_ca.crt mp-vm-1:/tmp
multipass umount mp-vm-1
Next, connect to the mp-vm-1 shell prompt:
multipass shell mp-vm-1
Once you are connected to the shell prompt for mp-vm-1, move the certificate to the appropriate directory:
sudo mv /tmp/landscape_server_ca.crt /usr/local/share/ca-certificates/
sudo update-ca-certificates
Look for confirmation that the certificates have been updated:
Updating certificates in /etc/ssl/certs...
1 added, 0 removed; done.
Running hooks in /etc/ca-certificates/update.d...
done.
Step 2: Install the Landscape Client
Earlier in this tutorial, we decided the Landscape server’s hostname would be “landscape”. The Landscape client needs to be able to access the Landscape server through that same “landscape” hostname. You are still connected to the mp-vm-1 shell from the earlier step. Insert the hostname and IP address pairing in the /etc/hosts file on mp-vm-1 with this command:
grep -qxF '192.168.33.2 landscape' /etc/hosts || sudo sed -i "3i192.168.33.2 landscape" /etc/hosts
Multipass configures images from a cloud template, in order for this setting to persist across reboots, it also needs to be applied to /etc/cloud/templates/hosts.debian.tmpl on mp-vm-1:
grep -qxF '192.168.33.2 landscape' /etc/cloud/templates/hosts.debian.tmpl || sudo sed -i "18i192.168.33.2 landscape" /etc/cloud/templates/hosts.debian.tmpl
Install the Landscape client on mp-vm-1:
sudo apt install landscape-client -y
Step 3: Configure the Landscape Client
This command will submit an enrollment request for your virtual machine named mp-vm-1 to the Landscape server:
sudo landscape-config --computer-title $(hostname) --account-name=standalone --url=https://landscape/message-system --ping-url=http://landscape/ping --script-users=ALL --silent
If you wish to have a more creative name for the computer title, instead of redundantly inserting the hostname, feel free to replace $(hostname) in the command above with something else.
Once the registration request has been submitted to Landscape, you will get this confirmation in your shell:
url=https://landscape/message-system --ping-url=http://landscape/ping --script-users=ALL --silent
Created symlink /etc/systemd/system/multi-user.target.wants/landscape-client.service → /lib/systemd/system/landscape-client.service.
Please wait...
System successfully registered.
Step 4: Accept the request in Landscape’s dashboard
Open Firefox on your Ubuntu workstation and visit https://landscape/account/standalone/pending-computers.

Accept the request from your virtual machine.
Delete unwanted virtual machines
You may also have a need to cleanly delete VMs. For example, to remove a virtual machine named “myuselessvm”, run these 3 commands:
multipass delete myuselessvm
multipass purge
virsh destroy myuselessvm
The final command may produce an error message that reads as follows:
error: failed to get domain 'myuselessvm'
This is normal, and may be ignored. This command is a way to ensure that we have been thorough with the removal of the virtual machine, and that no traces of it exist within the Virtual Machine Manager. In situations where Multipass didn’t successfully create the virtual machine, you may encounter the following output when virsh successfully destroys the virtual machine:
Domain 'myuselessvm' destroyed
Summary & Next Steps
Congratulations! Your development environment is neat and tidy. Repeat Step 6 for each new virtual Ubuntu instance you need, and everything will be tightly integrated to your host environment through Multipass, and get monitored and managed through Landscape.

This is the right time to organize your Ubuntu estate within Landscape: divide your virtual machines into groups by applying tags, and define policy profiles for each grouping of machines.
Common use cases for Landscape include:
- Upgrading all packages on a certain group of machines.
- Ensuring certain machines are kept up to date automatically.
- Pinning packages to a certain version.
- Observing resource utilization metrics over time, and configuring custom graphs.
Landscape can be configured to allow remote execution of scripts from within its dashboard. Pairing this capability with the Landscape API empowers you to build some deeper integrations between Multipass, Landscape, and your existing workflows.
If you wish to enable email notifications from within Landscape, this is a good time to configure Postfix. Postfix can act as an SMTP relay for Gmail, Sendgrid, Mailjet, and other services.
Learn more about Canonical’s high availability systems management and server monitoring solution, available through an affordable Software as a Service model. Landscape SaaS is available for free with an Ubuntu Advantage subscription.
Tell us your thoughts!
Thank you for following this tutorial, we’d love to hear how you got on.
Give us feedback in the Ubuntu Discourse if you have any issues.
To help us improve our tutorials, we’d love to hear more about you:
How will you use this tutorial?
- Only read through it
- Read it and complete the exercises
What is your current level of experience?
- Novice
- Intermediate
- Proficient
Why were you interested in this tutorial?
- For my personal use, or hobby projects
- Only for my personal developer environment
- To evaluate Landscape for broader use within my organization
