Overview
Duration: 1:00
Virola Messenger is a self-hosted corporate tool designed to facilitate
distributed teams collaboration. It offers essential features such as
private and group chat rooms, continuous voice and video meetings,
screen sharing, remote control, task management, and more.
Virola Client apps are available for all major desktop and mobile operating
systems, including Windows, macOS, Linux, iOS, and Android.
What you’ll learn
- How to install Virola Server on Ubuntu Linux as a systemd service
- How to connect the Virola Client app with your server
- How to manage Virola Server as the server admin
- How to manage the Virola Server systemd service
What you’ll need
- Ubuntu Desktop 18.04 or above
- Some basic command-line knowledge
Install and run Virola Server
Duration: 5:00
Download the Virola Server installer
Use the following command to download the Virola Server installer for Ubuntu
wget https://virola.io/downloads/current/virola-server-debian_amd64.deb
Actualize your Ubuntu
We recommend this step to make sure that your Ubuntu has the most recent packages and dependencies.
sudo apt-get update
sudo apt-get upgrade
Run the Virola Server installation
sudo apt --yes --fix-broken install ./virola-server-debian_amd64.deb
After running the installation, you will be prompted to register Virola Server as
a systemd service. We recommend choosing this option to allow the server to launch
automatically during system startup and restart gracefully when needed:
- Answer
Yto the questionDo you want to configure Virola Server? - Answer
Yto the questionDo you want to create Systemd configuration file '/etc/systemd/system/virola-server.service' for Virola Server? - Answer
Yto the questionDo you want to create User 'virola' with home directory '/home/virola'? - Enter the IP address your Virola Server will listen on in response to
Enter IP on which Virola Server will listen when running as Systemd service (0.0.0.0) - Enter the port your Virola Server will use in response to
Enter PORT on which Virola Server will listen when running as Systemd service (7777) - Answer
Yto the questionDo you want to start Virola Server Systemd service now?
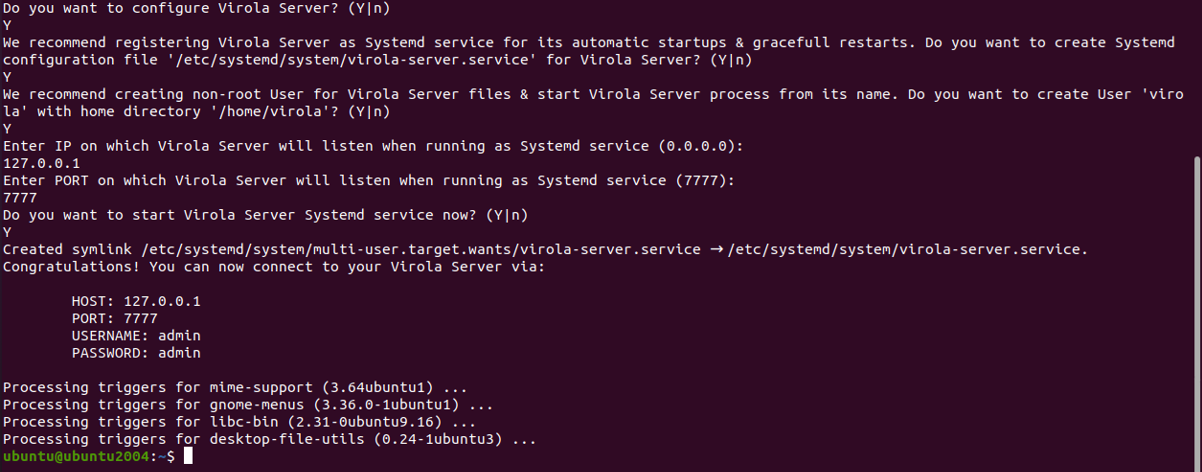
Congratulations! Your Virola Server is now up and running.
The default Admin user profile has been created on your Virola Server.
In the next steps, you’ll learn how to install the Virola Client app, log in, and continue configuring your server.
Install and connect the Virola Client app
Duration: 5:00
Install the Virola Client App
Currently, Virola Messenger does not offer a web client app. You’ll need to download and install the Virola Client for your operating system:
- for Linux Ubuntu https://virola.io/downloads/current/virola-client-debian_amd64.deb
- for Windows https://virola.io/downloads/current/virola-client-win32.exe
- for macOS https://virola.io/downloads/current/virola-client-macos.pkg
- use the Downloads page on the Virola Messenger website for other desktop installers
- use Google Play or the Apple App Store to install mobile Virola clients (search for Virola Messenger)
Install the client app following the standard procedure for your operating system.
Connect the Virola Client app to your Virola Server
After installation, open the Virola Client app. You will see the login form:
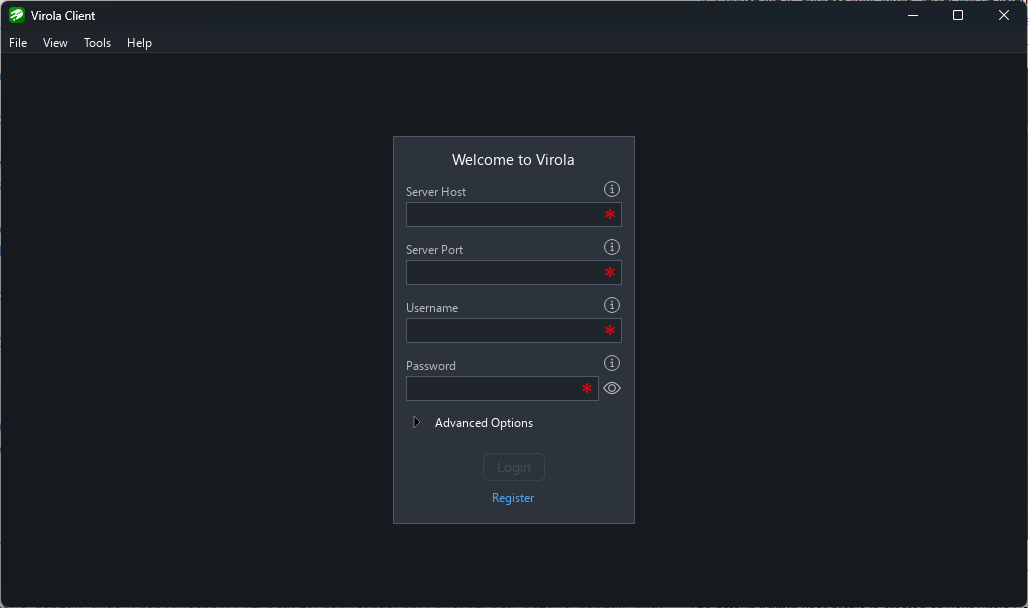
Use the following credentials:
- Server Host: The IP address you entered during server installation
- Server Port: The port you entered during server installation
- Username: admin
- Password: admin
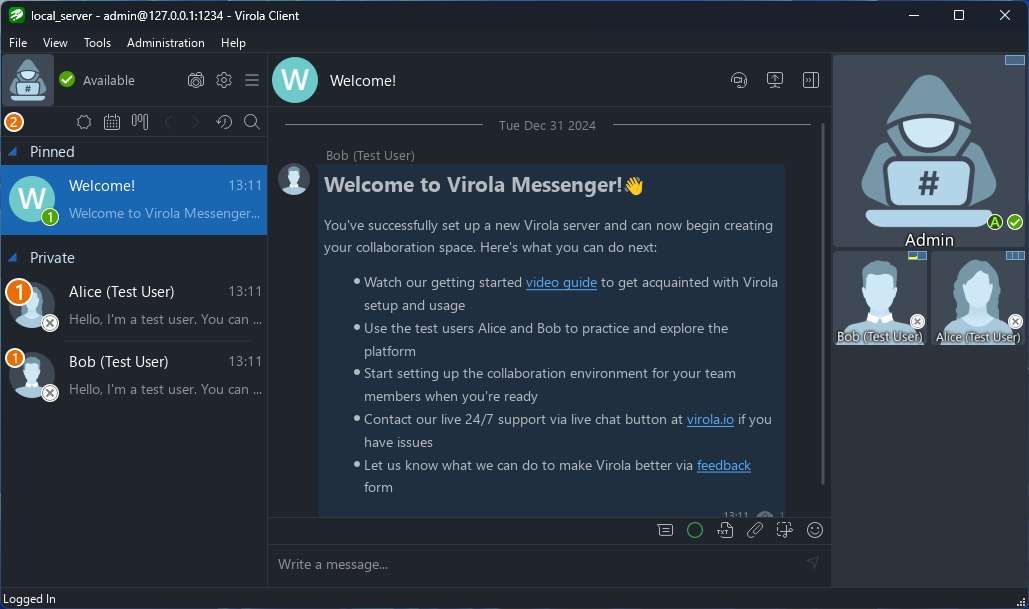
After logging in, you’ll see several predefined users and chat rooms in the Virola Client.
These can help you get acquainted with Virola.
Change your admin password immediately after logging in.
To do this, navigate to
- Main Menu > Tools > Change My User Password
- or Hamburger Menu > My User Profile > User Account Settings > Change My User Password
On the next step, you’ll learn about the Virola Client interface.
Virola Client interface
Duration: 3:00
Basic information
The Virola Client interface consists of three main panels:
- Left Panel: Lists the user’s private and group chat rooms
- Center Panel: Displays the toolbar, chat messages, and input field for the current chat room
- Right Panel: Shows the sidebar with information about chat room participants
You can resize these panels, hide the sidebar when necessary, or switch to split view mode
to separate the chat rooms list from its content.
Administration menu
As the server admin, you can manage your Virola Server via the Administration menu in the Virola Client. This menu is only visible to server admins:
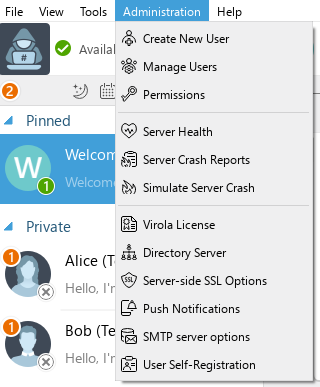
From this menu, you can
- Add new users
- Manage existing users (update details, deactivate accounts) and create users from JSON
- Restrict access to certain features
- Enter your Virola Server license
- Enable Directory Server integration to import Active Directory users
- Apply your own certificate for secure connections
- Disable/enable push notifications for mobile clients
- Configure SMTP server settings (useful for self-registration feature)
- Enable the self-registration feature for future users
Managing Virola Server systemd service
Duration: 3:00
The systemd service for Virola server is called virola-server
Start, stop, restart
sudo systemctl start virola-server - start the server
sudo systemctl stop virola-server - stop the server
sudo systemctl restart virola-server - restart the server
Changing the host and/or port
You may want to change the initial host or port you specified when installing
Virola Server. To do this
- Open the file
/home/virola/start-virola-server.shin a text editor - Locate the
--listenparameter - Update the value using the format:
--listen HOST:PORT - Save the changes
- Run
sudo systemctl restart virola-serverto apply the changes
Then, update the Server Host and Server Port
in your Virola Client login credentials.
Changing the database location
The default Virola Server database location is /home/virola/storage directory,
file virola_server_database_v9.db
You may want to move the database to another location. To do this
- Locate the database it its default directory
- Stop the Virola Server using
sudo systemctl stop virola-server - Move the database file to the desired location
- Open the systemd configuration file
/home/virola/start-virola-server.shin a text editor - Locate the
--storage-dirparameter - Update it with the new directory path using the format:
--storage-dir STORAGE-DIRECTORY-PATH - Save the changes
- Use
sudo systemctl start virola-serverto start the server again
Further reading
- Check the detailed information about Virola features
- Use video tutorials to learn how to further configure and use your Virola Server and Client
- Check Virola User Manual
- Contact our support chat if you have any questions