How to install a Windows 11 VM using LXD

Overview

Duration: 1:00

If you are using a Linux environment but want to run a Windows 11 virtual machine, you can easily do so using LXD. Windows 11 is somewhat strict in its requirements (needs UEFI SecureBoot, having a TPM, and having a modern CPU), but LXD supports that out of the box, and there’s no need for any complex configuration in order to enable a Windows VM. In this tutorial, we will walk through the process of installing Windows in an LXD virtual machine. We will be installing Windows 11, but the same procedure also applies to Windows server machines.

What you’ll learn

  • How to repackage an iso image with distrobuilder
  • How to install a Windows VM

What you’ll need

  • Ubuntu Desktop 16.04 or above
  • LXD snap (version 4.2 or above) installed and running
  • Some basic command-line knowledge

Prepare your Windows image

Duration: 5:00

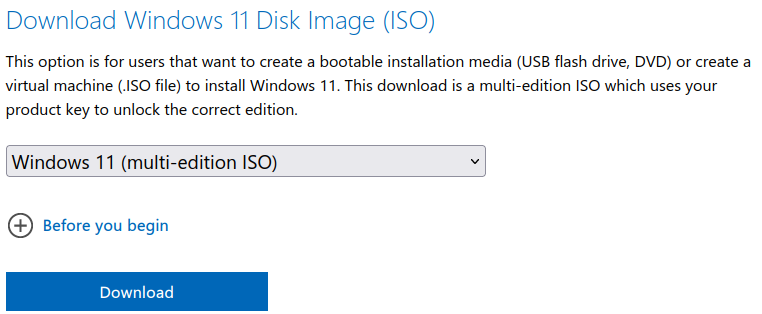
To start, we need to download a Windows 11 Disk Image (ISO) from the official website.

To proceed with the installation, we need to prepare the downloaded image, by repackaging it with a tool called distrobuilder. Distrobuilder is an image-building tool for LXC and LXD, used to build all our official images.

First, we need to install distrobuilder

sudo snap install distrobuilder --classic

Then we need to locate our downloads directory and find our Windows 11 iso file

cd Downloads/
ls WindowsIsoImage.iso

We can then repackage the file, and give it a new file name (let’s call it “win11.lxd.iso”)

:warning:This needs to be run as root

sudo distrobuilder repack-windows WindowsIsoImage.iso win11.lxd.iso

ⓘYou might get a message “Required tool “hivexregedit” is missing” and “Required tool “wimlib-imagex” is missing”. You can easily install the first one using the following command: apt-get install libwin-hivex-perl and the second one using apt-get install wimtools

ⓘYou might also get a message “failed to create overlay” depending on the file system you use. This does not hinder the process, rather it will just do things the alternative way which may take a few min longer

The result is a new iso image that will work seamlessly with LXD.

We can now locate the new iso file

ls -lh win11.lxd.iso

Create a new VM

Duration: 4:00

After we create the Windows image, We can create a new empty VM that we can call ”win11”

lxc init win11 --vm --empty

The default storage/disk provided to new VMs is 10GB, which is not enough for Windows so we need to increase the size of the disk to 50GB with the following command before proceeding

lxc config device override win11 root size=50GiB

We should also increase the CPU limits for optimal performance

lxc config set win11 limits.cpu=4 limits.memory=8GiB

Next, we need to add TPM (Trusted Platform Module) as it’s one of the things Windows requires. We can call it vtpm as it is a virtual TPM after all. Adding TPM will also enable you to enable things like bitlocker inside of your VM.

lxc config device add win11 vtpm tpm path=/dev/tpm0

The last thing we need to do is add the install media Itself and make it a boot priority (so it boots automatically)

lxc config device add win11 install disk source=/home/mionaalex/Downloads/win11.lxd.iso boot.priority=10

ⓘReplace /home/mionaalex/Downloads/ with your own path to the repackaged file

Now we can start the installer.

ⓘYou will need to manually provide a VGA console access by installing either remote-viewer or spicy. If neither of these is found in the system, you will get a message instructing you to install them.

lxc start win11 --console=vga

If needed, install remote-viewer or spicy as prompted

sudo apt install virt-viewer

The rest of the installation will proceed automatically.

Install Windows

Duration: 10:00

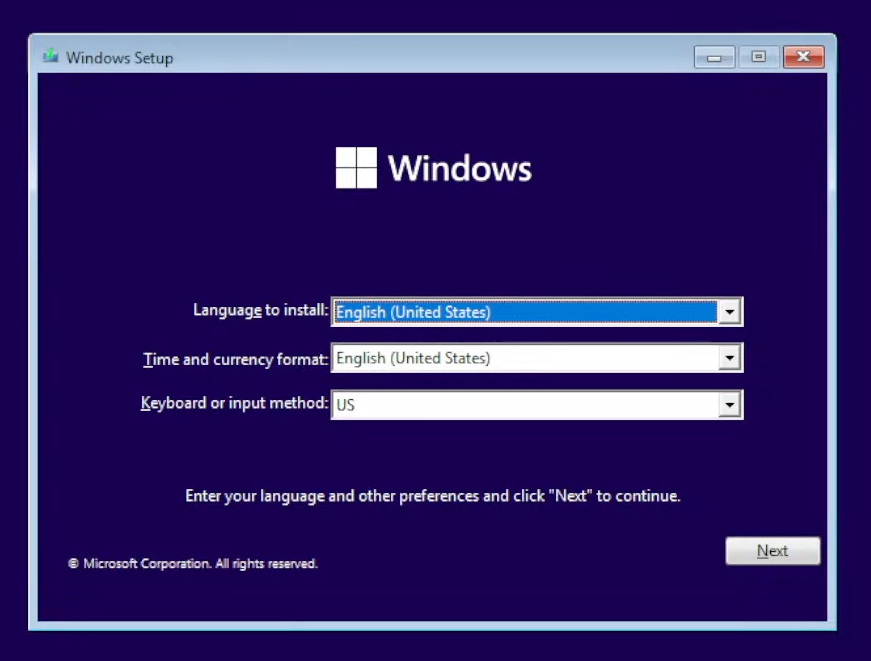
You should now see the Windows installer screen.

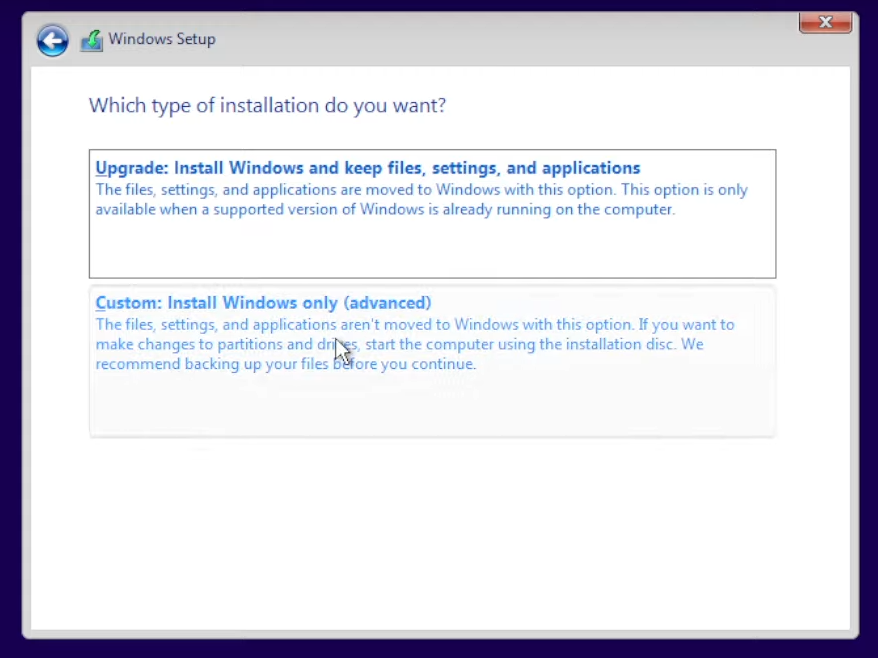
You can select “I don’t have a key” (or add a key if you have one), select Windows 11 Pro, select the option Custom: Install Windows Pro only (Custom/advanced) and click install.

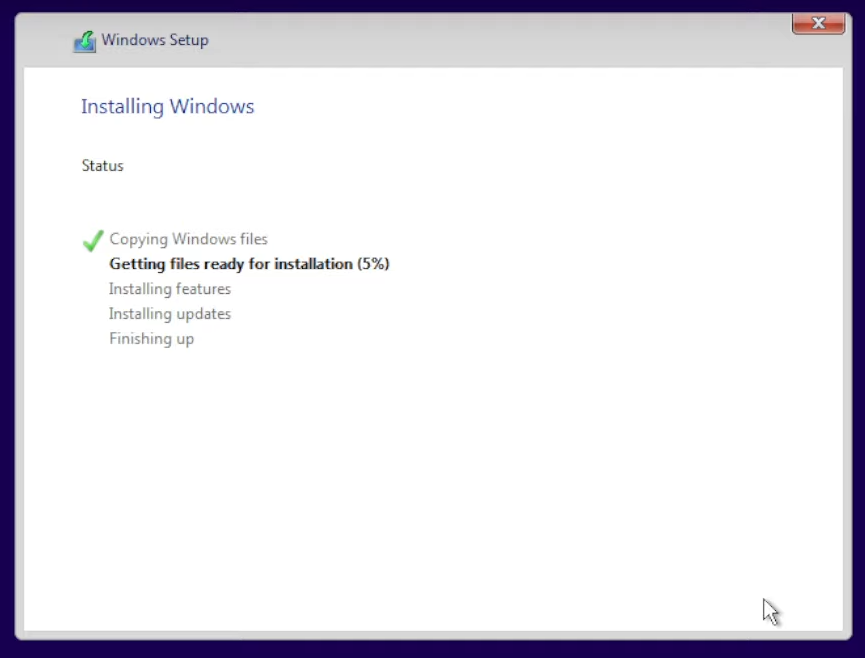
The installation will take some time.

Once the first stage is done, you will need to restart. That will close the terminal for the console, so you need to open it again.

lxc console win11 --type=vga

This will now look like a regular Windows installation process. You will see a boot window with “getting ready”. If it needs to reboot again, just run the command above.

You will get another standard setup screen, choose your options (date format, keyboard layout etc.) or skip through it.

Now it will look for updates. This will take some time.

Once completed, it will restart again so attach to the console again. The installer will show up once again and complete the process.

Additional information

Duration 1:00

Now you have your Windows 11 VM up and running, and you can use it in any way you’d like.

ⓘFor best results, update the virtIO drivers. It will give you a driver that is capable of doing more than 800 by 600, this allows you to increase the size of the window.

That’s all

Duration 1:00

Now you’ve learned how you can set up and run a Windows 11 virtual machine using LXD.

If you’d like to watch a video walkthrough, you can find it here.

If you’d like to read more about LXD virtual machines, read this blog.

For more about LXD in general, take a look at the following resources:

If you have further questions or need help, you can get help here:

2 Likes

I could not find wimtoolslx package.
Seems the package is named wimtools in focal repository.

Has the path parameter been removed when adding a tpm device?

$ sudo lxc config device add win11 tpm tpm path=/dev/tpm0
Error: Invalid devices: Device validation failed for "tpm": Failed to validate config: Invalid device option "path"
# Try with this:
sudo apt update; sudo apt install -y snapd genisoimage libwin-hivex-perl wimtools rsync; sudo snap install distrobuilder --classic

# Then build the image
sudo distrobuilder repack-windows WindowsIsoImage.iso win11.lxd.iso --windows-version w11
  1. Check if your computer has a tpm module available as follow:
    ls -la /dev/tpm*
    crw-rw---- 1 tss root 10, 224 Jul 19 00:14 /dev/tpm0
    crw-rw---- 1 tss root 253, 1 Jul 19 00:15 /dev/tpm1
    crw-rw---- 1 tss tss 253, 65536 Jul 19 00:14 /dev/tpmrm0
    crw-rw---- 1 tss tss 253, 65537 Jul 19 00:15 /dev/tpmrm1
  2. If you see /dev/tpm0, then try to add it without specifying a path (assuming that you are running the currrent latest/stable version of lxd or 5.3-91e042b)
    lxc config device add win11 vtpm tpm

For those having issues with this, the actual command is without spaces on each – or:
lxc init win11 --vm --empty

You can also specify the resources that you would like to allocate in the same command:
lxc init win11 --vm --empty -c limits.cpu=4 -c limits.memory=8GB

1 Like

This worked for me, thanks

The command fails without removing the space between the - and the -. It works only with
lxc init win11 --vm --empty

1 Like

@mionaalex
I suggest this change (I suspect an auto replacement of double dash to “long dash” char):

lxc console win11 --type=vga

Thank you for the tutorial!

1 Like

The tutorial commands assume you’re in a graphical environment. I followed the tutorial to setup a VM in a remote headless server. After installing virt-viewer, you still run into the message: (remote-viewer:989342): Gtk-WARNING **: 07:39:23.834: cannot open display:

Is there a way to connect to said VM and see the VGA console from a remote system, etc? (I’m trying to setup a dedicated server for a Windows-based application, and I’d like to avoid having to install VNC on the VM host.)

The best I’ve been able to do is lxc start <vm> --console, without =vga to get a TUI, but regardless of what I do, I can never get it to load the ISO. There’s no QM00001 drive in the Boot Manager, but even if I put the drive that actually shows up, it never picks up the ISO, so I can never get the OS installation process going.

a few more packages that are required:
sudo apt install libwin-hivex-perl wimtools genisoimage

2 Likes

Can I install Windows 11 using Ubuntu Workshops?

Here’s my repeatable procedure from today for Windows 10. It took some trial-and-error. In particular, Windows Media Creation ISOs don’t work with distrobuilder.

lxc profile create win10
lxc profile set win10 limits.cpu=4
lxc profile set win10 limits.memory=8GiB
lxc profile device add win10 vtpm tpm path=/dev/tpm0
lxc profile device add win10 root disk pool=default path=/ size=50GiB

sudo snap install distrobuilder --classic
sudo apt-get install libwin-hivex-perl wimtools genisoimage
sudo distrobuilder repack-windows Win10_22H2_English_x64v1.iso win10.lxd.iso

lxc init win10 --vm --empty
lxc config device set win10 root size=50GiB
lxc config device add win10 install disk source=$HOME/tmp/win10.lxd.iso boot.priority=10
lxc profile add win10 win10
lxc start win10 --console=vga &

You need to click in the console and press a key to boot to the ISO when prompted, then install Windows how you like (I used DISM). Once I had the first working boot and login, I shut down and did

lxc config device remove win10 install
lxc snapshot win10 ready
lxc start win10 --console=vga &

Then ran https://www.spice-space.org/download/windows/spice-guest-tools/spice-guest-tools-latest.exe to get mouse pointer integration, copy-paste, etc., shut down, snapshotted again, and I have a useful baseline system.

sudo apt-get remove libwin-hivex-perl wimtools genisoimage
sudo apt-get autoremove
sudo snap remove distrobuilder
1 Like

I was unable to follow the tutorial for a number of missing steps. The latest I can’t find a way around. Any tips?

Host OS: Ubuntu 22.04.3
Guest OS (desired): Win11

$ lxc init win11 --vm --empty
Creating win11
Error: Failed creating instance record: Failed initialising instance: Failed getting root disk: No root device could be found
$ lxc storage ls
+------+--------+--------+-------------+---------+-------+
| NAME | DRIVER | SOURCE | DESCRIPTION | USED BY | STATE |
+------+--------+--------+-------------+---------+-------+

On running
lxc init win11 --vm --empty

I got
If this is your first time running LXD on this machine, you should also run: lxd init

and it failed with
Creating win11
Error: Failed creating instance record: Failed initialising instance: Failed getting root disk: No root device could be found

Tried

lxd init

– it sat waiting until I hit ENTER then accepted all the defaults and the next steps worked.

On a clean install of 22.04.3, I got an error indicating I was missing hivexregedit and wimtoolslx. It took a little digging to figure out the packages in which these tools are distributed (libwin-hivex-perl and wimtools, respectively). No more than 5 minutes or so, but still, mentioning this somewhere in the instructions could be helpful.

Other than that, these instructions worked fine.

after i
lxc config device add win11 vtpm tpm path=/dev/tpm0
i got this
Error: Invalid devices: Device validation failed for “vtpm”: Failed loading device “vtpm”: Unsupported device type

need help

Hey there, I would explicitly add to the guide that you need to press any key while virt-viewer or spicy quickly because otherwise it will attempt to boot from Ethernet (I think). I did not understand what was going on because I was pressing buttons but the spicy window was not focused.

I also want to suggest that prerequisite of genisoimage package installation. So I suggest replace caution block like below.

This action could save lots of time from Ubuntu and LXD beginners. : )

ERROR  [2024-04-07T20:55:11+09:00] Failed running distrobuilder                  err="Failed to check dependencies: Required tool \"genisoimage\" is missing"
INFO   [2024-04-07T20:55:11+09:00] Removing cache directory

Hi, thank you very much for your tutorial :slight_smile: I’m discovering LXC while following it, so I’m a bit confused sometimes.

I’ve struggled a bit before I could start the vm because I had a permission error. Idk if that’s the only reason, but I solved my problem by adding the user to the lxd group (so that I don’t need sudo anymore) and it worked after reloging =D

$ sudo usermod -a -G lxd kam

But I’m still blocked during the windows installation process after setting the time zone and the keyboard layout… It needs to connect to the internet and I can’t figure out how to fix it, and anything I find just confuses me a bit more.

Could anyone help me ?
Here’s some information I gathered about my config that look relevant but not sure what everything means nor what I should do (host : Ubuntu 22.04.4)

$ ifconfig
[...]
lxcbr0: flags=4099<UP,BROADCAST,MULTICAST>  mtu 1500
        inet 10.0.3.1  netmask 255.255.255.0  broadcast 10.0.3.255
        inet6 fe80::216:3eff:fe00:0  prefixlen 64  scopeid 0x20<link>
        ether 00:16:3e:00:00:00  txqueuelen 1000  (Ethernet)
        RX packets 30  bytes 1968 (1.9 KB)
        RX errors 0  dropped 0  overruns 0  frame 0
        TX packets 48  bytes 8226 (8.2 KB)
        TX errors 0  dropped 0 overruns 0  carrier 0  collisions 0

lxdbr0: flags=4163<UP,BROADCAST,RUNNING,MULTICAST>  mtu 1500
        inet 10.185.169.1  netmask 255.255.255.0  broadcast 0.0.0.0
        inet6 fd42:6c33:ab21:95ad::1  prefixlen 64  scopeid 0x0<global>
        inet6 fe80::216:3eff:fef4:f5d7  prefixlen 64  scopeid 0x20<link>
        ether 00:16:3e:f4:f5:d7  txqueuelen 1000  (Ethernet)
        RX packets 4620  bytes 343225 (343.2 KB)
        RX errors 0  dropped 0  overruns 0  frame 0
        TX packets 903  bytes 86214 (86.2 KB)
        TX errors 0  dropped 0 overruns 0  carrier 0  collisions 0
[...]
veth296052c: flags=4163<UP,BROADCAST,RUNNING,MULTICAST>  mtu 1500
        inet6 fe80::e01b:9dff:fe03:34c2  prefixlen 64  scopeid 0x20<link>
        ether e2:1b:9d:03:34:c2  txqueuelen 0  (Ethernet)
        RX packets 0  bytes 0 (0.0 B)
        RX errors 0  dropped 0  overruns 0  frame 0
        TX packets 264  bytes 44418 (44.4 KB)
        TX errors 0  dropped 0 overruns 0  carrier 0  collisions 0
[...]
$ ip -4 netconf show dev veth296052c
inet veth296052c forwarding on rp_filter loose mc_forwarding off proxy_neigh off ignore_routes_with_linkdown off
$ sudo lxc network ls
+-----------------+----------+---------+-----------------+---------------------------+-------------+---------+---------+
|      NAME       |   TYPE   | MANAGED |      IPV4       |           IPV6            | DESCRIPTION | USED BY |  STATE  |
+-----------------+----------+---------+-----------------+---------------------------+-------------+---------+---------+
| br-a80d6ef02be1 | bridge   | NO      |                 |                           |             | 0       |         |
+-----------------+----------+---------+-----------------+---------------------------+-------------+---------+---------+
| docker0         | bridge   | NO      |                 |                           |             | 0       |         |
+-----------------+----------+---------+-----------------+---------------------------+-------------+---------+---------+
| eno1            | physical | NO      |                 |                           |             | 0       |         |
+-----------------+----------+---------+-----------------+---------------------------+-------------+---------+---------+
| lxcbr0          | bridge   | NO      |                 |                           |             | 0       |         |
+-----------------+----------+---------+-----------------+---------------------------+-------------+---------+---------+
| lxdbr0          | bridge   | YES     | 10.185.169.1/24 | fd42:6c33:ab21:95ad::1/64 |             | 2       | CREATED |
+-----------------+----------+---------+-----------------+---------------------------+-------------+---------+---------+
| virbr0          | bridge   | NO      |                 |                           |             | 0       |         |
+-----------------+----------+---------+-----------------+---------------------------+-------------+---------+---------+
| wlp1s0          | physical | NO      |                 |                           |             | 0       |         |
+-----------------+----------+---------+-----------------+---------------------------+-------------+---------+---------+
$ sudo lxc network show lxdbr0
name: lxdbr0
description: ""
type: bridge
managed: true
status: Created
config:
  ipv4.address: 10.185.169.1/24
  ipv4.nat: "true"
  ipv6.address: fd42:6c33:ab21:95ad::1/64
  ipv6.nat: "true"
used_by:
- /1.0/instances/win11
- /1.0/profiles/default
locations:
- none
$ sudo lxc info | grep -i firewall
- network_firewall_filtering
- firewall_driver
  firewall: nftables

Thanks, Kam

1 Like