When a robotics application is snapped, one might want to use it on multiple different robots.
Reusing the same snap means that we must be able to configure the snap to the specificity of a robot once installed on it.
We present in this guide the steps to distribute a snap with a configuration that is easily overwritable on the robot.
Our snap will be distributed with the default configuration, and will copy this default configuration into a location that is common across multiple revisions of the snap. This allows the user to manually modify the configuration file and keep it across updates.
For this how-to-guide, we use the example ubuntu-robotics/snap_configuration.
The repository consists of the snapcraft.yaml file from which the snap is built, as well as a launcher script.
The repository contains a standard snap package providing the key_teleop application from the teleop_tool ROS 2 package. The goal here is to be able to configure the application without having to update the snap. The key_teleop node can be configured for its forward_rate, backward_rate and rotational_rate parameters. They are the parameters present in the configuration file that are overwritable.
Requirements
This how-to-guide is assuming that we are familiar with robotics snaps. Please refer to our tutorials to learn more about robotics snaps.
An up and running Ubuntu (minimum 20.04) with snapcraft installed is also required.
Distribute a default configuration
At the beginning of this guide, we introduced the ubuntu-robotics/snap_configuration. We start from this snap and modify it so that it uses our shared configuration.
First, we clone the repository:
git clone https://github.com/ubuntu-robotics/snap_configuration.git
This repository already contains a snap package for the key_teleop package. There is a launcher script in snap/local/teleop_launcher.bash and the snap/snapcraft.yaml.
Import the default configuration
By default, our application doesn’t use any configuration file. It simply uses the default parameters hardcoded in the key_teleop.py. We then add our YAML file and import it in our snap!
First, we must create our default YAML file snap/local/up-to-date-config.yaml with the following content:
key_teleop:
  ros__parameters:
    forward_rate : 1.0
    backward_rate: 0.5
    rotation_rate: 1.0
Then we modify our snapcraft.yaml so it also imports the configuration file into our snap:
local-files:
  plugin: dump
    source: snap/local/
    organize:
    '*.bash': bin/
+   '*.yaml': etc/
Our default configuration file will now be available in the snap.
Use the default configuration
The teleop_launcher.bash is currently not using any configuration file. Let’s modify the launcher so it uses the default configuration file that we added to our snap:
#!/usr/bin/bash

+CONFIG_FILE_PATH="$SNAP/etc/up-to-date-config.yaml"

+echo "Using config file: $CONFIG_FILE_PATH."

-ros2 run key_teleop key_teleop
+ros2 run key_teleop key_teleop --ros-args --params-file $CONFIG_FILE_PATH
Our key_teleop ROS application is now using the default configuration file.
In the next section, we will see how to let the user customize this configuration file.
Add the overwritable configuration file
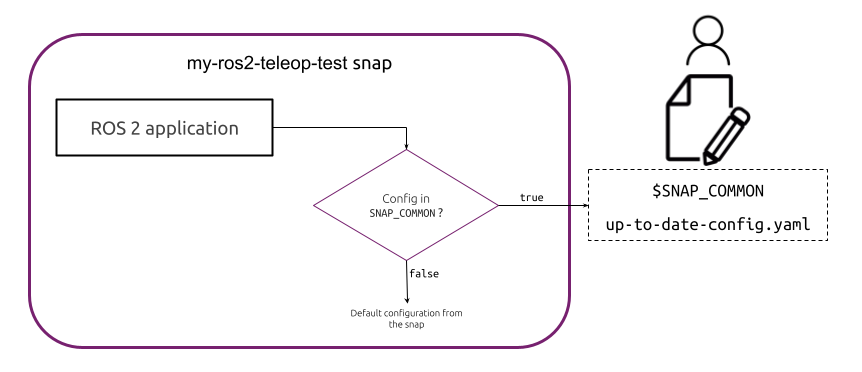
For the user to be able to customize the configuration file, it must be in a location that the snap can access and where a user can edit this configuration. We use $SNAP_COMMON to store the editable YAML file.
The following diagram illustrates the configuration file workflow. Before starting the application, our snap checks if a configuration file is available in $SNAP_COMMON. If not, we simply use the default configuration.
Let’s implement this workflow with our snap!
Provide the customizable configuration file
Launcher script
The first step is to implement the launching logic for the configuration file. We must check if the custom file exists and launch our application with the custom file if possible. To do so, we modify the teleop_launcher.sh:
#!/usr/bin/bash

+CUSTOM_CONFIG_FILE_PATH="$SNAP_COMMON/up-to-date-config.yaml”
CONFIG_FILE_PATH="$SNAP/etc/up-to-date-config.yaml"

+if [[ -f $CUSTOM_CONFIG_FILE_PATH ]]; then
+ CONFIG_FILE_PATH=$CUSTOM_CONFIG_FILE_PATH
+fi

echo "Using config file: $CONFIG_FILE_PATH."

ros2 run key_teleop key_teleop --ros-args --params-file $CONFIG_FILE_PATH
Our launcher script is now picking the customized configuration when available.
Install the customizable configuration at install
To provide a good starting point to the user, we add a script, so the default configuration is copied and placed in the editable area at install.
Note that the $SNAP_COMMON requires root privilege from the user for editing.
We create the script snap/local/reset-overwritable-configuration.bash with the following content:
#!/usr/bin/bash -e

echo "Make sure to run this application with enough privilege."

cp $SNAP/etc/up-to-date-config.yaml $SNAP_COMMON/

echo "The configuration can now be edited in the file $SNAP_COMMON/up-to-date-config.yaml."
We make the script executable:
chmod +x snap/local/reset-overwritable-configuration.bash
Now that we have a script, we simply call it from the install hook. This way, on the installation of the snap a default configuration is placed, so the user can directly edit the YAML.
We create the install hook:
mkdir snap/hooks
We can then add the file snap/hooks/install:
#!/usr/bin/bash

$SNAP/bin/reset-overwritable-configuration.bash
We make the hook executable:
chmod +x snap/hooks/install
The installation part of our snap is now done. Before testing, we add a last feature to our snap in case something goes wrong with our config.
Add an application to reset the configuration
By modifying the configuration, over time, one might want to retrieve the default behaviour.
To do so, we can add another application to our snap to reset the customizable configuration file. For this application, we reuse the reset-overwritable-configuration.bash already present in the snap.
To add the application, we only modify the snapcraft.yaml:
apps:
  my-ros2-teleop-test:
    command: bin/teleop_launcher.bash
    plugs: [network, network-bind]
    extensions: [ros2-humble]
    environment:
     "LD_LIBRARY_PATH": "$LD_LIBRARY_PATH:$SNAP/usr/lib/$SNAPCRAFT_ARCH_TRIPLET/blas:$SNAP/usr/lib/$SNAPCRAFT_ARCH_TRIPLET/lapack"

+ reset-overwritable-configuration:
+   command: bin/reset-overwritable-configuration.bash
This application requires sudo if called by a non-privileged user.
We are now all set to test this snap!
Testing
We can now test the overwritable configuration. First, we build and install the snap:
snapcraft
sudo snap install my-ros2-teleop-test_*.snap --dangerous
The snap being installed, we can make sure that the customizable YAML was correctly placed:
cat /var/snap/my-ros2-teleop-test/common/up-to-date-config.yaml
We then see the default content of the file:
key_teleop:
  ros__parameters:
    forward_rate : 1.0
    backward_rate: 0.5
    rotation_rate: 1.0
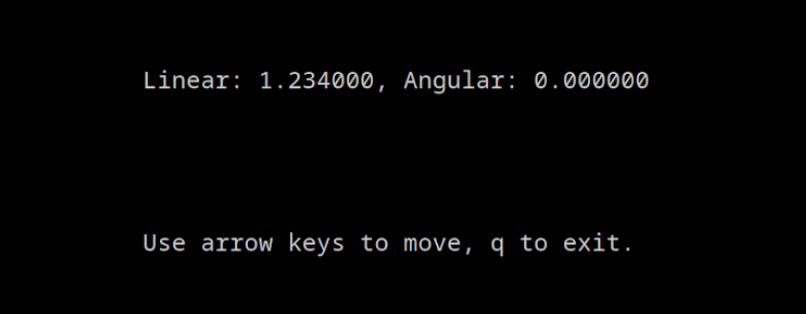
We can edit (with root privileges) this file with a custom value (1.234 for forwar_rate).
Now we launch the application:
my-ros2-teleop-test
And by pressing the “up” arrow key, we can see that the custom configuration was used:
Additionally, we can reset to the default configuration with the following command:
sudo my-ros2-teleop-test.setup-overwritable-configuration
With the application, snap properly using the custom YAML edited by the user. We can now update the configuration easily and independently of the snap.
We can now use the same snap on multiple robots and use a different configuration file for every device.
We can find the completed example of this how-to-guide on the branch howto/overwritable_configuration of the repository.