After building and writing a custom image for a Raspberry Pi, the device can now be booted and configured.
1. Boot Ubuntu Core
Insert the microSD card into your powered-off Raspberry Pi and power-on the device. For this setup phase, you will also need to have a keyboard and screen connected.
From this point, it can take around five minutes for the system to instantiate itself. You will see typical Linux output on the screen, periods where there’s just a flashing cursor, and messages like Installing the system, please wait for a reboot. When this process has finished, you will see the following:
Press enter to configure.
Press Enter and you will see a small menu with a single item:
Configure the network and setup an administrator account on this all-snap Ubuntu Core system.
Press Enter again and you will be taken to the network setup page:
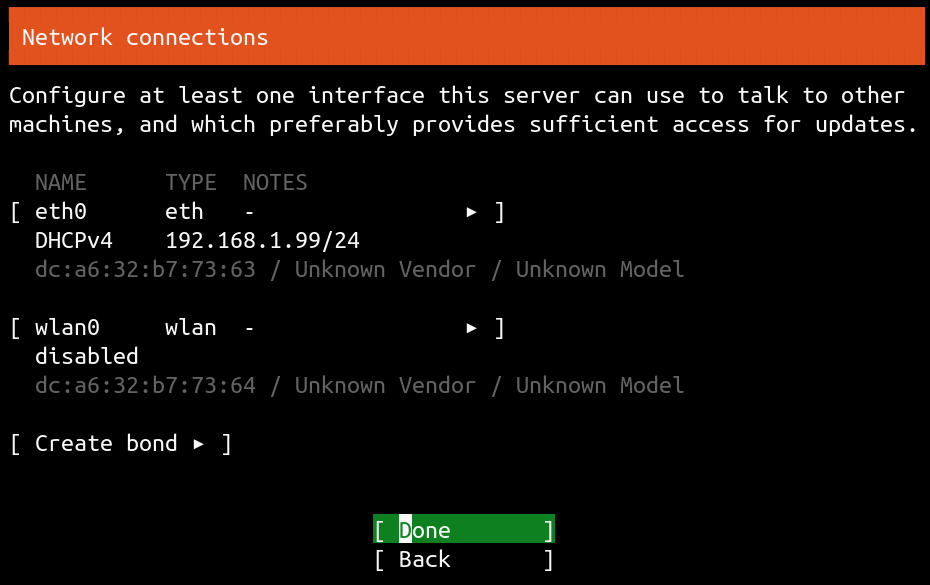
1.1 Configure a network connection
Network access is a requirement to setup Ubuntu Core, and you have a choice about whether to use a wired connection (Ethernet) or Wi-Fi, if your Raspberry Pi supports it.
Use the cursor up key, or tab, to move to the appropriate wlan0 or eth0 option to configure Wi-Fi or Ethernet respectively.
Wi-Fi (recommended)
This is the most common option. If you have a device with Wi-Fi capabilities, such as a Raspberry Pi 3 or 4, it will appear as a separate network device called wlan0 beneath any Ethernet devices.
.png)
To configure Wi-Fi, press the cursor up key until wlan0 is selected and press Enter. You will see a small menu and you need to select Edit Wifi.
.png)
After selecting Edit Wifi, you will see the network interface configuration panel for Wi-Fi. If you know the name of the Wi-Fi network you wish to connect to, it can be entered directly, or cursor down to Choose a visible network and select a network from a list of those that have been detected.
.png)
Finally, enter the Wi-Fi password and select Save to complete the configuration. You will be returned to the previous menu and your device will attempt to connect to the network. If successful, you will see its IP address to the right of DHCPv4.
.png)
For advanced network configuration, such as setting a static IP address, select the wlan0 device again, and choose edit IPv4 from the menu.
When you’ve finished configuring your network settings, select Done and press enter on the Network connections page to move on to the final step.
Ethernet
If an Ethernet cable is connected to your device, a network connection will attempt to be automatically negotiated and, if this is successful, you will see an IP address for the device after the DHCPv4 entry in the Network connections page. In this case, you don’t need to do anything further:
.png)
To configure an Ethernet connection manually, select the eth0 device and select Edit IPv4 from the small menu that appears. By default, the network device will be configured to use Automatic (DHCP), which is why the connection attempts to automatically configure itself. Press Enter to reveal two further options, Manual and Disabled:
.png)
Selecting Manual will allow you to configure your Ethernet connection manually by entering values for your subnet mask value (using CIDR xx.xx.xx.xx/yy notation), the static IP address of your device, the network gateway, and the name servers you wish to use:
.png)
Select Save to apply those changes and for the connection to be attempted. You can now proceed to the next step by pressing Done.
2. Connect to the device
A final configuration step asks for the email address of your account in the store. This can be safely ignored for now. Whenever your device boots, it will automatically connect to the network and requires no further configuration.
Each time the device starts up, if a display connected it will show its various addresses and the account linked to the device. As we’ve built this Ubuntu Core image to include the AdGuard Home snap, we can now connect to this service via the published IP address and its configured port (3000 for setup):

Congratulations! You have successfully built your own image, installed it, and connected to Ubuntu Core on your Raspberry Pi.
See First steps with Ubuntu Core for an introduction to using Ubuntu Core.