| Key | Value |
|---|---|
| Summary | If you’re running Ubuntu, the network connections are managed by Netplan. Discover how to access the YAML settings data in this quick tutorial, updated for Ubuntu 23.10 |
| Categories | desktop |
| Difficulty | 2 |
| Author | Lukas Märdian slyon@ubuntu.com |
Before you start
Regardless if using Ubuntu Server, Ubuntu Core or Ubuntu Desktop, our network configuration is provided by Netplan. We benefit from the consistency of having all network configuration in a single format at a single location across all variants of Ubuntu.
Which settings are managed through Netplan?
Netplan is able to handle systemd-networkd and NetworkManager settings. On desktop systems all NetworkManager settings are integrated without interrupting traditional NetworkManager workflows (graphical UI, nmcli, nmtui, …).
So all network settings, like Wi-Fi networks, passwords or IP address configuration is transparently visible in NetworkManager (GNOME Quick Settings, GNOME Control Center, …) and Netplan at the same time.

ⓘ Note: The NetworkManager-Netplan integration was first implemented in Ubuntu 23.10.
Checking our toolbox
Before proceeding, we ensure that we have installed all the needed software.
$ apt list netplan.io
Listing... Done
netplan.io/mantic,now 0.107-5 amd64 [installed,automatic]

$ apt list network-manager
Listing... Done
network-manager/mantic-updates,now 1.44.2-1ubuntu1.2 amd64 [installed]
Looking good? Let’s get started!
Connect to a Wi-Fi network
We open the system settings through GNOME’s “Quick Settings” menu in the top right corner, clicking the cogwheel icon. From the system settings, we choose the “Wi-Fi” menu from the left sidebar.

We select our preferred network from the list of “Visible Networks” to start the connection process. After entering the WPA-PSK password, we should see that the network (here: Home.Net) is now displayed as “Connected”.

Query connection details
Once the connection got established, we can click the cogwheel on the given Wi-Fi network name, to make NetworkManager display all the connection details in a graphical way.

While the connection was created inside the system settings and established by the NetworkManager daemon, Netplan picked up all the connection details transparently in the background. We can now query it to show connection details from the “Terminal” in a programmatic way, using the netplan status command line interface.

Access network config data
Using “netplan get” CLI
From the netplan status query above, we can see that our new Home.Net Wi-Fi network was saved using the “NM-217332a2-0760-4a1c-9d12-53c69fe48580” unique identifier on Netplan’s NetworkManager backend. We can use this information to get all the specific Netplan settings that make up this new Wi-Fi connection profile.
$ sudo netplan get network.wifis.NM-217332a2-0760-4a1c-9d12-53c69fe48580
[sudo] password for test:
renderer: NetworkManager
match: {}
dhcp4: true
dhcp6: true
ipv6-address-generation: "stable-privacy"
access-points:
  "Home.Net":
    auth:
      key-management: "psk"
      password: "s0s3cret!"
    networkmanager:
      uuid: "217332a2-0760-4a1c-9d12-53c69fe48580"
      name: "Home.Net"
      passthrough:
        connection.permissions: "user:test:;"
        connection.timestamp: "1698674438"
        ipv6.ip6-privacy: "-1"
        proxy._: ""
networkmanager:
  uuid: "217332a2-0760-4a1c-9d12-53c69fe48580"
  name: "Home.Net"
The output of sudo netplan get is in machine readable YAML format and can be consumed by 3rd party applications for further integration.
YAML settings on disk
At the same time we can see that the connection was persisted to disk at /etc/netplan/ in a new 90-NM-217332a2-0760-4a1c-9d12-53c69fe48580.yaml file, whereas no NetworkManager keyfile was written to the legacy location at /etc/NetworkManager/system-connections/.
On reboot, or when calling sudo netplan apply, the settings stored in Netplan’s YAML configuration will be translated to NetworkManager settings in /run/NetworkManager/system-connections/ and made available to NetworkManager.
Modify network configuration in Netplan
As we learned before, we can access the Netplan configuration created by NetworkManager in /etc/netplan/ and edit it to our liking. Modifying the YAML files directly can be error prone, therefore we should again be using Netplan’s CLI.
Using “netplan set” CLI
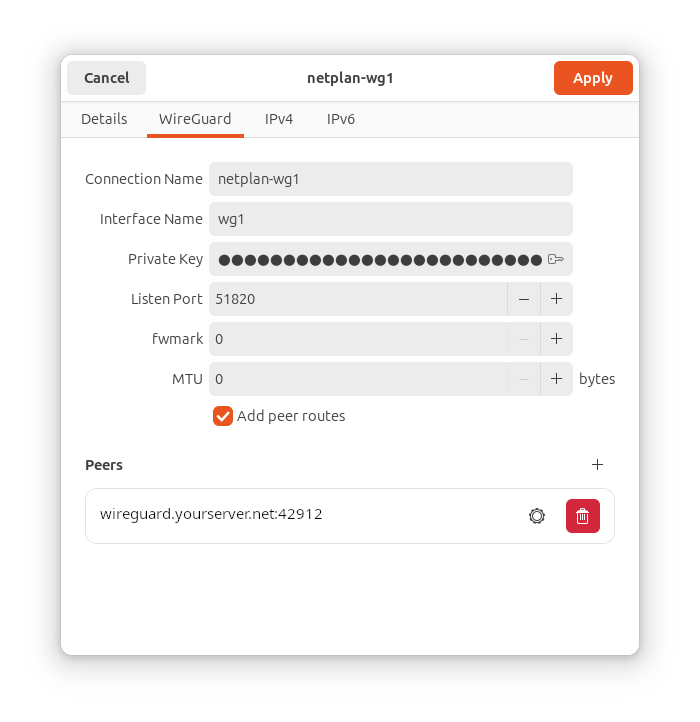
Let’s create a new WireGuard VPN tunnel in Netplan and see how it propagates into NetworkManager.
$ sudo netplan set network.tunnels.wg1="{\
  renderer: NetworkManager,\
  addresses: [192.168.4.202/24],\
  mode: wireguard,\
  key: 4HKPUuAaMopBe3LTMbrfvfllsnzs+EmUAWG+Iqikw1k=,\
  peers: [{\
    endpoint: wireguard.yourserver.net:42912,\
    keepalive: 25,\
    allowed-ips: [192.168.4.0/24, 0.0.0.0/0],\
    keys: {\
      public: CcKoFM8pmgoqOeAYFdUKzpzonCSjh8Vqxv6f/HjPwi0=,\
      shared: w3T2wVsJnu0vTmvP5tzjR1SNMgqdosuC1VXY6Haoi2k=\
}}]}"
After adding the new WireGuard connection, it will be stored in /etc/netplan/70-netplan-set.yaml and after running the sudo netplan apply (alternatively: sudo netplan generate && sudo nmcli con reload) command, we can see the VPN tunnel is now managed by NetworkManager.

Opening the system settings and choosing the “Network” menu from the sidebar shows the new “netplan-wg1” VPN connection that we just created using netplan set. Clicking the cogwheel on this VPN connection will reveal all the connection details we entered in Netplan, such as the “Interface Name” or the defined “Peers”.
Enjoy Netplan on Desktop!
That’s it! All our network configuration can be found in /etc/netplan/ and are made available to NetworkManager transparently, so that all graphical or D-Bus integrations, like GNOME Quick Settings, can continue to provide the common UI for Ubuntu Desktop users. Furthermore, a passthrough method was implemented for handling unknown or new settings, making Netplan future-proof for any upcoming NetworkManager release.
Learn more
If you have any issues with your upgrade process, or get stuck along the way, you can always reach out to our community.