Ubuntu Core runs on a large range of hardware, and pre-built images are available for amd64 and Raspberry Pi reference platforms.
Installation on a reference platform is easy and a great way to quickly get started with Ubuntu Core, or to explore Ubuntu Core’s features and evaluate its potential.
Below, we cover how to install a reference image of the latest version of Ubuntu Core on a small form factor PC NUC, however, these instructions will also work for most generic PC configurations too.
At the end of this tutorial, you’ll be able to connect to your PC, install and configure applications, safe in the knowledge that Ubuntu Core will automatically keep your device updated and secure.
- Requirements
- 1. Flash Ubuntu to a USB flash drive
- 2. Install Ubuntu Core from live Ubuntu desktop
- 3. Boot Ubuntu Core for the first time
- 4. Configure a network connection
- 5. Add Ubuntu SSO details
- 6. Connect to the device
See Supported platforms for a list of which images are available for which platforms.
Requirements
This tutorial is suitable for anyone with an interest in Ubuntu Core - no prior knowledge necessary, but you will need a few things first:
- A NUC or similar PC (internal storage will be erased, so make sure it’s backed up).
- A secondary Windows, macOS, or Linux computer to flash an image.
- 6GB+ USB flash drive (this will also be erased, so make sure it’s backed up).
- Connected screen and keyboard for installation.
- An Ubuntu SSO account with associated SSH keys.
Important: Ubuntu Core does not use a username and password to login to the system. Instead, it uses SSH with SSH keys uploaded to your Ubuntu One account. See Connect to Ubuntu Core with SSH for further details.
Unlike installing Ubuntu Core on an IoT device, such as Installing Ubuntu Core 22 a Raspberry Pi, NUC or PC installations require the Ubuntu Core image to be written directly to internal storage. This cannot be done from an operating system running on the same storage, and needs to be performed from an external storage device.
In this tutorial, we will first write and boot a live version of Ubuntu to a USB flash drive, download Ubuntu Core, and write the Ubuntu Core image to the device’s internal storage.
Alongside enough flash storage to hold an Ubuntu image (6GB+), you will need a screen and keyboard connected to the device. These are required for installation, but neither are needed after setup has completed. You may also need to check the BIOS configuration of your device to make sure it can boot from USB devices. If you
After Ubuntu Core is up and running, if you want to access your device remotely, you’ll need an SSH client for your operating system. Linux and macOS both have clients built-in, whereas Windows users can use Ubuntu on WSL.
1. Flash Ubuntu desktop to a USB drive
First, download the desktop ISO image of Ubuntu 22.04 LTS.
This ISO file now needs to be written to your flash storage device. There are many ways to do this, but we recommend using GNOME MultiWriter, which can be installed with a search from the Ubuntu Software application.
Run MultiWriter, and use the Choose file button to open a file requester. From here, select the desktop ISO file you just downloaded. Now insert your USB flash drive. This should be automatically detected by MultiWriter which will now show a Start Copying button. Select this to initiate the process.
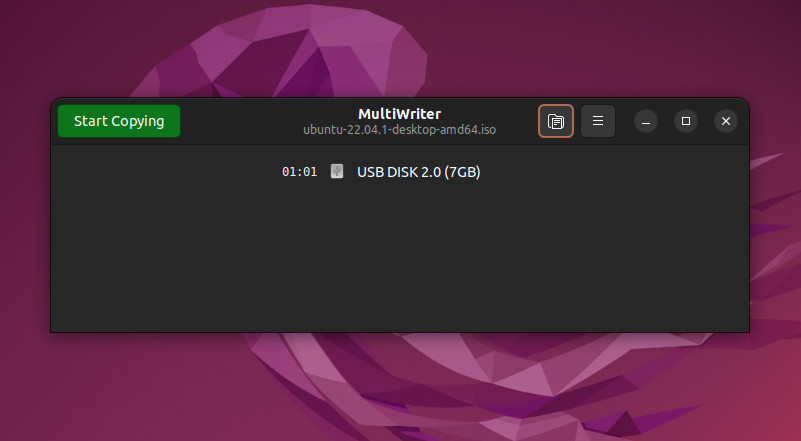
When the process has finished, remove the flash device. It’s now ready to be inserted into the target NUC or PC.
2. Install Ubuntu Core from live Ubuntu desktop
Connect the your freshly flashed USB device to your target NUC or PC and make sure it’s configured to boot from an external USB device, either via function-key triggered boot menu, via a BIOS setting, or simply by default.
Turn on the machine and if it’s booting correctly from the USB device, it will show the GNU GRUB boot menu. Select the default option, Try or Install Ubuntu to launch the desktop.
Similarly, when the desktop appears, select Try Ubuntu rather than proceeding with the installation.
From the live desktop that now appears, we need to do three things:
-
Download Ubuntu Core
Ubuntu Core 22 images are hosted at Index of /ubuntu-core/22/stable. Images are compressed with XZ and have a corresponding.xzfile extension. Use Firefox to download the following amd64 image for your device: ubuntu-core-22-amd64.img.xz (395MB) -
Discover the internal storage device name
This is usually/dev/sdabut it’s important to first make sure. One of the easiest ways is to open GPartEd and use the drop-down menu in the top-right to select the correct device. You’ll see storage space and layout below. Make a note of the device name. -
Write the Ubuntu Core image to internal storage
Open the terminal application and enter the following command, adjusting the paths to the Ubuntu Core download and the internal storage device accordingly:$ xzcat ~/Downloads/ubuntu-core-22-amd64.img.xz | \ sudo dd of=/dev/<target disk device> bs=32M status=progress; sync
Your internal storage will be irrevocably overwritten. Please make sure anything you wish to keep is backed-up before you start. After the write process has completed, you can safely restart and reboot your machine, which will then trigger the Ubuntu Core installation process.
3. Boot Ubuntu Core for the first time
The first boot can take around five minutes for the system to instantiate itself. You will see typical Linux output on the screen, periods where there’s just a flashing cursor, and messages like Installing the system, please wait for a reboot. When this process has finished, you will see the following:
Press enter to configure.
Press Enter and you will see a small menu with a single item:
Configure the network and setup an administrator account on this all-snap Ubuntu Core system.
Press Enter again and you will be taken to the network setup page:

4. Configure a network connection
Network access is a requirement for Ubuntu Core, at least initially, and you have a choice about whether to use a wired connection (Ethernet) or if you have a compatible device connected, Wi-Fi.
Ethernet
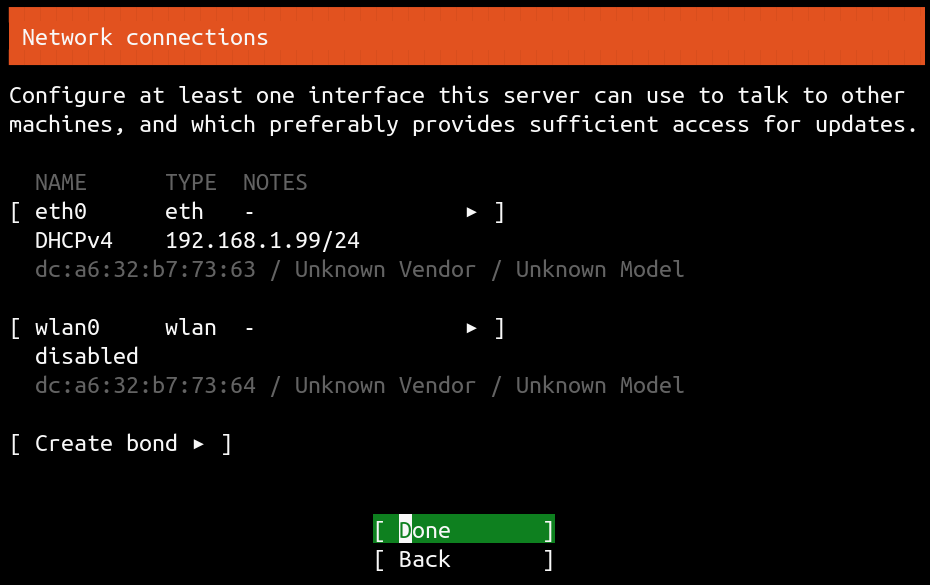
If an Ethernet cable is connected to your device, a network connection will attempt to be automatically negotiated and, if this is successful, you will see an IP address for the device after the DHCPv4 entry in the Network connections page. In this case, you don’t need to do anything further:

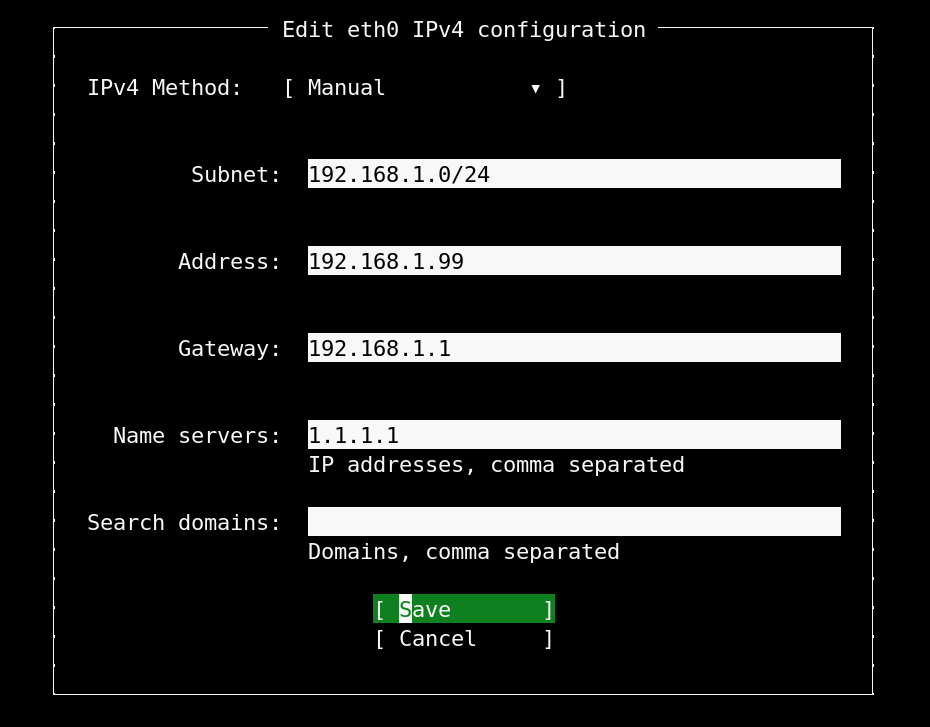
To configure an Ethernet connection manually, select the eth0 device and select Edit IPv4 from the small menu that appears. By default, the network device will be configured to use Automatic (DHCP), which is why the connection attempts to automatically configure itself. Press Enter to reveal two further options, Manual and Disabled:
Selecting Manual will allow you to configure your Ethernet connection manually by entering values for your subnet mask value (using CIDR xx.xx.xx.xx/yy notation), the static IP address of your device, the network gateway, and the name servers you wish to use:
Wi-Fi
If you have a device with Wi-Fi capabilities, WiFi will appear as a separate network device beneath any Ethernet devices.

To configure Wi-Fi, press the cursor up key until the wireless device is selected and press Enter. You will see a small menu and you need to select Edit Wifi.
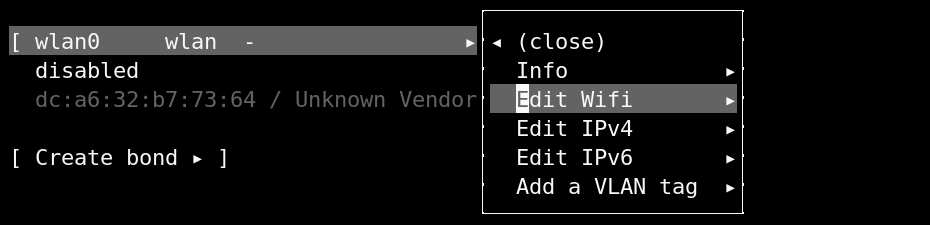
After selecting Edit Wifi, you will see the network interface configuration panel for Wi-Fi. If you know the name of the Wi-Fi network you wish to connect to, it can be entered directly, or cursor down to Choose a visible network and select a network from a list of those that have been detected.
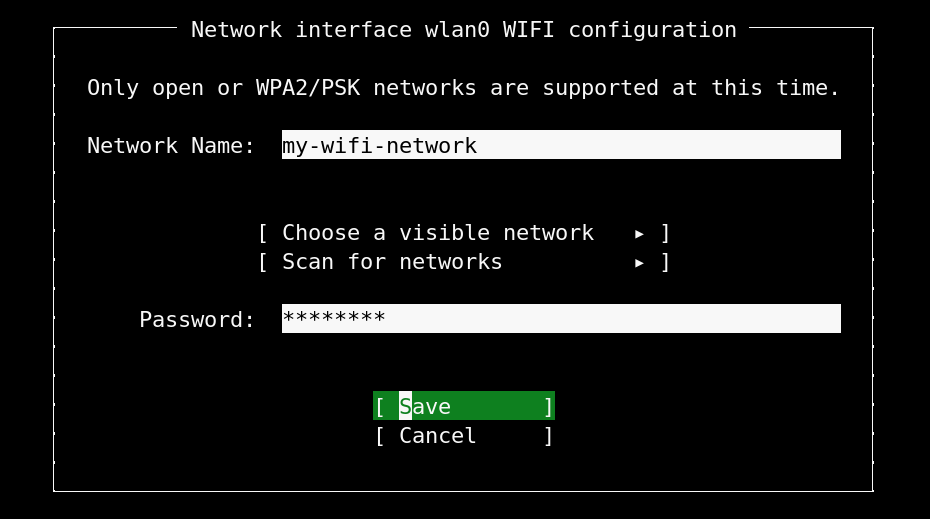
Finally, enter the Wi-Fi password and select Save to complete the configuration. You will be returned to the previous menu and your device will attempt to connect to the network. If successful, you will see its IP address to the right of DHCPv4.

For advanced network configuration, such as setting a static IP address, select the wireless device again, and choose edit IPv4 from the menu.
When you’ve finished configuring your network settings, select Done and press enter on the Network connections page to move on to the final step.
Select Save to apply those changes and for the connection to be attempted. You can now proceed to the next step by pressing Done.
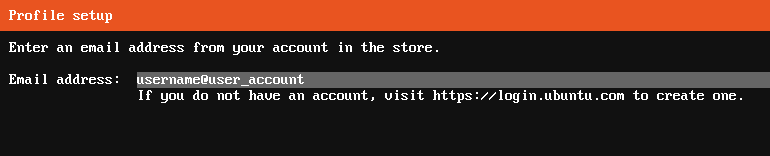
5. Add Ubuntu SSO details
This is the final step before completing the Ubuntu Core setup and you simply need to enter the email address linked to your Ubuntu SSH account.
As mentioned earlier, your account is used to link its registered SSH keys to the new device deployment and allow you to connect without any further device configuration.
With your username registered across the network, you will see a message similar to the following:
This device is registered to <ubuntu-sso-email-address>

Remote access was authenticated with SSO user <username>.
Public SSH keys were added to the device for remote access.

<ubuntu-sso-email-address> can connect remotely to this device via SSH:

ssh <username>@<ip-address>
Everything is now configured and you’re ready to connect to the device.
6. Connect to the device
Each time the device starts up, if a display connected it will show its various addresses and the account linked to the device:
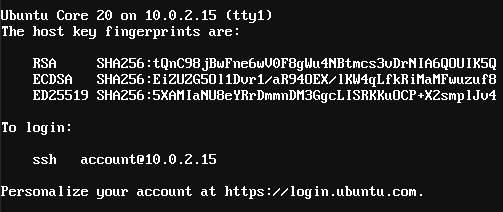
You can now connect to your Ubuntu Core machine with the ssh command and your username followed by the IP address of your device:
$ ssh account@10.0.2.15
The authenticity of host '10.0.2.15 (10.0.2.15)' can't be established.
ECDSA key fingerprint is SHA256:EiZUZG50l1Dvr1/aR940EX/lKW4qLfkRiMaMFwuzuf8
Are you sure you want to continue connecting (yes/no/[fingerprint])? yes
Warning: Permanently added '10.0.2.15' (ECDSA) to the list of known hosts.
[...]
This Ubuntu Core 22 machine is a tiny, transactional edition of Ubuntu,
designed for appliances, firmware and fixed-function VMs.
As shown above, the first time you connect to a new device you will be asked to accept its authenticity. You can check the ECDSA key fingerprint against the finger print shown on the screen after a first reboot. ECDSA is the second one listed.
Congratulations! You have successfully downloaded, installed, and connected to Ubuntu Core 22 on your PC. See First steps with Ubuntu Core for an introduction to using your new Ubuntu Core installation.